この記事では主に、vue-cli vue-router に基づくボトム ナビゲーション バー モバイル フロントエンド プロジェクトを紹介します。このプロジェクトは主に Flex レイアウトとビューポート関連の知識を使用し、各端末画面に適応するという目的を達成しました。必要な友達は、
vue.js を参照してください。 落とし穴を避けるための最初のステップ
1. まず、vue-cli スキャフォールディングをインストールします
主に Vue のロードを参照します。落とし穴を登る (1) - vue を使用した cli ビルド プロジェクト
2. プロジェクト プレゼンテーション効果

プロジェクト プレゼンテーション URL: www.zhoupeng520.cn/index.html
このプロジェクトは主に Flex レイアウトとビューポートを使用しますさまざまな端末に適応した関連知識 画面の目的
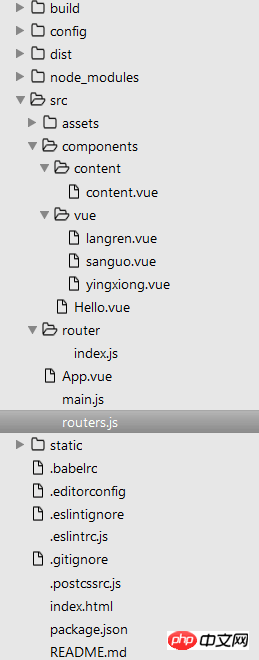
3. プロジェクトのメインディレクトリ

4 メインコードは次のとおりです
(1) App.vue
<template>
 <p id="app">
 <router-view class="view"></router-view>
 <p class="nav">
  <router-link class="nav-item" to="/langren">狼人杀</router-link>
  <router-link class="nav-item" to="/sanguo">三国杀</router-link>
  <router-link class="nav-item" to="/yingxiong">英雄杀</router-link>
 </p>
 </p>
</template>
<script>
</script>
<style>
 #app{
 height: 100%;
 display: flex;
 flex-direction: column;
 flex: 1;
 }
 .nav{
 height: 80px;
 line-height: 80px;
 display: flex;
 text-align: center;
 }
 .nav-item{
 flex: 1;
 text-decoration: none;
 }
 .nav-item:link,.nav-item:visited{
 background-color: white;
 color: black;
 }
 .nav-item:hover,.nav-item:active{
 color: white;
 background-color: #C8C6C6;
 }
</style>(2) main.js
// The Vue build version to load with the `import` command
// (runtime-only or standalone) has been set in webpack.base.conf with an alias.
import Vue from 'vue';
import VueRouter from 'vue-router';
import router from './router';
import App from './App';
Vue.config.productionTip = false;
Vue.use(VueRouter);
/* eslint-disable no-new */
new Vue({
el: '#app',
router,
template: '</App>',
render: h => h(App)
});(3) Index.js / /これがルーティング設定です
これは main.js に直接記述することも、私のように main.js に導入することもできます それぞれに独自の利点があります
import Vue from 'vue';
import VueRouter from 'vue-router';
Vue.use(VueRouter);

const router = new VueRouter({
 routes: [{
  path: '/langren',
  component: require('../components/vue/langren.vue')
 }, {
  path: '/sanguo',
  component: require('../components/vue/sanguo.vue')
 }, {
  path: '/yingxiong',
  component: require('../components/vue/yingxiong.vue')
 }, {
  path: '/',
  component: require('../components/content/content.vue')
 }]
});
export default router;routers.js を直接書いて src ディレクトリに置くこともできます
(4)router.js
import langren from './components/vue/langren.vue';
import sanguo from './components/vue/sanguo.vue';
import yingxiong from './components/vue/yingxiong.vue';
const routers = [
 {
  path: '/langren',
  component: langren
 },
 {
  path: '/sanguo',
  component: sanguo
 },
 {
  path: '/yingxiong',
  component: yingxiong
 }
];
export default routers;(5)content.vue
<template>
 <p class="content"><p>我是content!</p></p>
</template>
<script type="text/ecmascript-6">
 export default {};
</script>
<style lang="stylus" rel="stylesheet/stylus">
 .content
  height:100%
  background:blue
  flex:1
  display:flex;
  justify-content:center
  align-items:center
</style>langren.vue / sanguo.vue / yingxiong.vue コードはこれと同じですが、 color と p のフィールドが変更されました。
メインコードは以上です。
5. 発生した主なエラーと解決策も書き留めます
(1) es6 の文法に使用されるため、その文法規則の一部に従う必要があるため、一部のコードには最後に余分な空白行が含まれます。セミコロンを追加する必要がある、スペースを追加する必要がある、エラーに従って変更を加える
(2) semi//indent//no-tabs エラー、.eslintrc.js のコードを次のように変更します、主に最後の数行を追加します。
rreee以上が皆さんのためにまとめたもので、今後皆さんのお役に立てれば幸いです。
関連記事:
Ajaxを介したServlet3.0と純粋なJavaScriptのやり取り例を詳しく解説
Angular CLIを使用してAngular 5プロジェクトのチュートリアルを生成する詳しい解説
以上がvue-router を使用して vue-cli の下部ナビゲーション バーを構築します (詳細なチュートリアル)の詳細内容です。詳細については、PHP 中国語 Web サイトの他の関連記事を参照してください。