今回は、Canvas でダイナミック パーティクル グリッド アニメーションを作成する方法について詳しく説明します。Canvas でダイナミック パーティクル グリッド アニメーションを作成する際の 注意事項 は何ですか?実際の事例を見てみましょう。
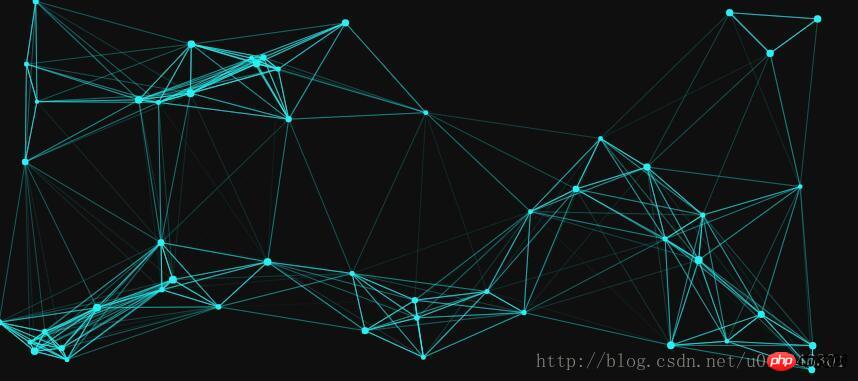
最近、非常にクールなパーティクル グリッド アニメーションを見たので、自分で作成しました。背景として最適です。 CSDN では 2M を超える画像をアップロードできないため、単純に静止画像を切り取りました: この効果を実現する方法から始めましょう:
<canvas></canvas>
<style>
    #canvas{
        position: absolute;
        display: block;
        left:0;
        top:0;
        background: #0f0f0f;
        z-index: -1;
     }
</style>function getSize(){
w = canvas.width = window.innerWidth;
h = canvas.height = window.innerHeight;
}var opt = {
particleAmount: 50, //粒子个数
defaultSpeed: 1, //粒子运动速度
variantSpeed: 1, //粒子运动速度的变量
particleColor: "rgb(32,245,245)", //粒子的颜色
lineColor:"rgb(32,245,245)", //网格连线的颜色
defaultRadius: 2, //粒子半径
variantRadius: 2, //粒子半径的变量
minDistance: 200 //粒子之间连线的最小距离
};function Partical(){
this.x = Math.random()*w; //粒子的x轴坐标
this.y = Math.random()*h; //粒子的y轴坐标
this.speed = opt.defaultSpeed + opt.variantSpeed*Math.random(); //粒子的运动速度
this.directionAngle = Math.floor(Math.random()*360); //粒子运动的方向
this.color = opt.particleColor ; //粒子的颜色
this.radius = opt.defaultRadius+Math.random()*opt.variantRadius; //粒子的半径大小
this.vector = {
x:this.speed * Math.cos(this.directionAngle), //粒子在x轴的速度
y:this.speed * Math.sin(this.directionAngle) //粒子在y轴的速度
}
this.update = function(){ //粒子的更新函数
this.border(); //判断粒子是否到了边界
this.x += this.vector.x; //粒子下一时刻在x轴的坐标
this.y += this.vector.y; //粒子下一时刻在y轴的坐标
}
this.border = function(){ //判断粒子是都到达边界
if(this.x >= w || this.x= h || this.y w){ //下面是改变浏览器窗口大小时的操作,改变窗口大小后有的粒子会被隐藏,让他显示出来即可
this.x = w;
}
if(this.y > h){
this.y = h;
}
if(this.x 1. 各パーティクルの初速度と角度はランダムに生成され、パーティクルの色は関連する設定オプション。 <p style="text-align: left;"></p>2. this.vector はパーティクルの移動方向を保存するために使用されます。this.vector.x が 1 の場合、パーティクルは右に移動します。-1 の場合、パーティクルは左に移動します。同様に、this.vector.y が負の場合、パーティクルは上に移動し、正の場合、パーティクルは下に移動します。 <p style="text-align: left;"></p>this.update は、各パーティクルの次の位置の座標を更新するために使用されます。まず、エッジ検出が実行されます。パーティクルの動きがキャンバスのサイズを超える場合は、方向ベクトルが -1 倍されて逆方向の移動が生成されます。 <p style="text-align: left;"></p>3. ウィンドウのスケーリングによりパーティクルが境界を越える可能性があるため、エッジ検出機能はそれを捕捉できません。そのため、この状況を検出してパーティクルの位置を現在のキャンバスの境界にリセットするには、一連の if ステートメントが必要です。 。 <p style="text-align: left;"></p>4. 最後のステップは、キャンバス上にこれらの点を描画することです。 <p style="text-align: left;"></p>パーティクル クラスが作成されたので、描画してみましょう: <p style="text-align: left;"></p><pre class="brush:php;toolbar:false">function init(){
getSize();
for(let i = 0;i<opt.particleamount> opt.particleAmount パーティクル オブジェクトは上で初期化されており、オブジェクトは初期化されていますが描画されません。 これがループ関数です: <p style="text-align: left;"></p>
<pre class="brush:php;toolbar:false">function loop(){
ctx.clearRect(0,0,w,h);
for(let i = 0;i<particle.length>loop() 毎回。関数が実行され、キャンバス上のコンテンツがクリアされ、パーティクル オブジェクトの update() 関数を通じてパーティクルの座標が再計算され、最後にパーティクル オブジェクトのdraw() 関数を通じてパーティクルが描画されます。パーティクルオブジェクト。このときの効果は次のとおりです: <p style="text-align: left;"></p><p style="text-align: left;"><img title="" alt="Canvasを使ったダイナミックなパーティクルグリッドアニメーションの作成について詳しく解説" src="https://img.php.cn/upload/article/000/061/021/c0c9b9891fd6ff9bfb9f8bad2673271e-1.gif"></p> ただし、ブラウザのウィンドウ サイズが変更されると一部のパーティクルが消えます。この時点で、ブラウザのサイズが変更されるかどうかを監視するイベントを追加する必要があります: <p style="max-width:90%"></p><pre class="brush:php;toolbar:false">window.addEventListener("resize",function(){
winResize()
},false);var particle = [], w,h; //粒子数组,浏览器宽高
var delay = 200,tid; //延缓执行事件和setTimeout事件引用
function winResize(){
clearTimeout(tid);
tid = setTimeout(function(){
getSize(); //获取浏览器宽高,在文章最上面有介绍
},delay)
}
我们现在知道每个粒子的x轴和y轴的坐标,那么我们就可以计算出两个点之间的距离了,写一个函数,传入两个点,如下:
function getDistance(point1,point2){
return Math.sqrt(Math.pow(point1.x-point2.x,2) + Math.pow(point1.y - point2.y ,2));
}现在我们可以计算出两个点的距离,那么我们就计算出所有每个粒子同其他所有粒子的距离,来确定它们之间是否需要连线,当然如果所有粒子的颜色深度都一模一样,那就有点丑了,所以我们这里可以根据两个粒子之间的距离来决定连线的透明度,两个粒子距离越近,越不透明,距离越远,越透明,超过一定距离就不显示了。
function linePoint(point,hub){
for(let i = 0;i<hub.length> 0){
ctx.lineWidth = 0.5;
ctx.strokeStyle = "rgba("+line[0]+","+line[1]+","+line[2]+","+opacity+")";
ctx.beginPath();
ctx.moveTo(point.x,point.y);
ctx.lineTo(hub[i].x,hub[i].y);
ctx.closePath();
ctx.stroke();
}
}
}</hub.length>上面传入的两个参数分别是一个点和整个点的数组,let opacity = 1 -distance/opt.minDistance;用于判断连线之间的透明度同时也判断了距离,距离大于opt.minDistance时,opacity为负,下面判断时就过滤掉了,上面的颜色用到了正则表达式,需要先解析最上面opt对象里给出的颜色,然后再加上透明度,这段代码如下:
var line = opt.lineColor.match(/\d+/g);
最后在loop()函数里面不断循环计算距离就可以了,在loop()中加入代码后如下:
function loop(){
ctx.clearRect(0,0,w,h);
for(let i = 0;i需要指出的是:如果添加过多的点和/或过多的连接距离(连接距离会创建过多的线条),动画也会扛不住。当视口变窄时最好降低粒子的运动速度:粒子的尺寸越小,在愈加狭窄空间内的移动速度貌似会越快。
显示整段代码:
nbsp;html>
canvasCanvasを使ったダイナミックなパーティクルグリッドアニメーションの作成について詳しく解説
<canvas></canvas>
<script>
var canvas = document.getElementById("canvas");
var ctx = canvas.getContext("2d");
var opt = {
particleAmount: 50, //粒子个数
defaultSpeed: 1, //粒子运动速度
variantSpeed: 1, //粒子运动速度的变量
particleColor: "rgb(32,245,245)", //粒子的颜色
lineColor:"rgb(32,245,245)", //网格连线的颜色
defaultRadius: 2, //粒子半径
variantRadius: 2, //粒子半径的变量
minDistance: 200 //粒子之间连线的最小距离
};
var line = opt.lineColor.match(/\d+/g);
console.log(line);
var particle = [], w,h;
var delay = 200,tid;
init();
window.addEventListener("resize",function(){
winResize()
},false);
function winResize(){
clearTimeout(tid);
tid = setTimeout(function(){
getSize();
},delay)
}
function init(){
getSize();
for(let i = 0;i<opt.particleAmount; i++){
particle.push(new Partical());
}
loop();
}
function loop(){
ctx.clearRect(0,0,w,h);
for(let i = 0;i<particle.length; i++){
particle[i].update();
particle[i].draw();
}
for(let i = 0;i<particle.length; i++){
linePoint(particle[i],particle)
}
window.requestAnimationFrame(loop);
}
function linePoint(point,hub){
for(let i = 0;i<hub.length;i++){
let distance = getDistance(point,hub[i]);
let opacity = 1 -distance/opt.minDistance;
if(opacity > 0){
ctx.lineWidth = 0.5;
ctx.strokeStyle = "rgba("+line[0]+","+line[1]+","+line[2]+","+opacity+")";
ctx.beginPath();
ctx.moveTo(point.x,point.y);
ctx.lineTo(hub[i].x,hub[i].y);
ctx.closePath();
ctx.stroke();
}
}
}
function getDistance(point1,point2){
return Math.sqrt(Math.pow(point1.x-point2.x,2) + Math.pow(point1.y - point2.y ,2));
}
function getSize(){
    w = canvas.width = window.innerWidth;
    h = canvas.height = window.innerHeight;
}
function Partical(){
this.x = Math.random()*w; //粒子的x轴坐标
this.y = Math.random()*h; //粒子的y轴坐标
this.speed = opt.defaultSpeed + opt.variantSpeed*Math.random(); //粒子的运动速度
this.directionAngle = Math.floor(Math.random()*360); //粒子运动的方向
this.color = opt.particleColor ; //粒子的颜色
this.radius = opt.defaultRadius+Math.random()*opt.variantRadius; //粒子的半径大小
this.vector = {
x:this.speed * Math.cos(this.directionAngle), //粒子在x轴的速度
y:this.speed * Math.sin(this.directionAngle) //粒子在y轴的速度
}
this.update = function(){ //粒子的更新函数
this.border(); //判断粒子是否到了边界
this.x += this.vector.x; //粒子下一时刻在x轴的坐标
this.y += this.vector.y; //粒子下一时刻在y轴的坐标
}
this.border = function(){ //判断粒子是都到达边界
if(this.x >= w || this.x<= 0){ //如果到达左右边界,就让x轴的速度变为原来的负数
this.vector.x *= -1;
}
if(this.y >= h || this.y <= 0){ //如果到达上下边界,就让y轴的速度变为原来的负数
this.vector.y *= -1;
}
if(this.x > w){ //下面是改变浏览器窗口大小时的操作,改变窗口大小后有的粒子会被隐藏,让他显示出来即可
this.x = w;
}
if(this.y > h){
this.y = h;
}
if(this.x < 0){
this.x = 0;
}
if(this.y < 0){
this.y = 0;
}
}
this.draw = function(){ //绘制粒子的函数
ctx.beginPath();
ctx.arc(this.x, this.y, this.radius ,0 ,Math.PI * 2);
ctx.closePath();
ctx.fillStyle = this.color;
ctx.fill();
}
}
</script>
ログイン後にコピー相信看了本文案例你已经掌握了方法,更多精彩请关注php中文网其它相关文章!
推荐阅读:
以上がCanvasを使ったダイナミックなパーティクルグリッドアニメーションの作成について詳しく解説の詳細内容です。詳細については、PHP 中国語 Web サイトの他の関連記事を参照してください。