今回はSpringMvc+AngularJsの使い方と、SpringMvc+AngularJsを使う際の注意点についてお届けします。
フロントエンド フレームワークは細分化されており、フレームワーク自体も日々変化しています。ただし、jQuery などの優れたフレームワークはまだたくさんありますが、jQuery 独自のクラス ライブラリの多くは比較的複雑です。両方のフロントエンド フレームワークにはそれぞれ適切なシナリオがあります。この記事では主に AngularJs と SpringMvc の統合について説明します。コードは GitHub からダウンロードして見て、統合についての私の理解を書きました。
目次
1. AngularJs を使用する理由
2. SpringMvc と AngularJs を統合して使用する
1. AngularJs を使用する理由
AngularJS は開発者に高いレベルの抽象化を提供することでアプリケーションを簡素化します。他の抽象化手法と同様に、ある程度の柔軟性が失われます。言い換えれば、すべてのアプリケーションが AngularJS に適しているわけではありません。 AngularJS は主に CRUD アプリケーションの構築に関係します。幸いなことに、WEB アプリケーションの少なくとも 90% は CRUD アプリケーションです。 G 2. Springmvc と AngularJS の統合
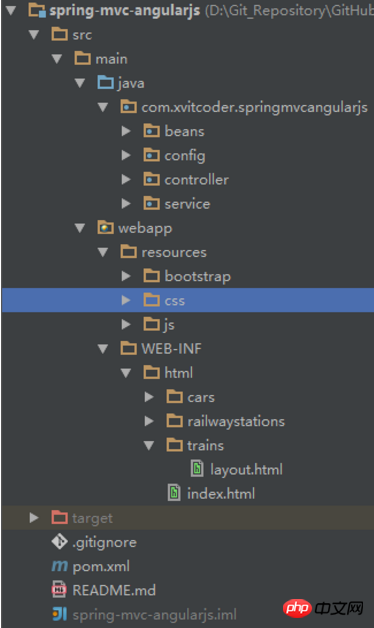
を使用 プロジェクト構造
JavaConfig を使用して Spring を使用 JSP の代わりに Thymeleaf をテンプレートとして使用
を使用
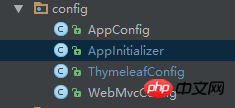
Bootstrapを使用 AngularJS を使用Spring を設定するには ig
public class AppInitializer implements WebApplicationInitializer {
        public void onStartup(ServletContext servletContext) throws ServletException {
        AnnotationConfigWebApplicationContext rootContext = new AnnotationConfigWebApplicationContext();
        rootContext.register(AppConfig.class);
        servletContext.addListener(new ContextLoaderListener(rootContext));
        AnnotationConfigWebApplicationContext dispatcherContext = new AnnotationConfigWebApplicationContext();
        dispatcherContext.register(WebMvcConfig.class);
 ServletRegistration.Dynamic dispatcher = servletContext.addServlet("dispatcher", new DispatcherServlet(dispatcherContext));
        dispatcher.setLoadOnStartup(1);
        dispatcher.addMapping("/");
    }
}@Configuration@EnableWebMvc@ComponentScan(basePackages = "com.xvitcoder.springmvcangularjs")@Import({ThymeleafConfig.class})public class WebMvcConfig extends WebMvcConfigurerAdapter { @Override
public void configureDefaultServletHandling(DefaultServletHandlerConfigurer configurer) {
configurer.enable();
} @Override
public void addResourceHandlers(final ResourceHandlerRegistry registry) {
registry.addResourceHandler("/resources/**").addResourceLocations("/resources/");
} @Override
public void configureMessageConverters(List<HttpMessageConverter<?>> converters) {
converters.add(new MappingJackson2HttpMessageConverter()); super.configureMessageConverters(converters);
}
} Thymeleaf テンプレートはここで設定されます
AngularJs の使用方法
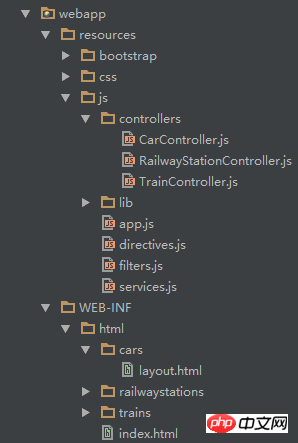
プロジェクト構造
IndexController では、デフォルトでページがインデックスにジャンプします。 HTML ページ、index.html ページは次のようになります。@Configurationpublic class ThymeleafConfig { @Bean
public ServletContextTemplateResolver templateResolver() {
ServletContextTemplateResolver resolver = new ServletContextTemplateResolver();
resolver.setPrefix("/WEB-INF/html/");
resolver.setSuffix(".html");
resolver.setTemplateMode("HTML5");
resolver.setCacheable(false); return resolver;
} @Bean
public SpringTemplateEngine templateEngine() {
SpringTemplateEngine engine = new SpringTemplateEngine();
engine.setTemplateResolver(templateResolver()); return engine;
} @Bean
public ThymeleafViewResolver thymeleafViewResolver() {
ThymeleafViewResolver resolver = new ThymeleafViewResolver();
resolver.setTemplateEngine(templateEngine()); return resolver;
}
} モジュールは angularJs において非常に重要な概念です
<!doctype html><html lang="en" ng-app="AngularSpringApp"><head>
    <meta charset="utf-8"/>
    <title>Service App</title>
    <link rel="stylesheet" href="resources/css/app.css"/>
    <link rel="stylesheet" href="resources/bootstrap/css/bootstrap.min.css" /></head><body><div id="wrapper">
    <ul class="menu">
        <li><a href="#/cars">Cars</a></li>
        <li><a href="#/trains">Trains</a></li>
        <li><a href="#/railwaystations">Railway Station</a></li>
    </ul>
    <hr class="" />
<div ng-view=""></div></div><script src="resources/js/lib/angular/angular.js"></script><script src="resources/js/app.js"></script><script src="resources/js/services.js"></script><script src="resources/js/controllers/RailwayStationController.js"></script><script src="resources/js/controllers/CarController.js"></script><script src="resources/js/controllers/TrainController.js"></script><script src="resources/js/filters.js"></script><script src="resources/js/directives.js"></script></body>パスに従って対応するコントローラーとテンプレートテンプレートを見つけます
var AngularSpringApp = {};
var App = angular.module('AngularSpringApp', ['AngularSpringApp.filters', 'AngularSpringApp.services', 'AngularSpringApp.directives']);// Declare app level module which depends on filters, and servicesApp.config(['$routeProvider', function ($routeProvider) {
    $routeProvider.when('/cars', {        templateUrl: 'cars/layout',        controller: CarController
    });
    $routeProvider.when('/trains', {        templateUrl: 'trains/layout',        controller: TrainController
    });
    $routeProvider.when('/railwaystations', {        templateUrl: 'railwaystations/layout',        controller: RailwayStationController
    });
    $routeProvider.otherwise({redirectTo: '/cars'});
}]);$http サービスを使用して送信しますデータを取得するためにバックグラウンドに ajax リクエストを送信します
var CarController = function($scope, $http) {
    $scope.fetchCarsList = function() {
        $http.get('cars/carlist.json').success(function(carList){
            $scope.cars = carList;
        });
    };
    $scope.addNewCar = function(newCar) {
        $http.post('cars/addCar/' + newCar).success(function() {
            $scope.fetchCarsList();
        });
        $scope.carName = '';
    };
    $scope.removeCar = function(car) {
        $http.delete('cars/removeCar/' + car).success(function() {
            $scope.fetchCarsList();
        });
    };
    $scope.removeAllCars = function() {
        $http.delete('cars/removeAllCars').success(function() {
            $scope.fetchCarsList();
        });
    };
    $scope.fetchCarsList();
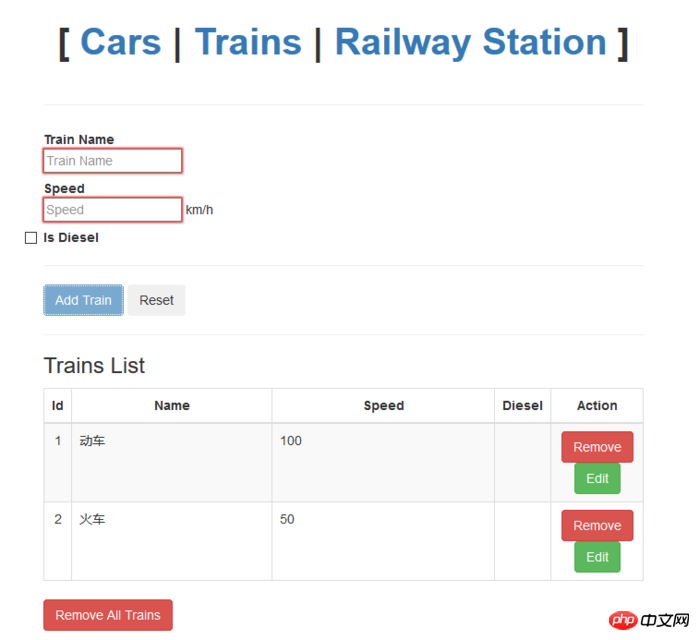
};対応するタグを使用してデータを受信し、表示やその他の操作を制御します
3. 概要インターフェース 少しシンプルですが、便利で高速な機能を隠すことはできませんAngularJs によってもたらされる操作。DOM 操作
にあまり注意を払う必要はありません。フロントエンドからバックエンドを導入するというアイデアも、現時点では 1 つだけ知っています。多くの概念について少し説明しますが、この記事は AngularJ の入門書です。 これらの事例を読んだ後は、その方法を習得したと思います。さらに興味深い情報については、php 中国語 Web サイトの他の関連記事に注目してください。 関連書籍:
関連書籍:
HTML での複数のクラス属性の定義は無効です
以上がSpringMvc+AngularJsの使い方の詳細内容です。詳細については、PHP 中国語 Web サイトの他の関連記事を参照してください。