実際のモバイルアプリケーションの操作方法では、最も一般的なのはスライド操作です。左右にスライドしてページを切り替えたり、指を広げて写真を拡大したり、すべてスライド操作で行います。
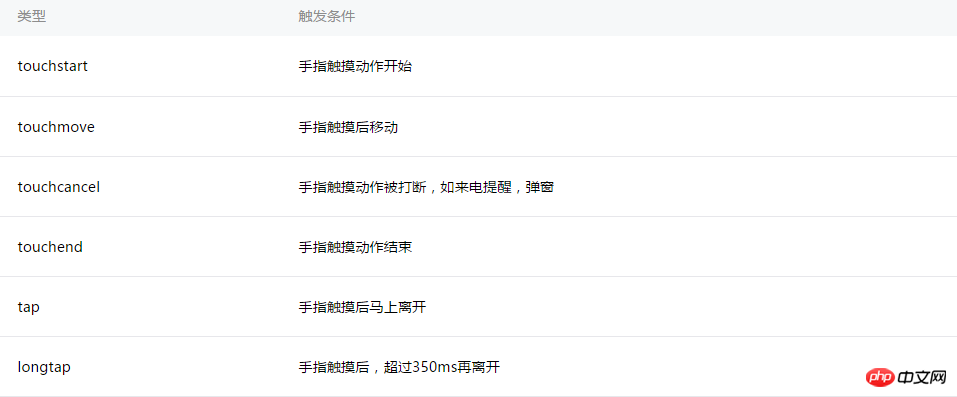
WeChat アプレットによってデフォルトで提供される関連イベントは次のとおりです。

tap はクリック操作に対応し、longtap も長押し操作をサポートするために提供されます。これらは比較的単純であり、さらに Tell する必要はありません。
touchmoveはスライド操作に対応しており、bindtouchmoveを通じてスライド操作に対応できます。
//wxml
<view id="id" bindtouchmove="handletouchmove" style = "width : 100px; height : 100px; background : #167567;">
</view>

//js
Page({
  handletouchmove: function(event) {
    console.log(event)
  },
})bindtouchmove即可响应滑动操作。//wxml
<view id="id" class = "ball" bindtouchmove="handletouchmove" style = "width : 60px; height : 60px; background : #545345;">
</view>
//wxss
.ball {
box-shadow:2px 2px 10px #AAA;
border-radius: 20px;
position: absolute;
}
//js
Page({
handletouchmove: function(event) {
console.log(event)
},
})当按住view标签并滑动鼠标时,会不停的触发滑动事件,直到放开鼠标,当鼠标移出view标签区域后依然会触发事件。
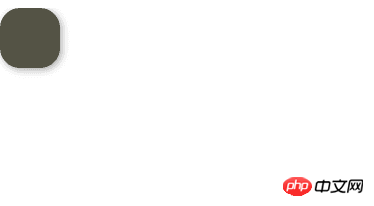
通过监听滑动事件,可以实现一些实用的功能,比如用过iphone的用户都知道assistivetouch,一个桌面上的快捷按钮,可以将按钮拖动到桌面的任意位置。为了方便,这里就用一个圆形来代表该按钮。
//wxml
<view id="id" class = "ball" bindtouchmove="handletouchmove" style = "width : 60px; height : 60px; background : #545345; top:{{ballTop}}px; left: {{ballLeft}}px">
</view>

//js
Page({
  data: {
    ballTop: 0,
    ballLeft: 0,
  },
  handletouchmove: function(event) {
    console.log(event)
  },
})
视图跟随
好吧,按钮丑了点,这不是重点。拖拽操作的实现思路也很简单,当触发滑动事件时,event对象会包含当前触摸位置的坐标信息,可以通过event.touches[0].pageX和event.touches[0].pageY 来获取,为什么touches是数组呢,答案是为了支持多点触控(在电脑上不知道如何模拟多点触控)。接下来将按钮的位置设置为触摸位置,应该就能实现预期效果了,让我们试试看。
在Page中定义按钮的位置数据ballBottom和ballRight,并绑定到view的对应属性中。
handletouchmove: function(event) {
  console.log(event)
  this.setData ({
    ballTop: event.touches[0].pageY,
    ballLeft: event.touches[0].pageX,
  });
},接下来在handletouchmove方法中更新按钮的位置数据
Page({
  data: {
    ballTop: 0,
    ballLeft: 0,
    screenHeight:0,
    screenWidth:0

  },
  onLoad: function () {
      //获取屏幕宽高
    var _this = this;
    wx.getSystemInfo({
     success: function (res) {
        _this.setData({
          screenHeight: res.windowHeight,
          screenWidth: res.windowWidth,
        });
      }
    });
  },
  handletouchmove: function(event) {
    console.log(event)
    let pageX = event.touches[0].pageX;
    let pageY = event.touches[0].pageY;
    //屏幕边界判断
    if (pageX < 30 || pageY < 30)
      return;
    if (pageX > this.data.screenWidth - 30)
      return;
    if (pageY > this.data.screenHeight - 30)
      return;
    this.setData ({
      ballTop: event.touches[0].pageY - 30,
      ballLeft: event.touches[0].pageX - 30,
    });
  },
})运行发现基本可以实现效果,不过有两个问题,一是会将按钮拖出屏幕边缘,二是按钮始终在鼠标右下方。
接下来加入对屏幕边界的判断并对按钮位置进行修正。其中屏幕大小可以通过wx.getSystemInfo来获取。
完整代码如下:
//wxml
<view id="id" class = "ball" bindtap = "handletap" bindtouchstart = "handletouchtart" bindtouchmove="handletouchmove" style = "width : 100%px; height : 40px;">
{{text}}
</view>

//js
Page({
  data: {
    lastX: 0,
    lastY: 0,
    text : "没有滑动",
  },
  handletouchmove: function(event) {
    console.log(event)
    let currentX = event.touches[0].pageX
    let currentY = event.touches[0].pageY

    console.log(currentX)
    console.log(this.data.lastX)
    let text = ""
    if ((currentX - this.data.lastX) < 0)
      text = "向左滑动"
    else if (((currentX - this.data.lastX) > 0))
      text = "向右滑动"

    //将当前坐标进行保存以进行下一次计算
    this.data.lastX = currentX
    this.data.lastY = currentY
    this.setData({
      text : text,
    });
  },

  handletouchtart:function(event) {
    console.log(event)
    this.data.lastX = event.touches[0].pageX
    this.data.lastY = event.touches[0].pageY
  },
  handletap:function(event) {
    console.log(event)
  },
})再次运行,一切ok。
通过处理滑动操作可以识别各种手势操作,如左右滑动等。思路也很简单,通过绑定touchstart和touchmove事件,然后对坐标信息进行识别计算即可(如current.PageX - last.PageX < 0则认为是向左滑动)
 handletouchmove: function(event) {
    console.log(event)
    let currentX = event.touches[0].pageX
    let currentY = event.touches[0].pageY
    let tx = currentX - this.data.lastX
    let ty = currentY - this.data.lastY
    let text = ""
    //左右方向滑动
    if (Math.abs(tx) > Math.abs(ty)) {
      if (tx < 0)
        text = "向左滑动"
      else if (tx > 0)
        text = "向右滑动"
    }
    //上下方向滑动
    else {
      if (ty < 0)
        text = "向上滑动"
      else if (ty > 0)
        text = "向下滑动"
    }

    //将当前坐标进行保存以进行下一次计算
    this.data.lastX = currentX
    this.data.lastY = currentY
    this.setData({
      text : text,
    });
},运行程序,当向左滑动时会view会显示"向左滑动", 向右同理。
同时识别左右滑动和上下互动
有时候希望同时识别左右和上下滑动,可以通过比较X轴上的差值和Y轴上的差值,较大的差值为滑动方向。
Page({
  data: {
    lastX: 0,
    lastY: 0,
    text : "没有滑动",
    currentGesture: 0,
  },
  handletouchmove: function(event) {
    console.log(event)
    if (this.data.currentGesture != 0){
      return
    }
    let currentX = event.touches[0].pageX
    let currentY = event.touches[0].pageY
    let tx = currentX - this.data.lastX
    let ty = currentY - this.data.lastY
    let text = ""
    //左右方向滑动
    if (Math.abs(tx) > Math.abs(ty)) {
      if (tx < 0) {
        text = "向左滑动"
        this.data.currentGesture = 1
      }
      else if (tx > 0) {
        text = "向右滑动"
        this.data.currentGesture = 2
      }

    }
    //上下方向滑动
    else {
      if (ty < 0){
        text = "向上滑动"
        this.data.currentGesture = 3

      }
      else if (ty > 0) {
        text = "向下滑动"
        this.data.currentGesture = 4
      }

    }

    //将当前坐标进行保存以进行下一次计算
    this.data.lastX = currentX
    this.data.lastY = currentY
    this.setData({
      text : text,
    });
  },

  handletouchtart:function(event) {
    console.log(event)
    this.data.lastX = event.touches[0].pageX
    this.data.lastY = event.touches[0].pageY
  },
  handletouchend:function(event) {
    console.log(event)
    this.data.currentGesture = 0
    this.setData({
      text : "没有滑动",
    });
  },
})在实际应用中,当某种手势被触发后,在用户没有放开鼠标或手指前,会一直识别为该手势。比如当用户触发左滑手势后,这时再向下滑动,仍要按照左滑手势来处理。
可以定义一个标记来记录第一次识别到的手势,如果已识别出手势,后续的滑动操作就可以忽略,直到用户放开鼠标或手指。放开鼠标或手指操作可以通过绑定handletouchend view ラベルを押したままマウスをスライドすると、マウスを放すまでスライド イベントが継続的にトリガーされます。
view の外に出ると、スライド イベントが継続的にトリガーされます。コード>ラベル領域でも、イベントをトリガーします。 ドラッグ アンド ドロップ操作
スライド イベントをリッスンすることで、いくつかの実用的な機能を実装できます。たとえば、iPhone を使用したことのあるユーザーは、ボタンをドラッグしてデスクトップ上のショートカット ボタンを認識できます。デスクトップ上の任意の場所。便宜上、ボタンを表すために円が使用されます。
rrreee フォローするにはビューを表示
event.touches[0] を通じて渡すことができます。 .pageX と event.touches[0].pageY を実行すると、touches が配列である理由がわかります (マルチタッチをシミュレートする方法がわかりません)。コンピュータ上で)。次に、ボタンの位置をタッチ位置に設定します。これで目的の効果が得られるはずです。試してみましょう。 🎜🎜ページ内でボタンの位置データ ballBottom と ballRight を定義し、ビューの対応する属性にバインドします。 🎜rrreee🎜 次に、handletouchmove メソッドでボタンの位置データを更新します 🎜rrreee🎜 実行してみると、基本的には効果が得られることが分かりましたが、問題が 2 つあります。ボタンは画面の端からドラッグされます。もう 1 つは、ボタンが常にマウスの右下にあることです。 🎜次に画面境界の判定を追加し、ボタン位置を修正します。画面サイズは wx.getSystemInfo で取得できます。 🎜完全なコードは次のとおりです: 🎜rrreee🎜 もう一度実行すると、すべて問題ありません。 🎜handletouchend イベントをバインドすることで処理できます。 🎜rrreee🎜🎜マルチタッチ🎜🎜 マルチタッチはテストするために実機が必要で、私のappidはまだ申請中であるため、説明は後回しにするしかありません。たとえば、指 🎜 を開いた場合、左側のタッチ ポイントが左側にスライドし、右側のタッチ ポイントが移動する方向を決定できます。右にある場合、🎜 と判断できます。 指を開いて操作します。 🎜以上がミニプログラム開発の基礎 スライド操作 (10)の詳細内容です。詳細については、PHP 中国語 Web サイトの他の関連記事を参照してください。