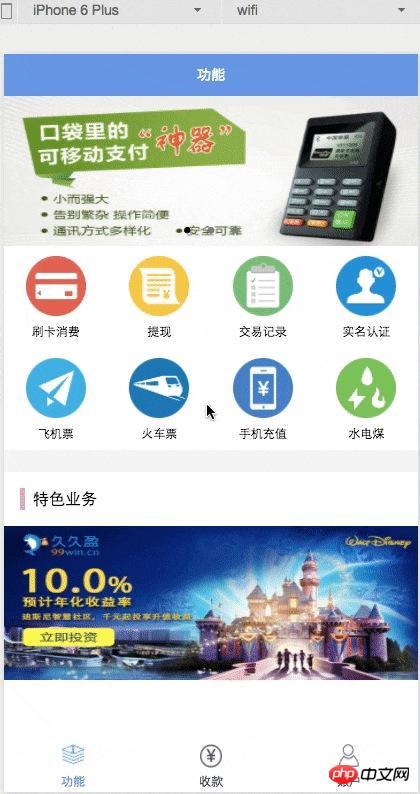
この記事では、実践的な例を使用して、WeChat ミニ プログラム ページを構築する方法を説明します。まず、この記事で達成されるページ効果を見てみましょう:

開発ツールのダウンロード: WeChat には開発とデバッグ、コード編集、プログラムのリリースなどの機能を統合した開発者ツールが公式に用意されています。
WeChat ミニ プログラムのアーキテクチャ:

これがプログラムの基本構造です。最も重要で不可欠なものは、app.js、app.json、および app.wxss です。このうち、.js サフィックスはスクリプト ファイル、.json サフィックスは設定ファイル、.wxss サフィックスはスタイル シート ファイルです。
下部ラベル 下部ラベルは tabBar です。実装は比較的単純で、簡単な構成のみが必要です。 app.json
{
  "pages":[
    "pages/function/function",
    "pages/pay/pay",
    "pages/account/account",
    "pages/index/index",
    "pages/logs/logs"
  ],
  "tabBar":{
    "color": "#464a56",
    "selectedColor": "#6595e9",
    "backgroundColor": "#FFFFFF",
    "borderStyle": "white",
    "list": [{
        "pagePath": "pages/function/function",
        "text": "功能",
        "iconPath": "images/tab_function_default.png",
        "selectedIconPath": "images/tab_function_sel.png"
    },{
        "pagePath": "pages/pay/pay",
        "text": "收款",
        "iconPath": "images/tab_consume_default.png",
        "selectedIconPath": "images/tab_consume_sel.png"
    },{
        "pagePath": "pages/account/account",
        "text": "账户",
        "iconPath": "images/tab_account_default.png",
        "selectedIconPath": "images/tab_account_sel.png"
    }]
  },
  "window":{
    "navigationBarBackgroundColor": "#6595e9",
    "navigationBarTextStyle":"white",
    "navigationBarTitleText": "V50",
    "backgroundColor": "#eeeeee",
    "backgroundTextStyle":"light"
  }
} ミニ プログラムがどのページで構成されているかを指定するために、ページは配列 (各項目は文字列) を受け入れることに注意してください。各項目は対応するページの [パス + ファイル名] 情報を表し、配列の最初の項目はミニ プログラムの最初のページを表します。
ミニプログラムでページを追加/削減するには、ページ配列を変更する必要があります。
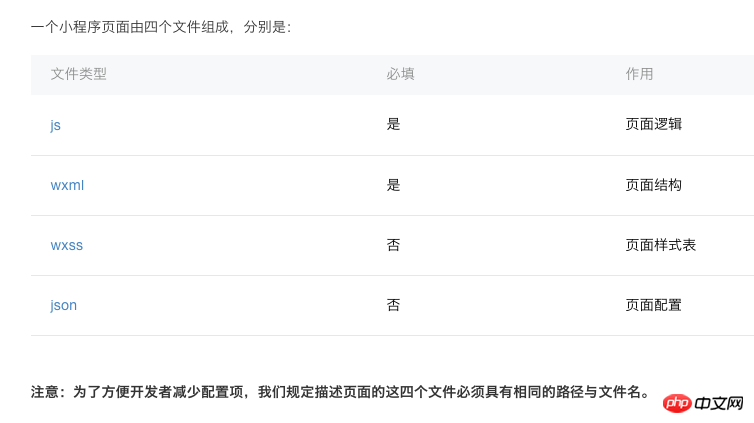
フレームワークは統合のためにパス .json、.js、.wxml、.wxss 内の 4 つのファイルを自動的に検索するため、ファイル名にファイル接尾辞を付ける必要はありません。
ページタイトル:
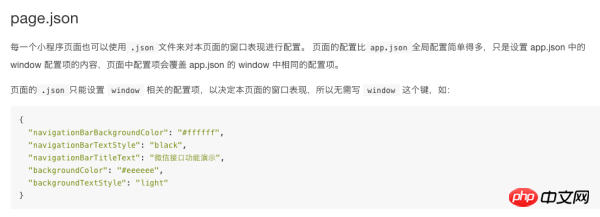
ページタイトル このタイトルを実装するにはどうすればよいですか?公式ドキュメントを見てみましょう。

これを見ると、指定したページの json ファイルでページを構成する必要があることがわかります。引き続き公式ドキュメントを確認してください

以上です!すべてのページに共通の構成を page.json に記述し、各ページの .json ファイルで各ページ固有のプロパティを構成するだけです。上記の app.json で一般ページの window 属性が設定されているので、function.json でページタイトルを設定するだけです:
{
     "navigationBarTitleText": "功能"
}カルーセルチャート
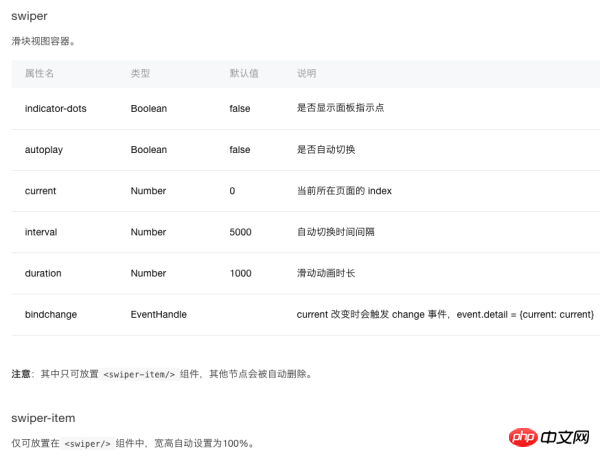
次に、上部のカルーセルチャートを実装します。 WeChat は、カルーセル チャートを実装するためのスワイパー コンポーネントを提供します。

コードは function.wxml
<swiper indicator-dots="{{indicatorDots}}"
autoplay="{{autoplay}}" interval="{{interval}}" duration="{{duration}}">
<block wx:for="{{imgUrls}}">
<swiper-item>
<image src="{{item}}" class="slide-image" />
</swiper-item>
</block>
</swiper>
function.js
//function.js
Page({
data: {
indicatorDots: true,
autoplay: true,
interval: 5000,
duration: 1000,
imgUrls: [
'http://img02.tooopen.com/images/20150928/tooopen_sy_143912755726.jpg',
'http://img06.tooopen.com/images/20160818/tooopen_sy_175866434296.jpg',
'http://img06.tooopen.com/images/20160818/tooopen_sy_175833047715.jpg'
],
},
}) はい、WeChat アプレットのカルーセル画像はとてもシンプルです。 「カルーセルの画像は URL アドレスを使用しています。ローカルの画像を使用したい場合はどうすればよいですか? 実現できますか?」
この公式ドキュメントではそれが紹介されていませんが、テストした結果、実現可能です。コードは次のとおりです
imgUrls: [
    '../../images/adv_50.png',
    '../../images/adv_60.png',
    '../../images/adv_80.png'
],真ん中の関数モジュール
真ん中の8つの関数モジュールはAndroidのGridView効果に似ています。この記事では、ループメソッドを使用して実装します: function.wxml
<view class='function_container'>
<view class='function_item' wx:for="{{functions}}" wx:for-index="idx" wx:for-item="function">
<image class='function_img' src='{{function.pic_url}}'/>
<view class='function_name'>{{function.name}}</view>
</view>
</view>
function.js
functions: [
{
"name": "刷卡消费",
"pic_url": '../../images/icon_consume.png'
},
{
"name": "提现",
"pic_url": '../../images/icon_withdrawals.png'
},
{
"name": "交易记录",
"pic_url": '../../images/icon_records.png'
},
{
"name": "实名认证",
"pic_url": '../../images/icon_auth.png'
},
{
"name": "飞机票",
"pic_url": '../../images/icon_airplane.png'
},
{
"name": "火车票",
"pic_url": '../../images/icon_train.png'
},
{
"name": "手机充值",
"pic_url": '../../images/icon_phone_recharge.png'
},
{
"name": "水电煤",
"pic_url": '../../images/icon_water.png'
}
]
function.wxss
/**function.wxss**/
.container {
height: 650px;
}
.slide-image{
display: block;
height: 280rpx;
width:100%
}
.function_container{
display:flex;
flex-wrap: wrap;
width:100%;
}
.function_item{
width:25%;
display:flex;
flex-direction:column;
justify-content:center;
align-items:center;
font-size:12px;
box-sizing:border-box;
padding-bottom:10px;
padding-top:10px
}
.function_img{
width:60px;
height:60px;
}
.function_name{
padding-top:10px
} ここでは、幅: 25% を使用して、各行に 4 つの機能ボタンを配置する効果を実現します。
完全なコード
以下のレイアウトは比較的単純です。完全なコードをアップロードするだけです: function.wxml
<!--function.wxml-->
<scroll-view scroll-y="true" class="container">
<swiper indicator-dots="{{indicatorDots}}"
autoplay="{{autoplay}}" interval="{{interval}}" duration="{{duration}}">
<block wx:for="{{imgUrls}}">
<swiper-item>
<image src="{{item}}" class="slide-image" />
</swiper-item>
</block>
</swiper>
<view class='function_container'>
<view class='function_item' wx:for="{{functions}}" wx:for-index="idx" wx:for-item="function">
<image class='function_img' src='{{function.pic_url}}'/>
<view class='function_name'>{{function.name}}</view>
</view>
</view>
<view class='divider' />
<view class='specialities_layout'>
<view class='view_divider' />
<text class="specialities_text">特色业务</text>
</view>
<image class='bottom-image' src='../../images/app_banner.jpg'/>
</scroll-view>
function.wxss
/**function.wxss**/
.container {
height: 650px;
}
.slide-image{
display: block;
height: 280rpx;
width:100%
}
.function_container{
display:flex;
flex-wrap: wrap;
width:100%;
}
.function_item{
width:25%;
display:flex;
flex-direction:column;
justify-content:center;
align-items:center;
font-size:12px;
box-sizing:border-box;
padding-bottom:10px;
padding-top:10px
}
.function_img{
width:60px;
height:60px;
}
.function_name{
padding-top:10px
}
.divider{
background: #f5f5f5;
height: 40rpx;
width:100%;
}
.specialities_layout{
display:flex;
flex-wrap: wrap;
width:100%;
flex-direction:row;
margin-left: 16px;
margin-top:16px;
margin-bottom: 16px;
}
.view_divider{
background: #EEA9B8;
height: 40rpx;
width:10rpx;
}
.specialities_text {
margin-left: 8px;
font-size: 16px;
height: auto;
width:auto;
margin-top: 6rpx;
}
.bottom-image{
height: 280rpx;
width:100%;
}
.Absolute-Center {
margin: auto;
position: absolute;
top: 0; left: 0; bottom: 0; right: 0;
}
function.js
//function.js
//获取应用实例
var app = getApp()
Page({
data: {
userInfo: {},
indicatorDots: true,
autoplay: true,
interval: 5000,
duration: 1000,
// imgUrls: [
// 'http://img02.tooopen.com/images/20150928/tooopen_sy_143912755726.jpg',
// 'http://img06.tooopen.com/images/20160818/tooopen_sy_175866434296.jpg',
// 'http://img06.tooopen.com/images/20160818/tooopen_sy_175833047715.jpg'
// ],
imgUrls: [
'../../images/adv_50.png',
'../../images/adv_60.png',
'../../images/adv_80.png'
],
functions: [
{
"name": "刷卡消费",
"pic_url": '../../images/icon_consume.png'
},
{
"name": "提现",
"pic_url": '../../images/icon_withdrawals.png'
},
{
"name": "交易记录",
"pic_url": '../../images/icon_records.png'
},
{
"name": "实名认证",
"pic_url": '../../images/icon_auth.png'
},
{
"name": "飞机票",
"pic_url": '../../images/icon_airplane.png'
},
{
"name": "火车票",
"pic_url": '../../images/icon_train.png'
},
{
"name": "手机充值",
"pic_url": '../../images/icon_phone_recharge.png'
},
{
"name": "水电煤",
"pic_url": '../../images/icon_water.png'
}
]
},
//事件处理函数
bindViewTap: function () {
wx.navigateTo({
url: '../logs/logs'
})
},
onLoad: function () {
console.log('onLoad')
var that = this
//调用应用实例的方法获取全局数据
app.getUserInfo(function (userInfo) {
//更新数据
that.setData({
userInfo: userInfo
})
that.update()
})
}
})WeChat ミニ プログラムのケースの詳細な説明については、ページ構築に関連する記事については、PHP 中国語 Web サイトに注目してください。