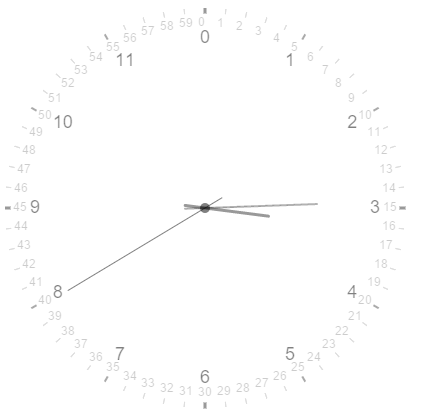
H5 の最大の特徴とも言えるキャンバスを使用すると、Web ページ上にさまざまなグラフィックを自由に描画したり、小さなゲームを作成したりできます。 Canvasタグの使い方についてはインターネット上にたくさんあるので、ここでは紹介しません。今日はキャンバスを使って小さな時計を作ります。
そこでまず、このページでは 2 つのキャンバスを使用し、1 つは静止した時計の文字盤と目盛りを描画し、もう 1 つは時計の 3 つの針を描画し、位置決めを使用してそれらを重ね合わせました。それから、ここで言うことは何もありません。コードは以下に添付されています。
<canvas id="plate">

            画表盘

    </canvas>

    <canvas id="needles">

            画时针

</canvas>var plate=document.getElementById('plate');
var needles=document.getElementById('needles');
needles.setAttribute('style','position:absolute;top:8px;left:8px;'); //这里因为chrome里面,body的magin值为8px,所以我这里就没设为0了。
var cntP=plate.getContext('2d');
var cntH=needles.getContext('2d');
plate.width=800;
plate.height=500;
needles.width=800;
needles.height=500;
ここまで来て、準備作業が完了し、時計を描く準備が整いました。まず、時計の文字盤を描画するコンストラクターを定義しました。
function drawclock(cnt,radius,platelen,linewidth,numLen,NUMLEN){
this.cnt=cnt;
this.radius=radius;
this.platelen=platelen;
this.linewidth=linewidth;
this.numLen=numLen;
this.NUMLEN=NUMLEN;
this.getCalibCoor=function(i){
//获得表盘刻度两端的坐标
var X=200+this.radius*Math.sin(6*i*Math.PI/180);
var Y=200-this.radius*Math.cos(6*i*Math.PI/180);
var x=200+(this.radius-this.platelen)*Math.sin(6*i*Math.PI/180);
var y=200-(this.radius-this.platelen)*Math.cos(6*i*Math.PI/180);
// 获得分钟数字的坐标
var numx=200+(this.radius-this.platelen-this.numLen)*Math.sin(6*i*Math.PI/180);
var numy=200-(this.radius-this.platelen-this.numLen)*Math.cos(6*i*Math.PI/180);
//获得小时数字的坐标
var numX=200+(this.radius-this.platelen-this.NUMLEN)*Math.sin(6*i*Math.PI/180);
var numY=200-(this.radius-this.platelen-this.NUMLEN)*Math.cos(6*i*Math.PI/180);
return {X:X,Y:Y,x:x,y:y,numx:numx,numy:numy,numX:numX,numY:numY};
};
this.drawCalibration=function(){ //画刻度
for(var i=0,coorObj;i<60;i++){
coorObj=this.getCalibCoor(i);
this.cnt.beginPath();
this.cnt.moveTo(coorObj.X,coorObj.Y);
this.cnt.lineTo(coorObj.x,coorObj.y);
this.cnt.closePath();
this.cnt.lineWidth=this.linewidth;
this.cnt.strokeStyle='#ddd';
i%5==0&&(this.cnt.strokeStyle='#aaa')
&&(this.cnt.lineWidth=this.linewidth*2);
i%15==0&&(this.cnt.strokeStyle='#999')
&&(this.cnt.lineWidth=this.linewidth*3);
this.cnt.stroke();
this.cnt.font='10px Arial';
this.cnt.fillStyle='rgba(0,0,0,.2)';
this.cnt.fillText(i,coorObj.numx-7,coorObj.numy+3);
i%5==0&&(this.cnt.fillStyle='rgba(0,0,0,.5)')
&&(this.cnt.font='18px Arial')
&&(this.cnt.fillText(i/5,coorObj.numX-5,coorObj.numY+5));
}
};
}
var clock=new drawclock(cntP,200,5,1,10,25); //实例化一个表盘对象
clock.drawCalibration();
ここで最も重要な部分は、スケールとデジタル図面の座標を取得することです。目盛りの始点を文字盤の端に置き、文字盤の半径から目盛りの長さを引いて目盛りの終点の位置を求め、角度と三角関数を使用して2 点の座標。最後に、文字盤の目盛りを描画できます。下の文字盤にも同じ方法で数字が描かれています。ここでの文字盤の中心は(200,200)の位置にあります。この時点で、静的な時計の文字盤が描画されました。
以下では、時計の針を描画するためのコンストラクターを定義します。
function clockNeedle(cnt,R,lineWidth,strokeStyle,lineCap,obj){

                this.R=R;

                this.cnt=cnt;

                this.lineWidth=lineWidth;

                this.strokeStyle=strokeStyle;

                this.lineCap=lineCap;

                this.obj=obj;

                this.getNeedleCoor=function(i){

                    var X=200+this.R*0.8*Math.sin(i); //起点的坐标

                    var Y=200-this.R*0.8*Math.cos(i);


                    var x=200-20*Math.sin(i); //终点的坐标

                    var y=200+20*Math.cos(i);

                    return {X:X,Y:Y,x:x,y:y};

                };

                this.drawNeedle=function(){

                    var d=new Date().getTime();

                    var angle;

                    switch(this.obj){

                        case 0:

                        angle=(d/3600000%24+8)/12*360*Math.PI/180;

                        break;

                        case 1:

                        angle=d/60000%60/60*360*Math.PI/180;

                        break;

                        case 2:

                        angle=d/1000%60/60*360*Math.PI/180;

                        break;

                    }

                    var coorobj=this.getNeedleCoor(angle);

                    this.cnt.beginPath();

                    this.cnt.moveTo(coorobj.x,coorobj.y);

                    this.cnt.lineTo(coorobj.X,coorobj.Y);

                    // this.cnt.closePath();


                    this.cnt.lineWidth=this.lineWidth;

                    this.cnt.strokeStyle=this.strokeStyle;

                    this.cnt.lineCap=this.lineCap;

                    this.cnt.stroke();

                }

            }
ここで言及する必要があることが 2 つあります: 1. 現在時刻のミリ秒を取得し、それを時間に変換するとき、モジュロ 24 を使用して 1 日の時間を計算するとき、ここでAdd 8 が必要です。 2. lineCap 属性を使用したい場合は、上記のパスを設定するときに closePath() を使用しないでください。
この時点では、ポインタを描画して回転できるように見せるメソッドがまだ必要です:
function draw(){

                cntH.clearRect(0,0,needles.width,needles.height);

                var mzneedle=new clockNeedle(cntH,200,1,'rgba(0,0,0,.5)','round',2);

                //最后一个参数0代表画时针,1画分针,2画秒针

                var fzneedle=new clockNeedle(cntH,80,3,'rgba(0,0,0,.4)','round',0);

                var szneedle=new clockNeedle(cntH,140,2,'rgba(0,0,0,.3)','round',1);

                mzneedle.drawNeedle();

                fzneedle.drawNeedle();

                szneedle.drawNeedle();

                cntH.arc(200,200,5,0,2*Math.PI);

                cntH.fillStyle='rgba(0,0,0,.5)';

                cntH.fill();

     }

     setInterval(draw,1);
時計の写真を以下に添付します: 
上記はHTML5 を使用したキャンバス クールな時計効果を実現するには、PHP 中国語 Web サイト (m.sbmmt.com) に注目して関連コンテンツを参照してください。