「FastAPI を使用すると API を 5 分で作成できます。最新の高性能 Python フレームワークである FastAPI を使用すると、強力な Web アプリケーションを簡単に構築できます。」
インストール
pip:
pip install fastapi uvicorn
pip install fastapi
API を作成しましょう
メモ帳を開いて以下の内容を貼り付け、ファイルを data.json として保存します (POST メソッドを使用してこのファイルにデータを追加し、GET メソッドを使用してレコードを取得します
データ.json
[
   {
      "name": "John",
      "age": 25
   },
   {  "name": "Smith",
      "age": 27
   }
]
次に、新しい Python ファイルを作成し、app.py という名前を付けて、以下のコードを貼り付けます
# This section imports necessary modules and classes from the FastAPI library and Python's standard library. It imports FastAPI for creating the web application, HTTPException for raising HTTP exceptions, List for type hints, and json for working with JSON data.

from fastapi import FastAPI, HTTPException
from typing import List
import json

# This creates an instance of the FastAPI class, which will be the main application instance for handling HTTP requests.
app = FastAPI()

# This block reads the content of the "data.json" file using a context manager (with statement) and loads the JSON data into the initial_data variable.
with open("data.json", "r") as file:
    initial_data = json.load(file)

# This line initializes the data variable with the loaded JSON data, effectively creating a list of dictionaries containing user information.
data = initial_data

# This decorator (@app.get(...)) defines a GET endpoint at the "/users" URL. It uses the get_users function to handle the request. The response_model parameter specifies the expected response model, which is a list of dictionaries in this case.
@app.get("/users", response_model=List[dict])
async def get_users():
    return data

# This decorator (@app.post(...)) defines a POST endpoint at the "/users" URL. It uses the create_user function to handle the request. The response_model parameter specifies the expected response model, which is a single dictionary in this case.
# The create_user function attempts to append the received user dictionary to the data list. If successful, it constructs a response dictionary indicating the success. If an exception occurs during the attempt (e.g., due to invalid data), it constructs a response dictionary indicating an error.
@app.post("/users", response_model=dict)
async def create_user(user: dict):
    try:
        data.append(user)
        response_data = {"message": "User created successfully", "user": user}
    except:
        response_data = {"message": "Error creating user", "user": user}
    return response_data

# This function uses a context manager to open the "data.json" file in write mode and then uses json.dump to write the contents of the data list back to the file, formatting it with an indentation of 4 spaces.
def save_data():
    with open("data.json", "w") as file:
        json.dump(data, file, indent=4)

# This decorator (@app.on_event(...)) defines a function that will be executed when the FastAPI application is shutting down. In this case, it calls the save_data function to save the data back to the JSON file before the application exits.
@app.on_event("shutdown")
async def shutdown_event():
    save_data()

# This block checks if the script is being run directly (not imported as a module). If it is, it uses the uvicorn.run function to start the FastAPI application on host "0.0.0.0" and port 8000. This is how you launch the application using the Uvicorn ASGI server.
if __name__ == "__main__":
    import uvicorn
    uvicorn.run(app, host="0.0.0.0", port=8000)
app.py を実行すると、Uvicorn サーバーが受信 HTTP リクエストを処理する新しいプロセスを開始します。サーバーが起動して実行されたら、Postman を開き、URL: http://0.0.0.0:8000/users で新しい GET リクエストを作成し、[送信] をクリックします


data.json ファイルからのユーザーのリストを含む JSON 応答が表示されます。
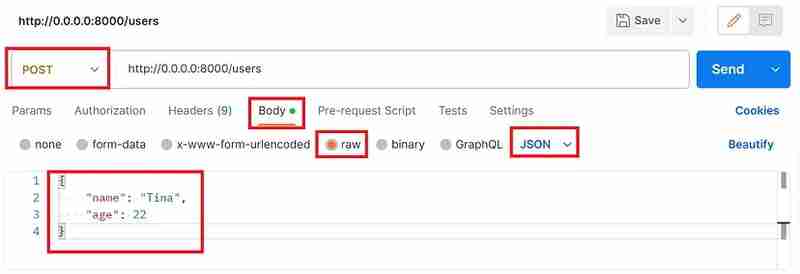
次に、POST メソッドを使用してこのファイルにユーザーを追加してみましょう。新しいリクエストを作成し、POST メソッドを選択し、本文をクリックして raw を選択し、ドロップダウンから JSON を選択して、以下の JSON をペイロードとして貼り付けて新しいユーザーを追加します
{
    "name": "Tina",
    "age": 22
}

[送信] をクリックすると、ユーザーが正常に追加された場合はステータス コード 200 OK の応答が返されます

これで、ユーザーを表示してファイルに追加するための GET/POST メソッドを備えた API が正常に作成されました。 GET リクエストに戻って [送信] をクリックすると、API の応答にユーザー Tina もリストされていることがわかります。
FastAPI の驚くべき点の 1 つは、API エンドポイント用の Swagger ドキュメントが自動的に生成されるため、開発者が API を理解し、効果的に使用することが容易になることです。
ブラウザを開いて http://localhost:8000/docs と入力すると、API の Swagger ドキュメントが表示されます

これは、Python を使用して簡単な API を作成する基本的な例にすぎないことに注意してください。特にエラー処理、データ検証、セキュリティの観点からさらに構成やコーディングを行う必要があります。
以上がPython を使ってすぐに API を作成の詳細内容です。詳細については、PHP 中国語 Web サイトの他の関連記事を参照してください。