Vite.js チュートリアル – Web プロジェクトに Vite をインストールして使用する方法
Vite.js is a rapid development tool for modern web projects. It focuses on speed and performance by improving the development experience.
Vite uses native browser ES imports to enable support for modern browsers without a build process.

Vite consists of two major parts:
- The dev server provides support for Hot Module Replacement (HMR) for updating modules during the execution of the application. When changes are made to the source code of an application, only the changes are updated, rather than the entire application being reloaded. This feature helps speed up development time.
- The build command enables developers to bundle their code with Rollup, pre-configured to output highly optimized static assets for production.
How Vite.js Works
When ES modules were introduced in ES2015, many browsers had poor support for ES6 modules. To address this, modern browsers now support native ES modules. This allows developers to use the import and export statements natively.
In native ES, the import must get either a relative or absolute URL because it does not support bare module imports such as:
import { someMethod } from 'my-dep'
The above code will throw an error in the browser because many browsers do not have support for ES6 modules. So the question now is how does Vite handle this?
Vite will automatically detect bare module imports from your source files and perform the following two actions on them:
- Vite will pre-bundle the source files to speed up page loading and convert CommonJS / UMD modules to ESM.
- To allow browsers to import modules without throwing errors, Vite will rewrite the imports to a valid URLs like this
/node_modules/.vite/my-dep.js?v=f3sf2ebb
Why Use Vite?
Now that we know what Vite is and how it works, you might be wondering why you should use Vite.
There are many reasons why you should use Vite for your project. Let's take a brief look at some of them.
Performance
Pre-bundling with Vite's ESbuild makes it 10 to 100 times faster than using any other JS bundler. This is because it helps improve page speed and convert CommonJS / UMD modules to ESM.
According to the Vite documentation,
"The pre-bundling step is performed with esbuild and makes Vite's cold start time significantly faster than any JavaScript-based bundler."
Hot Module Replacement (HMR)
Vite uses HMR functionalities to keep track of changes in your application without reloading the full page. With the HMR API, the browser will only load the modified section of the page and still retain the application's state.
There's no need to manually configure the HMR API in your app. It's automatically added to your project during application installation.
With HMR performance, you can design lighter and faster applications regardless of the number of modules or the size of your application.
Configuration Options
Vite allows you to have more control over your project's configuration by extending the default configuration with vite.config.js or vite.config.ts. These are located in the project's base root directory.
You can also specify different config files with the --config CLI option, as shown below:
vite --config my-config.js
What You'll Need
You must have the following software installed on your computer before you can create a Vite project:
- Node.js version 12.2.0 or higher (to check if you have Node installed on your computer run node -v on the terminal)
- Npm / Yarn
Once you have these installed on your computer, you can now create a Vite project.
How to Create a Vite Project
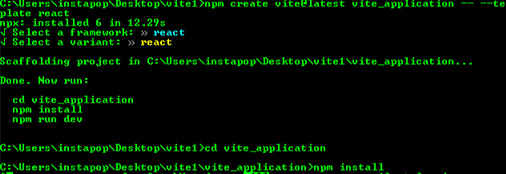
To create a Vite application, open your terminal and navigate to the folder where you want to save the Vite program. Then run this command:
npm create @vitejs/app my-vite-app
Note: my_vite_app is the name of the Vite application that we want to create. You can change it to whatever name you prefer.
After running the above command, you'll be prompted to select a framework and the template (variant). For the purposes of this tutorial, we'll use React, but you can select any framework and template that you are familiar with.

Next, run the following commands to finish the installation:
cd vite_applicationnpm install

The installation may take a few minutes, so just wait until it's completed.
How to Run a Vite Application
To run your Vite application on the terminal, navigate to the application folder (vite_application) and then run the dev command below to start the development server:
npm run dev
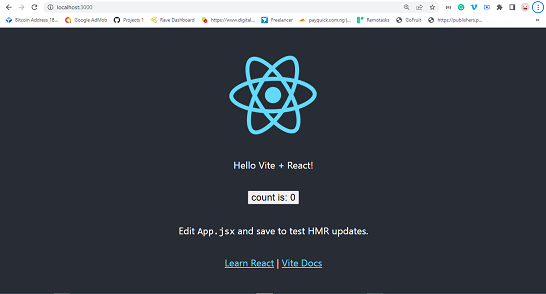
Running the above command will start the development server. Then open your terminal and enter http://localhost:3000.
You should see something like this in the browser:
 React application
Vite Folder Structure
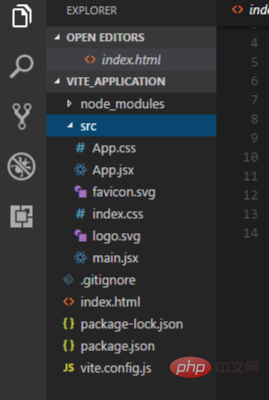
Let's have a look at how Vite application folders are organized. We'll also look at a few of the folders and files in detail.
Note: if you are using a different framework and template, the file name will not be the same.

Vite folder structure
node_modules folder
The node_modules folder contains all the necessary dependencies for the application, which are specified in the package.json file.
All of the configured dependencies in package.json will be downloaded into the node_modules folder once the npm install command is run.
When pushing your source code to GitHub, you don't need to push the node_modules folder because users can install all the necessary dependencies used in your application through the package.json.
You can find the package.json file in the application parent's root directory.
src folder
The src folder is one of the folder that we interact with most when developing Vite applications. This folder contains app.jsx, main.jsx, app.css and index.js.
All of your application's assets, such as images, videos, and other files, must be stored in the src folder because Vite automatically rebases all URLs inside index.html.
App.jsx and main.jsx
The app.jsx file is the base component that serves as a container for all of the other components used in the application.
The main.jsx file is where you target the root id from the index.html and render all the components used in the application.
index.css and app.css
These files contain all of the CSS styles used in the program. You can add your own CSS file or change the style.
以上がVite.js チュートリアル – Web プロジェクトに Vite をインストールして使用する方法の詳細内容です。詳細については、PHP 中国語 Web サイトの他の関連記事を参照してください。

ホットAIツール

Undress AI Tool
脱衣画像を無料で

Undresser.AI Undress
リアルなヌード写真を作成する AI 搭載アプリ

AI Clothes Remover
写真から衣服を削除するオンライン AI ツール。

Clothoff.io
AI衣類リムーバー

Video Face Swap
完全無料の AI 顔交換ツールを使用して、あらゆるビデオの顔を簡単に交換できます。

人気の記事

ホットツール

メモ帳++7.3.1
使いやすく無料のコードエディター

SublimeText3 中国語版
中国語版、とても使いやすい

ゼンドスタジオ 13.0.1
強力な PHP 統合開発環境

ドリームウィーバー CS6
ビジュアル Web 開発ツール

SublimeText3 Mac版
神レベルのコード編集ソフト(SublimeText3)

ホットトピック
 1794
1794
 16
16
 1740
1740
 56
56
 1591
1591
 29
29
 1474
1474
 72
72
 267
267
 587
587
 Vue.js vs. React:プロジェクト固有の考慮事項
Apr 09, 2025 am 12:01 AM
VUE.JSは、中小規模のプロジェクトや迅速な反復に適していますが、Reactは大規模で複雑なアプリケーションに適しています。 1)Vue.jsは使いやすく、チームが不十分な状況やプロジェクトスケールが小さい状況に適しています。 2)Reactにはより豊富なエコシステムがあり、高性能で複雑な機能的ニーズを持つプロジェクトに適しています。
 React vs. Vue:Netflixはどのフレームワークを使用していますか?
Apr 14, 2025 am 12:19 AM
netflixusesaCustomframeworkは、「ギボン」ビルトンリアクト、notreactorvuedirectly.1)チームエクスペリエンス:seice basedonfamperivity.2)projectomplerprojects:vueforsplerprojects、racefforcomplexones.3)customeforsneeds:reactofforsmorefloficailie.
 HTMLにおけるReactの役割:ユーザーエクスペリエンスの向上
Apr 09, 2025 am 12:11 AM
ReactはJSXとHTMLを組み合わせてユーザーエクスペリエンスを向上させます。 1)JSXはHTMLを埋め込み、開発をより直感的にします。 2)仮想DOMメカニズムは、パフォーマンスを最適化し、DOM操作を削減します。 3)保守性を向上させるコンポーネントベースの管理UI。 4)国家管理とイベント処理は、インタラクティブ性を高めます。
 Reactのエコシステム:ライブラリ、ツール、およびベストプラクティス
Apr 18, 2025 am 12:23 AM
Reactエコシステムには、状態管理ライブラリ(Reduxなど)、ルーティングライブラリ(Reactrouterなど)、UIコンポーネントライブラリ(材料-UIなど)、テストツール(JESTなど)、およびビルディングツール(Webpackなど)が含まれます。これらのツールは、開発者がアプリケーションを効率的に開発および維持し、コードの品質と開発効率を向上させるのを支援するために協力します。
 Netflixのフロントエンド:React(またはVue)の例とアプリケーション
Apr 16, 2025 am 12:08 AM
Netflixは、Reactをフロントエンドフレームワークとして使用します。 1)Reactのコンポーネント開発モデルと強力なエコシステムが、Netflixがそれを選択した主な理由です。 2)コンポーネント化により、Netflixは複雑なインターフェイスをビデオプレーヤー、推奨リスト、ユーザーコメントなどの管理可能なチャンクに分割します。 3)Reactの仮想DOMおよびコンポーネントライフサイクルは、レンダリング効率とユーザーインタラクション管理を最適化します。
 React:Web開発のためのJavaScriptライブラリの力
Apr 18, 2025 am 12:25 AM
Reactは、メタがユーザーインターフェイスを構築するために開発したJavaScriptライブラリであり、そのコアはコンポーネント開発と仮想DOMテクノロジーです。 1。コンポーネントと状態管理:Reactは、コンポーネント(関数またはクラス)とフック(UseStateなど)を介して状態を管理し、コードの再利用性とメンテナンスを改善します。 2。仮想DOMとパフォーマンスの最適化:仮想DOMを介して、実際のDOMを効率的に更新してパフォーマンスを向上させます。 3.ライフサイクルとフック:フック(使用効果など)は、関数コンポーネントがライフサイクルを管理し、副作用操作を実行できるようにします。 4。使用例:基本的なHelloworldコンポーネントから高度なグローバル州管理(USECONTEXTおよび
 Reactの未来:Web開発におけるトレンドと革新
Apr 19, 2025 am 12:22 AM
Reactの未来は、究極のコンポーネント開発、パフォーマンスの最適化、および他のテクノロジースタックとの深い統合に焦点を当てます。 1)Reactは、コンポーネントの作成と管理をさらに簡素化し、究極のコンポーネント開発を促進します。 2)特に大規模なアプリケーションでは、パフォーマンスの最適化が焦点になります。 3)Reactは、開発エクスペリエンスを改善するために、GraphQLやTypeScriptなどのテクノロジーと深く統合されます。
 Reactを使用したフロントエンド開発:利点とテクニック
Apr 17, 2025 am 12:25 AM
Reactの利点は、その柔軟性と効率性であり、これは以下に反映されています。1)コンポーネントベースの設計により、コードの再利用性が向上します。 2)仮想DOMテクノロジーは、特に大量のデータ更新を処理する場合、パフォーマンスを最適化します。 3)リッチエコシステムは、多数のサードパーティライブラリとツールを提供します。 Reactがどのように機能し、例を使用するかを理解することにより、そのコアコンセプトとベストプラクティスをマスターして、効率的で保守可能なユーザーインターフェイスを構築できます。


