ホームページ > ウェブフロントエンド > jsチュートリアル > AWS Elastic Beanstalk での Next.js デプロイに関する完全ガイド: Docker、AWS CodePipeline、CodeBuild の使用

AWS Elastic Beanstalk での Next.js デプロイに関する完全ガイド: Docker、AWS CodePipeline、CodeBuild の使用

DDD
リリース: 2024-09-12 20:15:10
オリジナル
323 人が閲覧しました

導入

AWS (アマゾン ウェブ サービス) Elastic Beanstalk、Docker、CI/CD パイプラインと AWS Code Build、Code Deploy、GitLab を活用すると、Next.js ウェブ アプリケーションを本番環境にデプロイすることが合理化され、効率的になります。このガイドでは、アプリが堅牢でスケーラブルで、保守が容易であることを保証するための最新のデプロイメント パイプラインのセットアップ手順を説明します。

前提条件

展開プロセスに入る前に、次のものが揃っていることを確認してください。

  • AWS 内に Elastic Beanstalk 環境を作成する権限を持つ AWS ルート アカウントまたは IAM アカウント

  • ローカルマシンにインストールされた Docker

  • Next.js アプリのリポジトリを持つ GitLab または GitHub アカウント

  • デプロイの準備ができた Next.js プロジェクト

ステップ 1: AWS Elastic Beanstalk をセットアップする

  • Elastic Beanstalk 環境を作成する - AWS マネジメントコンソールにログインし、Elastic Beanstalk に移動して、新しいアプリケーションを作成します。

Complete Guide on Next.js Deployment on AWS Elastic Beanstalk: Using-Docker, AWS CodePipeline & CodeBuild

  • アプリケーション名を入力し、「作成」をクリックします。

  • アプリケーションを作成したら、新しい環境を作成します。 「新しい環境の作成」をクリックします。

Complete Guide on Next.js Deployment on AWS Elastic Beanstalk: Using-Docker, AWS CodePipeline & CodeBuild

  • Webサーバー環境を選択します。環境名にはアプリケーション名とともに接尾辞 env が付き、必要に応じて編集できます。

Complete Guide on Next.js Deployment on AWS Elastic Beanstalk: Using-Docker, AWS CodePipeline & CodeBuild

  • 有効な環境名をドメインとともに入力します。ドメイン名を入力してください。

Complete Guide on Next.js Deployment on AWS Elastic Beanstalk: Using-Docker, AWS CodePipeline & CodeBuild

  • 適切なプラットフォームを選択してください。この場合、プラットフォームとしてマネージド プラットフォームと Docker を選択します。

Complete Guide on Next.js Deployment on AWS Elastic Beanstalk: Using-Docker, AWS CodePipeline & CodeBuild

  • AWS Code Pipeline を通じて独自のコードをデプロイするため、アプリケーション コードで [サンプル アプリケーション] を選択します。

  • プリセットではデフォルトのままにすることができますが、実稼働アプリケーションでは高可用性インスタンスを使用することをお勧めします。プリセットを選択したら、「次へ」をクリックします。

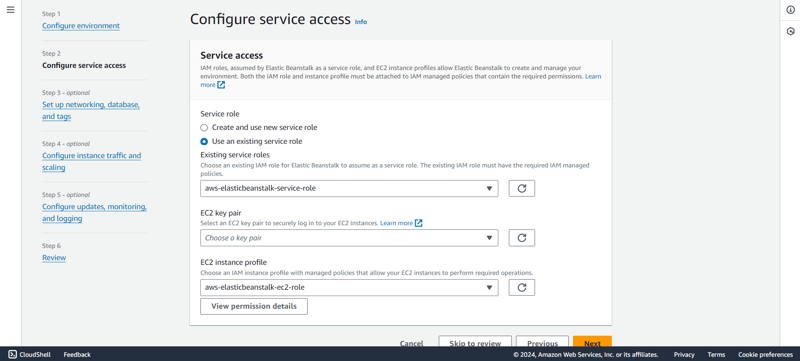
  • 既存のサービス ロールを作成するか、使用します。 EC2 インスタンスの作成を続行する前に、Elastic Beanstalk サービス ロールと EC2 サービス ロールをセットアップすることが重要です。
    ただし、ターミナルから EC2 インスタンスに SSH 接続する場合は、EC2 キー ペアを追加し、必要な操作を実行するために EC2 インスタンス プロファイルを作成します。
Complete Guide on Next.js Deployment on AWS Elastic Beanstalk: Using-Docker, AWS CodePipeline & CodeBuild

  • EC2 インスタンスをデプロイする VPC を選択します。

Complete Guide on Next.js Deployment on AWS Elastic Beanstalk: Using-Docker, AWS CodePipeline & CodeBuild

  • VPC を選択した後、各アベイラビリティーゾーンのサブネットを選択します。ロード バランサーとインスタンスを同じパブリック サブネットで実行するには、図に示すようにインスタンスにパブリック IP アドレスを割り当てます。

Complete Guide on Next.js Deployment on AWS Elastic Beanstalk: Using-Docker, AWS CodePipeline & CodeBuild

  • データベースを構成する必要がないため、「次へ」をクリックして次のステップに進むことができます。

  • ルート ボリュームには、汎用 SSD を選択します。

  • ここで、セキュリティ グループから、既存のセキュリティ グループから選択するか、そのままにしておくことができます。EC2 インスタンスのセットアップ中に、Elastic Beanstalk がセキュリティ グループを作成します。

  • 運用目的でデプロイする場合は、自動スケーリングを設定し、Elastic Beanstalk がトラフィックを処理するために作成するインスタンスのタイプを選択することを常にお勧めします。 t3ファミリーと一緒に行きます。

Complete Guide on Next.js Deployment on AWS Elastic Beanstalk: Using-Docker, AWS CodePipeline & CodeBuild

  • Click on Next.

  • In health reporting, we will go with the Basic reporting, but feel free to choose from the available options based on the type of report you need.

  • We will also uncheck the Managed platform updates as it is not required for the demo website.

  • Keep rest of the settings as it is and click on Next.

  • Finally, review your changes and click on Submit.

  • Elastic Beanstalk will launch your environment, and it will take some time.

Complete Guide on Next.js Deployment on AWS Elastic Beanstalk: Using-Docker, AWS CodePipeline & CodeBuild

  • After a successful launch, you will see congratulations screen.

Complete Guide on Next.js Deployment on AWS Elastic Beanstalk: Using-Docker, AWS CodePipeline & CodeBuild

Step 2: Create your Next.js app (or use an existing one)

  • To create a Next.js app, open your terminal, cd into the directory you would like to create the app in, and run the following command:
npx create-next-app@latest nextjs-blog --use-npm --example "https://github.com/vercel/next-learn/tree/main/basics/learn-starter" 

ログイン後にコピー

If you already have your existing code ready you may skip to the next part

  • You now have a new directory called nextjs-blog. Let us cd into it:
cd nextjs-blog 

ログイン後にコピー

Then, run the following command:

npm run dev 

ログイン後にコピー

This starts your Next.js app’s "development server" (more on this later) on port 3000.

Let's check to see if it is working. Open http://localhost:3000 in your browser.

  • Now it is time to create a Dockerfile within the application.

  • Create a file named Dockerfile in the root of your application and add the following code:

FROM node:18-alpine 

RUN mkdir -p /app 

WORKDIR /app 

COPY . . 

RUN npm install 

RUN npm run build 

EXPOSE 3000 

CMD ["npm", "start"] 

ログイン後にコピー
  • After making the changes, it is important to check if the build is successful. Start the docker engine and run the following command:
docker build -t testapp . 

ログイン後にコピー

Complete Guide on Next.js Deployment on AWS Elastic Beanstalk: Using-Docker, AWS CodePipeline & CodeBuild

Once the build is successful, then run the application with the command below:

docker run -p 3000:3000 testapp 

ログイン後にコピー
  • Create a file named buildspec.yml in the root of your application and add the following code. This file will be used at a later stage when setting up the code pipeline within AWS.
version: 0.2 

artifacts: 

  type: zip 

  files: 

    - '**/*' 

ログイン後にコピー
  • After adding these files to your new or existing code, push these changes to the remote repository on Gitlab or GitHub.

Step 3: Setup Code Pipeline

  • Log in to the AWS Management Console, navigate to Code Pipeline, and click on create pipeline.

  • Enter a valid Pipeline name and choose the execution mode for the pipeline. In our case, we will select Queued (Pipeline type V2 required).

  • Create a new service role if it does not already exist or select from existing service role and click Next.

Complete Guide on Next.js Deployment on AWS Elastic Beanstalk: Using-Docker, AWS CodePipeline & CodeBuild

  • From the source provider select where you have your artifacts stored. We will select "Gitlab".

  • From the connection list, select an existing connection or create a new connection.

Complete Guide on Next.js Deployment on AWS Elastic Beanstalk: Using-Docker, AWS CodePipeline & CodeBuild

  • Once the connection is successful, then select the Repository name and the branch from which the code will be used.

  • For trigger type, we will choose No filter and click on Next.

Complete Guide on Next.js Deployment on AWS Elastic Beanstalk: Using-Docker, AWS CodePipeline & CodeBuild

  • Next, we select the Build Provider. In our case, we will select AWS Code Build. Select region or leave it to default AWS Region.

Complete Guide on Next.js Deployment on AWS Elastic Beanstalk: Using-Docker, AWS CodePipeline & CodeBuild

  • 次に、[プロジェクトの作成] をクリックして、Code Build で新しいプロジェクトを作成します。新しいウィンドウが開きます。プロジェクト名を入力し、環境内のすべてをデフォルトのままにします。

Complete Guide on Next.js Deployment on AWS Elastic Beanstalk: Using-Docker, AWS CodePipeline & CodeBuild

  • ビルド仕様を指定するときは、必ず [Buildspec ファイルを使用する] を選択してください。これは前に作成したのと同じファイルです。他の設定はデフォルトのままにして、次のステップに進みます。

Complete Guide on Next.js Deployment on AWS Elastic Beanstalk: Using-Docker, AWS CodePipeline & CodeBuild

  • [コード パイプラインの続行] をクリックすると、ウィンドウが自動的に閉じて、コード パイプライン画面に戻ります。

  • ビルド タイプを単一ビルドとして指定し、[次へ] をクリックします。

Complete Guide on Next.js Deployment on AWS Elastic Beanstalk: Using-Docker, AWS CodePipeline & CodeBuild

  • デプロイの追加ステージで、デプロイプロバイダーを選択します。この場合、アプリケーションを最終的にデプロイするのは AWS Elastic Beanstalk になります。

Complete Guide on Next.js Deployment on AWS Elastic Beanstalk: Using-Docker, AWS CodePipeline & CodeBuild

  • アプリケーション名、環境名を選択し、ロールバック設定を構成し、「次へ」をクリックします。コード パイプラインの設定を確認し、[パイプラインの作成] をクリックします。

ステップ 4: ウェブサイトが公開されました!

Next.js Web アプリケーションを本番環境にデプロイするのは非常に簡単で、AWS Code Build、Code Deploy、GitLab を使用する AWS Elastic Beanstalk、Docker、CI/CD パイプラインを使用するとより効率的に実行できます。

Elastic Beanstalk によって提供される URL を使用してアクセスできます。ローカルで変更を加えると、ブランチにプッシュすると自動的にデプロイされます。

コーディングを楽しんでください!!

以上がAWS Elastic Beanstalk での Next.js デプロイに関する完全ガイド: Docker、AWS CodePipeline、CodeBuild の使用の詳細内容です。詳細については、PHP 中国語 Web サイトの他の関連記事を参照してください。

ソース:dev.to
このウェブサイトの声明
この記事の内容はネチズンが自主的に寄稿したものであり、著作権は原著者に帰属します。このサイトは、それに相当する法的責任を負いません。盗作または侵害の疑いのあるコンテンツを見つけた場合は、admin@php.cn までご連絡ください。
人気のチュートリアル
詳細>
最新のダウンロード
詳細>
ウェブエフェクト
公式サイト
サイト素材
フロントエンドテンプレート