


Python で Flet を使用して計算機を構築する

導入
こんにちは、Python スピーカーの Arsey です。これが私の最初のブログです。Flet を使用してこの単純な計算アプリを構築する方法を説明します。これを皆さんと共有できることをとても楽しみにしています。
今日のデジタル時代では、クロスプラットフォーム アプリケーションの作成は必須です。利用可能なフレームワークが多数あるため、適切なものを選択するのは困難な場合があります。そのようなフレームワークの 1 つが Flet です。これは、開発者が Flutter を使用して Web、デスクトップ、モバイル アプリを簡単に構築できるようにする Python ライブラリです。
このブログでは、Flet を使用して基本的な電卓アプリを作成する方法を検討し、このフレームワークがいかにシンプルで効率的であるかを示します。
なぜフレッツなのか?
私がプログラミングを始めたときの目標は、モバイル アプリケーションを構築することでした。明確なガイドがないまま、私は第一言語として Python を選びました。学ぶのは楽しかったのですが、経験を積むにつれて、Python は伝統的にアプリ開発には適しておらず、データ分析や関連タスクによく使用されていることがわかりました。
現在、ネイティブ開発では Kotlin を使用した Android 開発を、クロスプラットフォームでは Flutter を使用して Dart を学習していますが、このライブラリ フレッツのおかげで目標に一歩近づきました。
Python をアプリの構築に使用できる Kivy、Tkinter、Flet などのフレームワークを発見するまで、この認識は落胆しました。 Kivy や Tkinter とは異なり、これらのフレームワークは優れていますが、Android や iOS で適切に動作する見栄えの良いモバイル アプリケーションを開発するには多くのカスタマイズが必要です。そこで flet が輝くのです。
Flet は、Google の人気のある UI ツールキットである Flutter からインスピレーションを得た Python フレームワークです。 flet で達成できる結果は印象的であり、さらに共有できることを楽しみにしています。
フレッツとは何ですか?
Flet は、開発者が Flutter の UI ツールキットを使用してユーザー インターフェイスを直接構築できるようにする Python パッケージです。
Flet の主な利点は、Python のシンプルさと Flutter の豊富な UI 機能を組み合わせて、フロントエンドの豊富な経験を必要とせずにクロスプラットフォーム アプリケーションの迅速な開発を可能にすることです。
Flet はバッテリー付属のライブラリであるため、SDK は必要なく、Flutter の SDK で簡単に拡張できます。
注: ボックス モデル、フレックスボックスやグリッドなどのレイアウト構造、位置決めなど、いくつかのフロントエンドの概念について基本的に理解しておくと有益です。この知識がなくても読み進めることはできますが、これらの概念を理解しておくことを強くお勧めします。
さて、本題はこのくらいにして、電卓の構築に移りましょう!
環境のセットアップ
コーディングに入る前に、マシンに Python がインストールされていることを確認してください。次に、次の手順に従ってフレッツの環境をセットアップします。
- Flet のインストール: pip を使用して Flet をインストールできます。ターミナルまたはコマンド プロンプトを開いて、このコマンドを入力して実行するだけです。
pip インストール フレット
- 新しい Python ファイルを作成します。インストールが成功したら、VS-Code、Pycharm などのお気に入りのコード エディターを開き、新しい Python ファイルを作成し、main.py または好みの名前を付けます。 興奮していますか?きっとそうですよ!まず、開発者コミュニティで最も愛されているフレーズ「Hello World!」でインストールが機能するかテストしてみましょう
Python ファイルに次のコードを入力します
import flet as ft

def main(page: ft.Page):
    page.add(ft.Text(value="Hello, World!"))

ft.app(target=main)
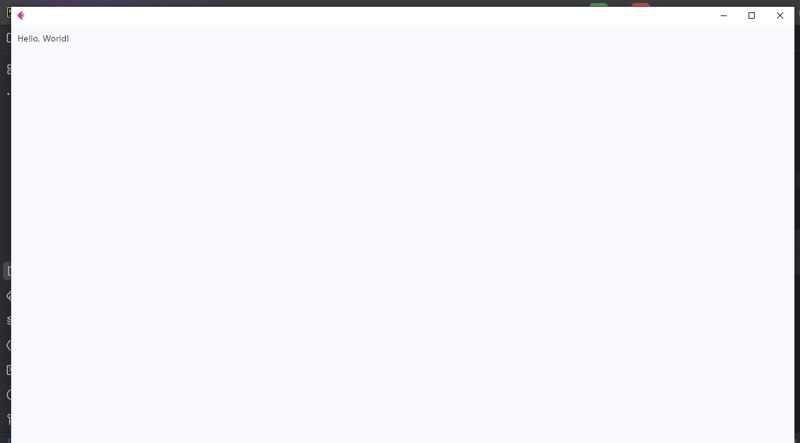
コードを実行して、すべてが機能するかどうかを確認します。 「Hello, World!」が表示されたらと表示されたら、計算機の構築に進む準備が整いました。
出力
レイアウトの作成
このセクションでは、電卓の構造に焦点を当てます。ここでは、列ウィジェットを使用してディスプレイとボタンを積み重ねます。ディスプレイには現在の入力が表示され、ボタンによりユーザーとの対話が可能になります。 UI がユーザー インタラクションへのユーザー インターフェイスを意味することがあるということに今まで気付かなかったのは奇妙です。
次に、次のようにコードを記述します。
from flet import (
    app, Page, Container, Column, Row,
    TextField, colors, border_radius, ElevatedButton, TextAlign, TextStyle
)


def main(page: Page):
    page.title = "Calculator"
    result = TextField(
        hint_text='0', text_size=20,
        color='white', text_align=TextAlign.RIGHT,
        hint_style=TextStyle(
            color=colors.WHITE, size=20
        ),
        read_only=True
    )

    def button_click(e):
        pass

    button_row0 = Row(
        [
            ElevatedButton(text='C',  on_click=button_click),
            ElevatedButton(text='^',  on_click=button_click),
            ElevatedButton(text='%',  on_click=button_click),
            ElevatedButton(text='/',  on_click=button_click),
        ]
    )
    button_row1 = Row(
        [
            ElevatedButton(text='7',  on_click=button_click),
            ElevatedButton(text='8',  on_click=button_click),
            ElevatedButton(text='9',  on_click=button_click),
            ElevatedButton(text='*',  on_click=button_click),
        ]
    )
    button_row2 = Row(
        [
            ElevatedButton(text='4',  on_click=button_click),
            ElevatedButton(text='5',  on_click=button_click),
            ElevatedButton(text='6',  on_click=button_click),
            ElevatedButton(text='-',  on_click=button_click),
        ]
    )
    button_row3 = Row(
        [
            ElevatedButton(text='1',  on_click=button_click),
            ElevatedButton(text='2',  on_click=button_click),
            ElevatedButton(text='3',  on_click=button_click),
            ElevatedButton(text='+',  on_click=button_click),
        ]
    )
    button_row4 = Row(
        [
            ElevatedButton(text='0',  on_click=button_click),
            ElevatedButton(text='.',  on_click=button_click),
            ElevatedButton(text='=',  on_click=button_click),
        ]
    )
    container = Container(
        width=350, padding=20,
        bgcolor=colors. BLACK,
        content=Column(
            [
                result,
                button_row0, button_row1, button_row2,
                button_row3, button_row4
            ]
        )
    )
    page.add(container)


if __name__ == '__main__':
    app(target=main)
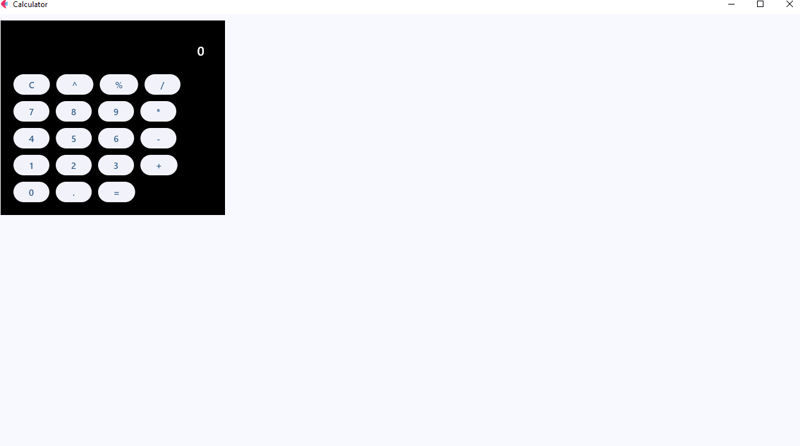
上記のコードを実行すると、電卓レイアウトの出力が表示されます。見た目は良くないかもしれませんが、問題ありません。コンテナの間隔、半径、テーマを追加して、電卓をより洗練されたものにすることで機能を強化します。
出力
コードの説明
さて、レイアウトは構築できましたね?まあ、それでも、ここにいる皆さんの中には、私たちがここで何をしたか理解できなかった人もいると思います。質問せずに座ってください。コードが何をするのか説明させてください。
In the first line, we import our controls. Flet controls are widgets used to lay out our application into a meaningful User Interface. But here we have imported app, Page, Container, Column, Row,
TextField, colors, border_radius, ElevatedButton, TextAlign, TextStyle.
Even though some of them are not entire widgets, like app, colors, border_radius, TextAlign, and TextStyle. These are classes and methods that provide us with extra functionalities of our application, for example
The app, allows us to launch our app in a standalone mode targeting to the main instance of our application.* colors* allow us to style our controls that support the color and bgcolor attribute without us struggling to define their names and border_radius allows us to curve the corners of our containers.
In line 7 we define the main app instance to Page; a page is a container for View Controls. So here I won’t go deep into views since it’s beyond the scope of this tutorial, but you reference here.
We now give the title to our page, with the page.titleattribute, the title on the title bar of our app.
In lines 9-16 is the result control with its required attributes, though it has many, we are gonna use these ones for this project, as you can see we have add a place holder of 0, giving it a size of 20, color to white, align text to right, and the read-only to true so we don’t allow external of soft keyboards to work directly in it.
Line 18 we defined our event handler, button_click this is where we will apply the logic to function our application, eventually making it a working calculator, but for now I just used a pass statement as a placeholder.
From lines 21 – 59, we defined our rows using the Row Widget, the row widget is a control that displays its children in a horizontal array or layout from left to right, similar to the linear layout in Android development, or inline elements in CSS the row controls works in the same way as them, it lays out controls in a horizontal axis or linearly.
Then the ElevatedButton_will represent buttons on the calculator’s UI, but notice we have given it the text and _onclick attributes, the text defines the data that will be displayed on the results when clicked using the onclick attribute that will call for the function button_click to handle events accordingly.
We have the container, the container is a control that will allow us to decorate a control with background color, spacing, applying borders and border radius, and position it with padding, margin, and alignment.
A container follows the box-model concept like the one for CSS as in the figure below,
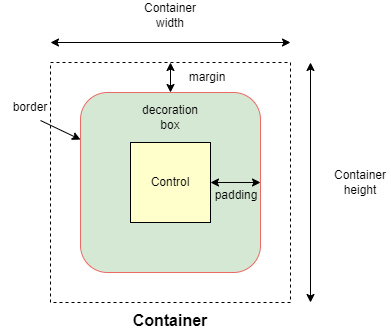
The column control, like the Row control, this one displays its children in a vertical array or layout from top to bottom, this will allow us to vertically lay our buttons in the right order.
Now after defining our UI elements, we need to display them to our application and then call it. We do that by using the page.add() method which allows us to add and build our UI logically.
Then we have to call our app in the stand-alone mode, and that’s what lines 74-75 accomplished.
Adding functionality
Update your button click function to match this code below.
def button_click(e):
        if e.control.text == "=":
            try:
                result.value = str(eval(result.value))
            except Exception:
                result.value = "Error"
        elif e.control.text == "C":
            result.value = ""
        # elif e.control.text == "^":
        # logic for powers
        # pass
        else:
            result.value += e.control.text
        result.update()
CODE EXPLANATION
Okay, what does this code do under the hood; the button_click function is designed to handle various button click events within our calculator app.
Save to apply our current changes then run the calculator and see the results.
Here is a breakdown of how the code works
- Retrieving the button text: when a button is clicked, the function retrieves the button’s text (e.g., ‘1’, ‘2’, ‘+’, ‘-‘, ‘C’, ‘=’) through the e.control.text. this tells the functions which button the user has interacted with
- Clearing the display: when the user clicks the ‘C’ button, the calculator’s input is cleared. The result is set to an empty string (“”), and the display is reset to 0. This effectively clears the display making the calculator ready for a new input. Talk but a fresh number meal.
- Evaluating expressions: if the user clicks the “=” button, the calculator needs to evaluate the current mathematical expression, here we used the str() and eval() functions, and the str() function houses the eval() function so that the result is directly converted into a string and theeval() function will compute the result of the expression, then displayed as a string to our calculator’s display. Or else if the expression is invalid, an exception is caught, and the “Error” message will be displayed instead.
- For the rest of the buttons like numbers and operators: the function will append the button’s text to the display (which is initially “0” or when cleared), it replaces “0” with the button value, otherwise it adds button value to the end of the display.
- After processing the button click, the page is updated via page.update() method call to refresh the UI and show the updated input or result on the calculator's display. So every time you click the button and see the value on the display or a result, this is what the page.update() does.
NOTE: The eval() function is a quick way to evaluate expression but it can be risky with un-trusted input because it executes/evaluates any Python code. In a more secure app, you’d use a safer method for evaluating mathematical expressions.
Exercise: test your knowledge, of how would you handle the exponent ‘^’ expression so that if the user clicks the exponent button it returns the required output. For example, if the user inputs 2^2 the output will be 4, 5^5=25, and 3^4=81. You get the idea.
Let me know how you approached to this problem in the comments, okay, all done, let’s continue.
Improving our UI
Previously the user interface did not look that catchy and awesome, so let’s improve it, and update the buttons to match the following code.
button_row0 = Row(
    [
        ElevatedButton(text='C', expand=1, on_click=button_click,
                       bgcolor=colors.RED_ACCENT, color=colors.WHITE),
        ElevatedButton(text='^', expand=1, on_click=button_click,
                       bgcolor=colors.BLUE_ACCENT_100,
                       color=colors.RED_900
                       ),
        ElevatedButton(text='%', expand=1, on_click=button_click,
                       bgcolor=colors.BLUE_ACCENT_100,
                       color=colors.RED_900
                       ),
        ElevatedButton(text='/', expand=1, on_click=button_click,
                       bgcolor=colors.BLUE_ACCENT_100,
                       color=colors.RED_900
                       ),
    ]
)
button_row1 = Row(
    [
        ElevatedButton(text='7', expand=1, on_click=button_click),
        ElevatedButton(text='8', expand=1, on_click=button_click),
        ElevatedButton(text='9', expand=1, on_click=button_click),
        ElevatedButton(text='*', expand=1, on_click=button_click,
                       bgcolor=colors.BLUE_ACCENT_100,
                       color=colors.RED_900
                       ),
    ]
)
button_row2 = Row(
    [
        ElevatedButton(text='4', expand=1, on_click=button_click),
        ElevatedButton(text='5', expand=1, on_click=button_click),
        ElevatedButton(text='6', expand=1, on_click=button_click),
        ElevatedButton(text='-', expand=1, on_click=button_click,
                       bgcolor=colors.BLUE_ACCENT_100
                       ),
    ]
)
button_row3 = Row(
    [
        ElevatedButton(text='1', expand=1, on_click=button_click),
        ElevatedButton(text='2', expand=1, on_click=button_click),
        ElevatedButton(text='3', expand=1, on_click=button_click),
        ElevatedButton(text='+', expand=1, on_click=button_click,
                       bgcolor=colors.BLUE_ACCENT_100,
                       color=colors.RED_900),
    ]
)
button_row4 = Row(
    [
        ElevatedButton(text='0', expand=1, on_click=button_click),
        ElevatedButton(text='.', expand=1, on_click=button_click),
        ElevatedButton(
            text='=', expand=2, on_click=button_click,
            bgcolor=colors.GREEN_ACCENT, color=colors.AMBER
        ),
    ]
)
What have we changed exactly, hmm!
For the buttons, we could have used the width attribute but that won’t work as we want it would break the UI, feel free to test it.
But we have this expand attribute which allows only a Boolean and an int data type value.
For the normal buttons like the operators, numbers, and the clear button we expanded them to 1, and for the equals button, we expanded it by 2.
Now what does the expand attribute do, the expand attribute allows a control to fill the available space in a given container.
So the buttons with expand 1 will have an equal size of width and for the equals button it will expand 2, or in simple terms span two buttons or will equal two buttons in width.
Notice that we have added colors and background colors to some of our buttons to make them stand out from the numbers buttons.
Understand, great.
In the container add these attributes, just after the padding attribute to make it look more appealing and user friendly.
border_radius=border_radius.all(20),
Output
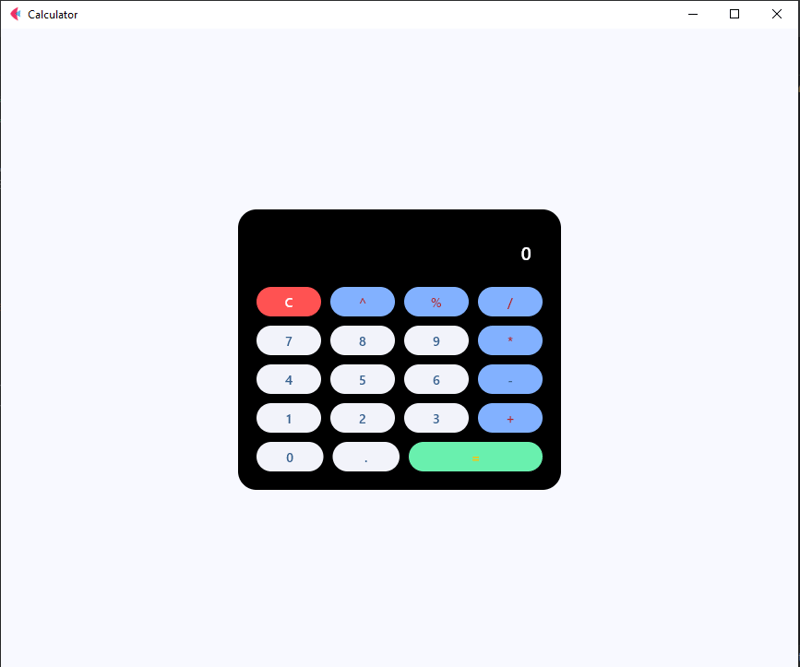
Now, you have a fully functional calculator built with Flet! Feel free to customize it to your liking or add more features. You can even package it as a standalone APK, AAB to launch on Google Play Store or Apple App Store
Here is the full code,
from flet import (
    app, Page, Container, Column, Row,
    TextField, colors, border_radius, ElevatedButton, TextAlign, TextStyle
)
from flet_core import ThemeMode


def main(page: Page):
    page.title = "Calculator"
    page.theme_mode = ThemeMode.DARK
    page.horizontal_alignment = page.vertical_alignment = 'center'
    result = TextField(
        hint_text='0', text_size=20,
        color='white', text_align=TextAlign.RIGHT,
        hint_style=TextStyle(
            color=colors.WHITE, size=20
        ),
        read_only=True
    )

    def button_click(e):
        if e.control.text == "=":
            try:
                result.value = str(eval(result.value))
            except Exception:
                result.value = "Error"
        elif e.control.text == "C":
            result.value = ""
        # elif e.control.text == "^":
        # logic for powers
        # pass
        else:
            result.value += e.control.text
        result.update()

    button_row0 = Row(
        [
            ElevatedButton(text='C', expand=1, on_click=button_click,
                           bgcolor=colors.RED_ACCENT, color=colors.WHITE),
            ElevatedButton(text='^', expand=1, on_click=button_click,
                           bgcolor=colors.BLUE_ACCENT_100,
                           color=colors.RED_900
                           ),
            ElevatedButton(text='%', expand=1, on_click=button_click,
                           bgcolor=colors.BLUE_ACCENT_100,
                           color=colors.RED_900
                           ),
            ElevatedButton(text='/', expand=1, on_click=button_click,
                           bgcolor=colors.BLUE_ACCENT_100,
                           color=colors.RED_900
                           ),
        ]
    )
    button_row1 = Row(
        [
            ElevatedButton(text='7', expand=1, on_click=button_click),
            ElevatedButton(text='8', expand=1, on_click=button_click),
            ElevatedButton(text='9', expand=1, on_click=button_click),
            ElevatedButton(text='*', expand=1, on_click=button_click,
                           bgcolor=colors.BLUE_ACCENT_100,
                           color=colors.RED_900
                           ),
        ]
    )
    button_row2 = Row(
        [
            ElevatedButton(text='4', expand=1, on_click=button_click),
            ElevatedButton(text='5', expand=1, on_click=button_click),
            ElevatedButton(text='6', expand=1, on_click=button_click),
            ElevatedButton(text='-', expand=1, on_click=button_click,
                           bgcolor=colors.BLUE_ACCENT_100
                           ),
        ]
    )
    button_row3 = Row(
        [
            ElevatedButton(text='1', expand=1, on_click=button_click),
            ElevatedButton(text='2', expand=1, on_click=button_click),
            ElevatedButton(text='3', expand=1, on_click=button_click),
            ElevatedButton(text='+', expand=1, on_click=button_click,
                           bgcolor=colors.BLUE_ACCENT_100,
                           color=colors.RED_900),
        ]
    )
    button_row4 = Row(
        [
            ElevatedButton(text='0', expand=1, on_click=button_click),
            ElevatedButton(text='.', expand=1, on_click=button_click),
            ElevatedButton(
                text='=', expand=2, on_click=button_click,
                bgcolor=colors.GREEN_ACCENT, color=colors.AMBER
            ),
        ]
    )
    container = Container(
        width=350, padding=20,
        bgcolor=colors.BLACK, border_radius=border_radius.all(20),
        content=Column(
            [
                result,
                button_row0, button_row1, button_row2,
                button_row3, button_row4
            ]
        )
    )
    page.add(container)


if __name__ == '__main__':
    app(target=main)
Conclusion
Building this calculator has been a fun experience for me and a learning experience for you, and I hope you enjoyed it too.
Let me know what kind of project you’d like to build using this framework or any other like PyQt, Kivy, or Tkinter. I’d be glad to make a tutorial on it. Or even web design and development tutorials, also are allowed.
Feel free to ask questions, I’ll do my best to answer them.
If you've read this far, thank you—I appreciate it!
以上がPython で Flet を使用して計算機を構築するの詳細内容です。詳細については、PHP 中国語 Web サイトの他の関連記事を参照してください。

ホットAIツール

Undress AI Tool
脱衣画像を無料で

Undresser.AI Undress
リアルなヌード写真を作成する AI 搭載アプリ

AI Clothes Remover
写真から衣服を削除するオンライン AI ツール。

Clothoff.io
AI衣類リムーバー

Video Face Swap
完全無料の AI 顔交換ツールを使用して、あらゆるビデオの顔を簡単に交換できます。

人気の記事
ホットツール

メモ帳++7.3.1
使いやすく無料のコードエディター

SublimeText3 中国語版
中国語版、とても使いやすい

ゼンドスタジオ 13.0.1
強力な PHP 統合開発環境

ドリームウィーバー CS6
ビジュアル Web 開発ツール

SublimeText3 Mac版
神レベルのコード編集ソフト(SublimeText3)


 完成したPython Blockbuster Online Viewing Entrant Python無料完成ウェブサイトコレクション
Jul 23, 2025 pm 12:36 PM
完成したPython Blockbuster Online Viewing Entrant Python無料完成ウェブサイトコレクション
Jul 23, 2025 pm 12:36 PM
この記事では、いくつかのトップPython「完成した」プロジェクトWebサイトと、高レベルの「大ヒット作「学習リソースポータル」が選択されています。開発のインスピレーション、観察、学習のマスターレベルのソースコードを探している場合でも、実用的な機能を体系的に改善している場合でも、これらのプラットフォームは見逃せず、Pythonマスターに迅速に成長するのに役立ちます。
 Python Run Shellコマンドの例
Jul 26, 2025 am 07:50 AM
Python Run Shellコマンドの例
Jul 26, 2025 am 07:50 AM
subprocess.run()を使用して、シェルコマンドを安全に実行し、出力をキャプチャします。注入リスクを避けるために、リストのパラメーターを渡すことをお勧めします。 2。シェル特性が必要な場合は、シェル= trueを設定できますが、コマンドインジェクションに注意してください。 3. subprocess.popenを使用して、リアルタイム出力処理を実現します。 4。Check = COMMATが失敗したときに例外をスローするためにtrueを設定します。 5.単純なシナリオで直接チェーンを呼び出して出力を取得できます。 os.system()または非推奨モジュールの使用を避けるために、日常生活の中でsubprocess.run()を優先する必要があります。上記の方法は、Pythonでシェルコマンドを実行するコアの使用を上書きします。
 量子機械学習用のPython
Jul 21, 2025 am 02:48 AM
量子機械学習用のPython
Jul 21, 2025 am 02:48 AM
Quantum Machine Learning(QML)を開始するには、優先ツールがPythonであり、Pennylane、Qiskit、Tensorflowquantum、Pytorchquantumなどのライブラリをインストールする必要があります。次に、Pennylaneを使用して量子ニューラルネットワークを構築するなど、例を実行してプロセスに慣れます。次に、データセットの準備、データエンコード、パラメトリック量子回路の構築、古典的なオプティマイザートレーニングなどの手順に従ってモデルを実装します。実際の戦闘では、最初から複雑なモデルを追求したり、ハードウェアの制限に注意を払ったり、ハイブリッドモデル構造を採用したり、開発をフォローアップするための最新のドキュメントと公式文書を継続的に参照することを避ける必要があります。
 PythonのWeb APIからのデータへのアクセス
Jul 16, 2025 am 04:52 AM
PythonのWeb APIからのデータへのアクセス
Jul 16, 2025 am 04:52 AM
Pythonを使用してWebAPIを呼び出してデータを取得するための鍵は、基本的なプロセスと共通のツールをマスターすることです。 1.リクエストを使用してHTTPリクエストを開始することが最も直接的な方法です。 GETメソッドを使用して応答を取得し、json()を使用してデータを解析します。 2。認証が必要なAPIの場合、ヘッダーからトークンまたはキーを追加できます。 3.応答ステータスコードを確認する必要があります。respons.raise_for_status()を使用して、例外を自動的に処理することをお勧めします。 4.ページングインターフェイスに直面すると、さまざまなページを順番にリクエストし、遅延を追加して周波数制限を回避できます。 5.返されたJSONデータを処理する場合、構造に従って情報を抽出する必要があり、複雑なデータをデータに変換できます
 Python Seabornジョイントプロットの例
Jul 26, 2025 am 08:11 AM
Python Seabornジョイントプロットの例
Jul 26, 2025 am 08:11 AM
Seabornのジョイントプロットを使用して、2つの変数間の関係と分布をすばやく視覚化します。 2。基本的な散布図は、sns.jointplot(data = tips、x = "total_bill"、y = "tip"、dind = "scatter")によって実装され、中心は散布図であり、ヒストグラムは上部と右側と右側に表示されます。 3.回帰線と密度情報をdind = "reg"に追加し、marminal_kwsを組み合わせてエッジプロットスタイルを設定します。 4。データ量が大きい場合は、「ヘックス」を使用することをお勧めします。
 Pythonの文字列のリストに参加する方法
Jul 18, 2025 am 02:15 AM
Pythonの文字列のリストに参加する方法
Jul 18, 2025 am 02:15 AM
Pythonでは、Join()メソッドを使用して文字列をマージするときに次の点に注意する必要があります。1。str.join()メソッドを使用し、前の文字列は呼び出し時にリンカーとして使用され、ブラケットの反復オブジェクトには接続する文字列が含まれています。 2。リスト内の要素がすべて文字列であることを確認し、非弦タイプが含まれている場合は、最初に変換する必要があります。 3.ネストされたリストを処理する場合、接続する前に構造を平らにする必要があります。
 パイソンリストへの変換の例
Jul 26, 2025 am 08:00 AM
パイソンリストへの変換の例
Jul 26, 2025 am 08:00 AM
文字列リストは、 '' .join(words)などのJoIn()メソッドとマージして、「Helloworldfrompython」を取得できます。 2。NUMBERリストは、参加する前にMAP(STR、数字)または[STR(x)forxinNumbers]を備えた文字列に変換する必要があります。 3.任意のタイプリストは、デバッグに適したブラケットと引用符のある文字列に直接変換できます。 4。カスタム形式は、 '|' .join(f "[{item}]" foriteminitems)output "[a] | [などのjoin()と組み合わせたジェネレーター式によって実装できます。
 Python Webスクレイピングチュートリアル
Jul 21, 2025 am 02:39 AM
Python Webスクレイピングチュートリアル
Jul 21, 2025 am 02:39 AM
Python Web Crawlersをマスターするには、3つのコアステップを把握する必要があります。1。リクエストを使用してリクエストを開始し、メソッドを取得してWebページのコンテンツを取得し、ヘッダーの設定に注意を払い、例外を処理し、robots.txtを遵守します。 2。美しいソープまたはXPathを使用してデータを抽出します。前者は単純な解析に適していますが、後者はより柔軟で複雑な構造に適しています。 3.セレンを使用して、動的読み込みコンテンツのブラウザ操作をシミュレートします。速度は遅いですが、複雑なページに対処できます。また、効率を向上させるために、WebサイトAPIインターフェイスを見つけることもできます。
