Flask と Django は 2 つの主要な Python Web フレームワークであり、どちらも開発者が Web サイトを迅速に構築するのに役立ちますが、そのアプローチは大きく異なります。この記事では、各フレームワークが何をするのか、どのように機能するのか、そして開発者が一方を選択する理由について見ていきます。これらの違いを実証するために、Hello World アプリ、個人 Web サイト、To Do プロジェクトという 3 つの異なるプロジェクトを最初から構築します。これにより、それらがどのように機能するかを自分の目で確認し、ニーズに最適な決定を下すことができます。
データベース主導の Web サイトには、URL ルーティング、ロジック、データベースへの接続、HTML テンプレートのレンダリング、ユーザー認証など、非常に類似したニーズがあります。 World Wide Web の初期の頃、開発者は Web サイト自体の作業を開始する前に、これらすべての部分を自分で構築する必要がありました。
オープンソースの Web フレームワークが間もなく登場し、開発者のグループがこの課題に協力してベスト プラクティスを共有し、コードをレビューできるようになり、通常、誰かが新しい Web サイトを構築するたびに車輪の再発明を行う必要がなくなります。すべての主要なプログラミング言語に Web フレームワークがあり、Ruby で書かれた Ruby on Rails、PHP で書かれた Laravel、Java で書かれた Spring、Python の 2 つのフレームワーク (ここで取り上げる Flask と Django) などの注目すべき例が含まれます。
プログラミングに慣れていない人は、Python の「フレームワーク」と「ライブラリ」という用語を聞くと混乱するかもしれません。どちらもソフトウェアを指しますが、違いは複雑さです。ライブラリは特定の問題に焦点を当てていますが、フレームワークはより大きな課題に取り組み、そのために多くの小さなライブラリが組み込まれていることがよくあります。これから説明するように、Flask と Django は両方ともかなりの数の Python ライブラリに依存しています。
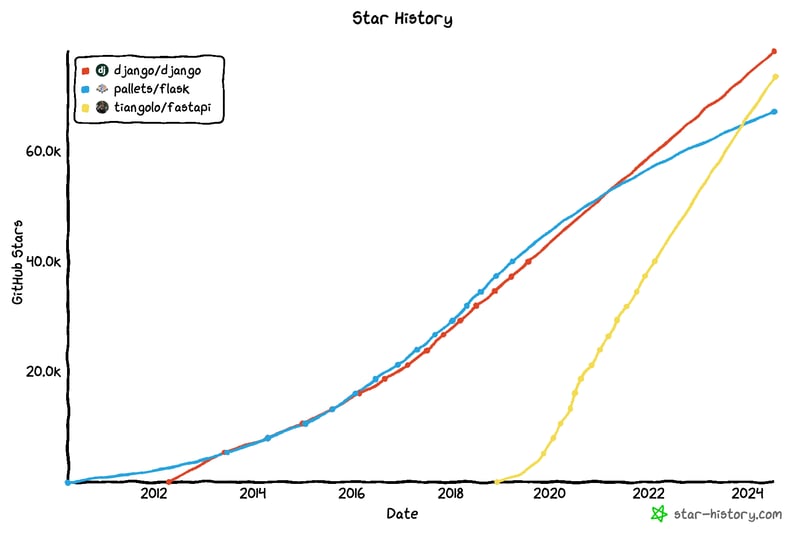
GitHub のスターを見ると、Flask と Django は比較的互角ですが、FastAPI が爆発的に成長しており、Python Web フレームワークのトップ 3 に明確に定着していることがわかります。

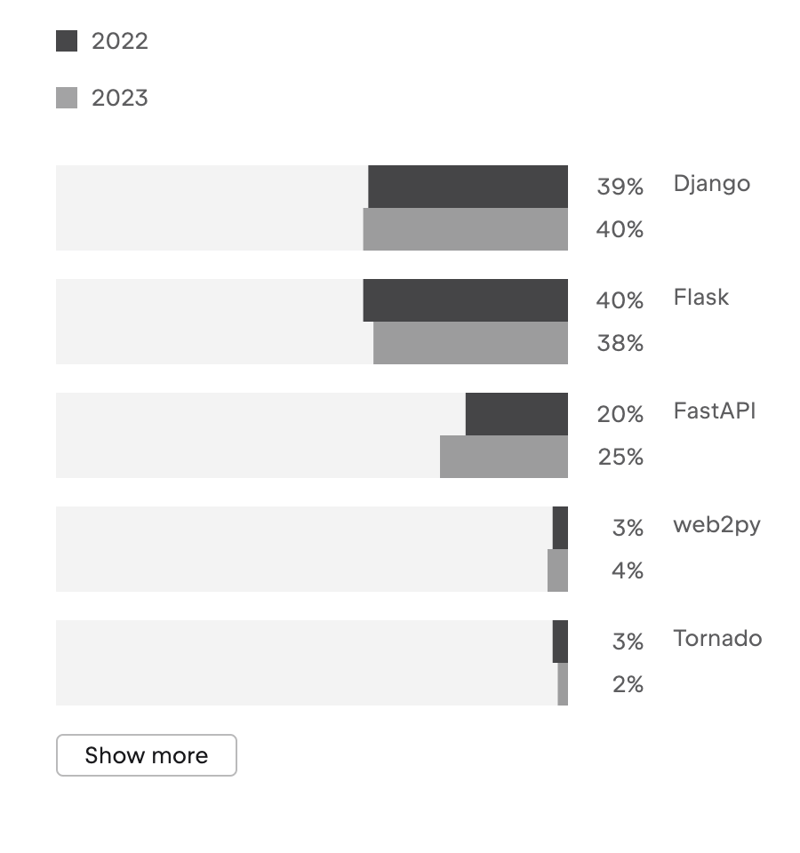
2023 年の Python 開発者調査では、2023 年に Django が Flask をわずかに上回っていますが、FastAPI も勢いを増していることが示されています。

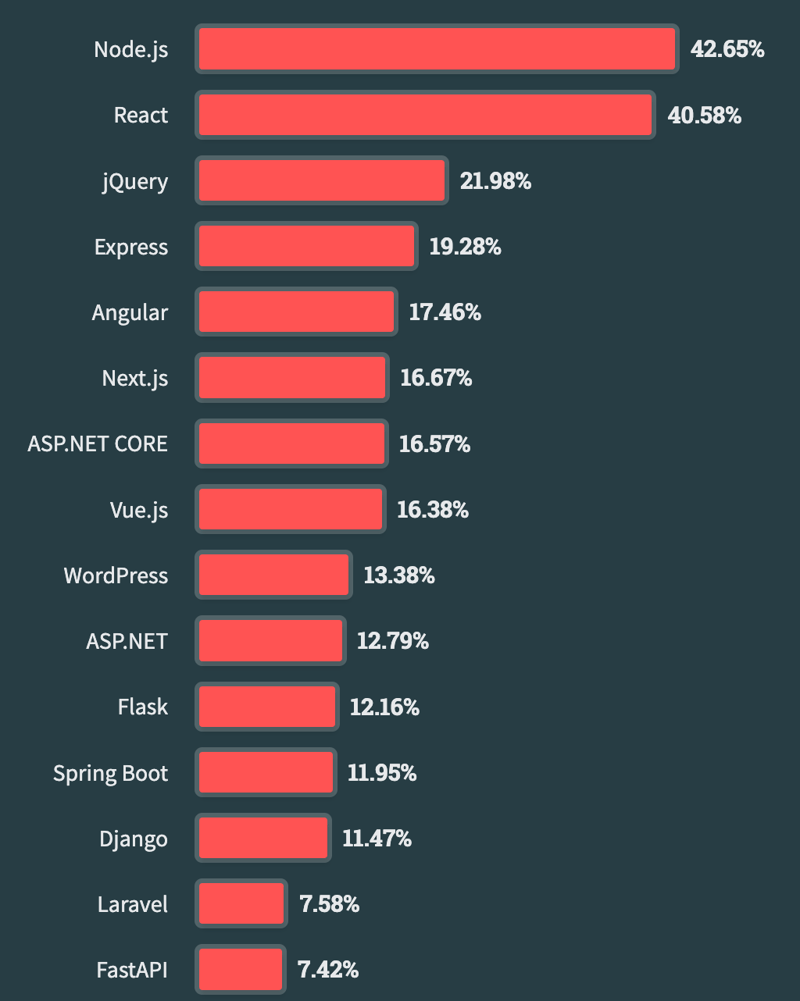
Stack Overflow によるすべてのプログラミング言語の開発者を対象とした 2023 年の調査では、Flask がわずかにリードしていますが、ほぼすぐに Django が続き、FastAPI は少し遅れています。

これらの比較は、傾向を知るには興味深いものですが、多くのことを説明するものではありません。たとえば、Web フレームワークが人気があるということは、実際の企業やプロの開発者がそれを使用していることを意味するのでしょうか、それとも単に初心者が試してみたいものなのでしょうか?
比較指標に関係なく、Flask と Django が現在 Python Web フレームワークのトップ 2 であることは明らかです。
Python Web 開発者としての仕事を探しているのであれば、Django がより良い選択です。 Indeed.com などの主要な求人サイトには、Django 開発者のリストが Flask のほぼ 2 倍あります。
ただし、この違いは、Django が Flask よりもはるかに具体的な選択であるためと考えられます。スタートアップや企業は Django だけでほぼすべてのサービスを実行できますが、Flask はフットプリントが軽いため、他のテクノロジーと併用されることがよくあります。
最も採用可能なアプローチは、まず Python を完全にマスターし、次に Django または Flask (理想的には両方!) のいずれかで Web 開発の知識を追加することです。
Django には、2 つのコミュニティのうち、より大規模で組織化されたコミュニティがあります。 Django コードベースのコミッターは 1,800 名を超えていますが、Flask のコミッターは約 550 名です。 StackOverflow には、Django の質問が約 212,500 件あるのに対し、Flask の質問は約 31,500 件あります。
Django は、米国、ヨーロッパ、オーストラリアでも年次カンファレンスを開催しています。 Flask には同様のレベルのカンファレンスはありませんが、PyCon イベントでは両方のフレームワークについて活発な議論が行われています。
Flask は意図的に最小限かつ柔軟に設計されたマイクロフレームワークであり、明らかにその有用性を制限しません。これから説明するように、この設計上の決定には長所と短所の両方が伴います。
Flask は、2010 年に Armin Ronacher によってエイプリル フールのジョークとして始まり、Sinatra Ruby フレームワークに触発されました。 FLask は、単一の Python ファイルに収まるほどシンプルであることを意図しており、そのユーモラスな起源にもかかわらず、Flask はそのシンプルさと柔軟性によりすぐに人気を博しました。
Flask 自体のコードベースは非常に小さく、2 つの主要な依存関係である Werkzeug と Jinja に大きく依存しています。どちらも最初に Armin Ronacher によって作成されました。
Werkzeug は、Flask のコア機能を提供する WSGI (Web Server Gateway Interface) ツールキットです。 HTTP リクエストとレスポンス、URL ルーティング システム、組み込み開発サーバー、対話型デバッガー、テスト クライアント、ミドルウェアを処理します。 Jinja は、基本的なロジック、変数、if/else ループ、テンプレートの継承などのための独自の構文を備えた動的 HTML ドキュメントの生成に使用されるテンプレート エンジンです。
Flask は特定の構造を指定していませんが、Ruby on Rails などの他の Web フレームワークに共通の Model-View-Controller (MVC) パターンでよく使用されます。
Flask のマイクロフレームワーク アーキテクチャは、いくつかのタスクを非常にうまく実行し、残りの実装はサードパーティのライブラリ (および開発者) に依存することを意味します。このアプローチは、Django に組み込まれているすべての付加機能を必要としない小規模な Web アプリケーションに適しています。逆に、アプリケーションを完全に制御することを要求する経験豊富なプログラマーは Flask を好むことがよくありますが、これは Django のような完全なフレームワークを使用する場合よりも多くの設計上の決定を行うことを意味します。
Django は、迅速な開発とクリーンで実用的な設計を促進する高レベルの Python Web フレームワークです。これは、Lawrence Journal-World 新聞で作成され、2005 年に公開されました。「高レベル」とは、Django が、ほとんどのユースケースに内蔵の「バッテリー」を提供することで、Web アプリケーションのプロセス中に必要な実際のコーディングを最小限に抑えるように設計されていることを意味します。これには、ORM (オブジェクト リレーショナル マッパー)、URL ルーティング、テンプレート エンジン、フォーム処理、認証システム、管理インターフェイス、堅牢なセキュリティ機能が含まれます。 Flask では、開発者はこれらのさまざまな機能を選択して実装する必要がありますが、Django では、それらはすぐに使えるように組み込まれています。
Django は非営利の Django Software Foundation によって管理されており、新しいリリース、広範なドキュメント、活発なオンライン コミュニティ、コミュニティが運営する定期的なカンファレンスに取り組んでいる大規模な熱心なコミュニティが背後にあります。
Django は、関心の分離を強調するモデル-ビュー-テンプレート (MVT) パターンと呼ばれる MVC アーキテクチャのバリアントに従っています。
4 番目のコンポーネントであるURLsも含まれており、URL ルーティングを処理するために使用され、ユーザー リクエストを特定のビューと照合して応答を生成します。
Python はすでにコンピューターにインストールされているはずなので、必要なのは仮想環境を作成して Flask をインストールすることだけです。
テキスト エディタを使用して、hello.py という名前の新しいファイルを作成します。 Flask が Hello World Web ページに必要とするのは 5 行だけであることは有名です。
このコードは先頭で Flask クラスをインポートし、次の行で app というインスタンスを作成します。 Route() デコレータは、どの URL が関数をトリガーするかを Flask に指示します。ここでは / のホームページに設定されています。次に、関数 hello_world は段落
間の HTML 文字列を返します。私たちのメッセージを含むタグ。
コードを実行するには、flask run コマンドを使用します。
Web ブラウザで 127.0.0.1:5000 に移動すると、メッセージが表示されます。 Flask はデフォルトでポート 5000 を使用します。

これは可能な限りシンプルであり、単一ファイルで Web アプリケーションを作成する試みとしての Flask のルーツと、その固有の柔軟性の一例の両方を物語っています。
Django のドキュメントには同様のクイックスタート ガイドが提供されていませんが、あと数行のコードを追加するだけで同様の偉業を達成できます。実際、これを行うことは、経験豊富な Django 開発者の間ではちょっとした難問になっており、これらの取り組み専用のリポジトリ全体、django-microframework が存在します。オプション 2 を選択します。これは最も簡潔ではありませんが、他のアプローチよりも理解しやすいです。
Navigate to a new directory, perhaps called django on your Desktop, and create a virtual environment containing Django.
# Windows > cd onedrive\desktop\code > mkdir django > cd django > python -m venv .venv > .venv\Scripts\Activate.ps1 (.venv) > python -m pip install django # macOS % cd ~/desktop/code % mkdir django % cd django % python3 -m venv .venv % source .venv/bin/activate (.venv) % python3 -m pip install django
In your text editor create a hello_django.py file with the following code:
# hello_django.py from django.conf import settings from django.core.handlers.wsgi import WSGIHandler from django.core.management import execute_from_command_line from django.http import HttpResponse from django.urls import path settings.configure( ROOT_URLCONF=__name__, DEBUG=True, ) def hello_world(request): return HttpResponse("Hello, Django!") urlpatterns = [path("", hello_world)] application = WSGIHandler() if __name__ == "__main__": execute_from_command_line()
Django is designed for larger web application and typically relies on a global settings.py file for many configurations, however we can import what we need in a single file. The key points of reference are the hello_world function that returns the string, "Hello, Django!" and the urlpatterns defining our URL routes, namely at "", meaning the empty string, so the homepage.
Start up Django's built-in server using the runserver command
(.venv) > python hello_django.py runserver Watching for file changes with StatReloader Performing system checks... System check identified no issues (0 silenced). July 17, 2024 - 13:48:54 Django version 5.0, using settings None Starting development server at http://127.0.0.1:8000/ Quit the server with CONTROL-C.
Navigate to Django's standard port of 8000, http://127.0.0.1:8000/, to see the "Hello, Django!" message.

Django required tweleve lines of code rather than Flask's five, but both these examples are intended as quickstart guides; they are not how you structure a real-world Flask or Django app.
Now let's build a Personal Website with a home page and an about page. This will give a chance to introduce templates and repeat some of the patterns we saw around how routes are defined in Flask.
Update the app.py file as follows:
from flask import Flask, render_template app = Flask(__name__) @app.route('/') def home(): return render_template('home.html') @app.route('/about') def about(): return render_template('about.html') if __name__ == '__main__': app.run(debug=True)
Both the home and about View functions now return a template. We're also using the route() decorator again to define the URL path for each. We've also added debug=True at the bottom so that the development server runs now in debug mode.
The next step is creating our two templates. Flask will look for template files in a templates directory so create that now.
(.venv) $ mkdir templates
Within it add the two files with the following code:
    Personal Website
  Welcome to My Website About Me
    About Me
  About Me This is my personal website. Home
Each file use the method url_for to define links based on the view function name.
Run the server again with flask run and navigate to the homepage:

Then click the "About Me" link.

This is a rudimentary example but you can start to see how templates and views interact in Flask. We still have only one main Python file powering the whole thing, but once we have many more pages and start to introduce logic, the single-file approach stops making sense and it's time to start organizing the Flask app in different ways. There are some common patterns used in the Flask community, however, it is ultimately up to the developer.
Django is designed for full-bodied web applications so building a Personal Website is a chance to see this in action. We'll start by creating a project, which is the central hub for our website, using the startproject command.
(.venv) $ django-admin startproject django_project .
We've named the project django_project here. Adding the period, ., means the new folder and files are installed in the current directory. If you don't have the period Django creates a new directory andthenadds the project folder and files there.
This is what your directory should look like now. The hello_django.py file remains and can either be left there or removed entirely: we will no longer use it. There is an entirely new django_project folder containing several files and a manage.py file used for running Django commands.
├── django_project │ ├── __init__.py │ ├── asgi.py │ ├── settings.py │ ├── urls.py │ └── wsgi.py ├── hello_django.py └── manage.py
We want to create an app now using thes startapp command which will be called pages. A single Django project typically has multiple apps for different functionality. If we added user registration that code should be in its own app, same for payments, and so on. This is a way to help developers reason better about their code.
(.venv) $ python manage.py startapp pages.
This command creates a pages directory with the following files:
└── pages ├── __init__.py ├── admin.py ├── apps.py ├── migrations │ └── __init__.py ├── models.py ├── tests.py └── views.py
Our first step is updating the django_project/settings.py file to tell Django about our new app. This is a global settings file for the entire project.
# django_project/settings.py INSTALLED_APPS = [ "django.contrib.admin", "django.contrib.auth", "django.contrib.contenttypes", "django.contrib.sessions", "django.contrib.messages", "django.contrib.staticfiles", "pages", # new ]
Second, update the django_project/urls.py file. When a URL request comes in it will hit this file first and then be either processed or redirected to a specific app. In this case, we want to send requests to the pages app. To do this we'll import include and set a new path at "", meaning the homepage. Django defaults to including the URL configuration for the built-in admin, a powerful visual way to interact with your database.
# django_project/urls.py from django.contrib import admin from django.urls import path, include # new urlpatterns = [ path("admin/", admin.site.urls), path("", include("pages.urls")), # new ]
Within the pages app we need a view and a URLs file. Let's start with the view at pages/views.py.
# pages/views.py from django.shortcuts import render def home(request): return render(request, "home.html") def about(request): return render(request, "about.html")
In Django, views receive web requests and return web responses. The request parameter is an object containing metadata about the request from the user. We'll define two function-based views here, home and about, that use the shortcut function render to combine a template with an HttpResponse object sent back to the user. The two templates are home.html and about.html.
For the templates, we can create a templates directory within pages, then another directory with the app name, and finally our template files. This approach removes any concerns about confusing the Django template loader in larger projects.
(.venv) $ mkdir pages/templates (.venv) $ mkdir pages/templates/pages
Then in your text editor add two new files: pages/templates/pages/home.html and pages/templates/pages/about.html.
    Personal Website
  Welcome to My Website About Me
    About Me
  About Me This is my personal website. Home
The final step is configuring the URLs for these two pages. To do this, create a urls.py file within the pages app with the following code.
# pages/urls.py from django.urls import path from . import views urlpatterns = [ path("", views.home, name="home"), path("about/", views.about, name="about"), ]
At the top we import our views and then set a URL path for each. The syntax is defining the URL path, the view name, and optionally adding a URL name that allows us to link to each path in our templates.
Start up the Django local server with the runserver command.
(.venv) $ python manage.py runserver
You can see the homepage:

Click the "About Me" to be redirected to the about page:

As you can see Django required more scaffolding than Flask, however this approach provides a consistent structure that is quite scaleable.
The true comparison of these web frameworks depends on your project's needs. Are you building a traditional web application that connects to a database, requires CRUD (Create-Read-Update-Delete) functionality, and user authentication? If yes, Django has built-in solutions for all of these needs. By comparison, Flask requires installing multiple third-party libraries: Flask-SQLAlchemy to connect to the database, Flask-Migrate to manage database migrations, Flask-WTF and WTForms for forms, Flask-Login for user authentication, FLask-Mail for email support, Flask-Security for security features, Flask-Admin for an admin interface to manage application data, Flask-Caching for caching support, Flask-BCrypt for password hashing and so on.
The power of Django is that you don't have to worry about any of these things. They are included, tested, and supported by the community. For Flask, the third-party libraries are not as tightly integrated and require more manual installation by the developer. This affords greater flexibility but also requires more programmer expertise.
Ultimately, you can't go wrong choosing Flask or Django for your web application needs. They both are mature, scaleable, and well-documented. This difference is in approach and the best way to determine what you prefer is to try each out by building more complex projects.
If you're interested in learning more about Django, check out Django for Beginners for a guide to building six progressively more complex web applications including testing and deployment. For Flask, the Flask Mega-Tutorial has a free online version. There are also two courses over at TestDriven.io worth recommending: TDD with Python, Flask and Docker and Authentication with Flask, React, and Docker. If you prefer video, there are many Flask courses on Udemy but the best video course I've seen is Build a SaaS App with Flask and Docker.
以上がPython Web フレームワークの包括的な比較における Flask と Djangoの詳細内容です。詳細については、PHP 中国語 Web サイトの他の関連記事を参照してください。