


JWT (JSON Web Token) は、二者間 (クライアントとサーバーなど) で情報を JSON オブジェクトとして安全に送信するための方法です。コンパクトかつ URL セーフになるように設計されているため、URL やヘッダー内で簡単に渡すことができます。
ヘッダー
ヘッダーは通常、トークンのタイプ (JWT) と使用されている署名アルゴリズム (HMAC SHA256 や RSA など) の 2 つの部分で構成されます。
{
"alg":"HS256",
"タイプ":"JWT"
}
ペイロード
ここに実際のデータが保存されます。これには、ユーザー ID、ロール、有効期限、その他のクレーム (ユーザーまたはセッションに関するデータ) などの情報が含まれる場合があります。
{
"メール":"ayushstwt@gmail.com",
"名前":"アユシュ"
}
署名
トークンの整合性を保証します。これは、トークンが変更されていないことを保証するセキュリティ機能です。これは、指定されたアルゴリズムを使用して、エンコードされたヘッダーとペイロードを秘密キーと組み合わせることで作成されます。この署名は、サーバーがトークンが正当なものであり、改ざんされていないことを検証するのに役立ちます。
資格情報を繰り返し送信する必要はありません:JWT を使用すると、リクエストのたびにユーザー名とパスワードを送信する必要がありません。代わりに、一度ログインすると、サーバーからトークンが与えられます。その後、リクエストごとにこのトークンを送信して身元を証明し、プロセスをより安全かつ効率的にします。
組み込みの有効期限:各 JWT には有効期限があり、特定の期間のみ有効であることを意味します。これにより、トークンが何らかの方法で傍受された場合に長期にわたる悪用のリスクが軽減されます。有効期限が切れると、ユーザーは再度ログインして新しいトークンを取得する必要があり、セキュリティ層が追加されます。
Spring Boot を使用したJWT は、ログイン後にトークンを発行することでユーザー認証を安全に管理します。これらのトークンはリクエストごとに送信されるため、資格情報を繰り返し送信することなく、安全でステートレスな通信が保証されます。
ステートレス通信は、サーバーが過去のリクエストを覚えていないことを意味します。各リクエストには必要なもの (JWT など) がすべて含まれるため、サーバーはセッション情報を保存しません。Java Spring Boot アプリケーションに JWT を実装するには、いくつかの手順が必要です。始めるための簡単な概要は次のとおりです:
1.依存関係を追加します
必要な依存関係を pom.xml ファイルに含めます
リーリーJWT を使用して Spring-Boot アプリケーションを作成するために必要なすべての依存関係
次のようなさまざまな種類の依存関係を使用しています
Spring Boot Starter Actuator: 3.3.3 - モニタリングやヘルスチェックなどの実稼働対応機能を追加します。
 3. application.properties ファイルに構成を追加します
リーリー
4. USER エンティティを作成します
リーリー** 5. サービス、リポジトリのクラス、インターフェイスを作成します**
サービス.java
6.ログインとサインインのリクエストとレスポンス用の DTO を作成します
loginDTO.javaを作成する
リーリーloginResponse.java
DTO.java を登録する
RegisterResponse.java
*
7. API からカスタム応答を送信するには、ResponseHandler.java *
を使用します。
package com.tier3Hub.user_auth_service.utils; import org.springframework.http.HttpStatus; import org.springframework.http.ResponseEntity; import java.util.HashMap; import java.util.Map; public class ResponseHandler { public static ResponseEntity
8. for storing some constants we create the class inside the utils package that is ApplicationConstants.java
package com.tier3Hub.user_auth_service.utils; public class AppConstants { public static final String[] PUBLIC_URLS = { "/v3/api-docs/**", "/swagger-ui/**", "/api/auth/register/**", "/api/auth/login/**","/api/auth/registerAdmin/**" }; }
9. for converting the object one to another we use the dependency that is model mapper for configuration that we create the class inside the config package that is ApplicationConfigs.java
package com.tier3Hub.user_auth_service.config; import org.modelmapper.ModelMapper; import org.springframework.context.annotation.Bean; import org.springframework.context.annotation.Configuration; @Configuration public class ApplicationConfigs { @Bean public ModelMapper modelMapper() { return new ModelMapper(); } }
**
This is the basic setup that we do for every spring-boot application we create now securing the rest endpoint with JWT we started.
**
now inside the security package we create the class called JWTFilter.java
The JWTFilter is a custom Spring Security filter that intercepts HTTP requests to validate JWTs. It checks for the "Authorization" header, extracts the token, and retrieves the username. If the token is valid, it creates an authentication token with user details and sets it in the security context, allowing the application to recognize the authenticated user for further processing.
package com.tier3Hub.user_auth_service.security; import jakarta.servlet.FilterChain; import jakarta.servlet.ServletException; import jakarta.servlet.http.HttpServletRequest; import jakarta.servlet.http.HttpServletResponse; import org.springframework.beans.factory.annotation.Autowired; import org.springframework.security.authentication.UsernamePasswordAuthenticationToken; import org.springframework.security.core.context.SecurityContextHolder; import org.springframework.security.core.userdetails.UserDetails; import org.springframework.security.core.userdetails.UserDetailsService; import org.springframework.security.web.authentication.WebAuthenticationDetailsSource; import org.springframework.stereotype.Service; import org.springframework.web.filter.OncePerRequestFilter; import java.io.IOException; @Service public class JWTFilter extends OncePerRequestFilter { @Autowired private UserDetailsService userDetailsService; @Autowired private JWTUtil jwtUtil; @Override protected void doFilterInternal(HttpServletRequest request, HttpServletResponse response, FilterChain chain) throws ServletException, IOException { String authorizationHeader = request.getHeader("Authorization"); String username = null; String jwt = null; if (authorizationHeader != null && authorizationHeader.startsWith("Bearer ")) { jwt = authorizationHeader.substring(7); username = jwtUtil.extractUsername(jwt); } if (username != null) { UserDetails userDetails = userDetailsService.loadUserByUsername(username); if (jwtUtil.validateToken(jwt)) { UsernamePasswordAuthenticationToken auth = new UsernamePasswordAuthenticationToken(userDetails, null, userDetails.getAuthorities()); auth.setDetails(new WebAuthenticationDetailsSource().buildDetails(request)); SecurityContextHolder.getContext().setAuthentication(auth); } } chain.doFilter(request, response); } }
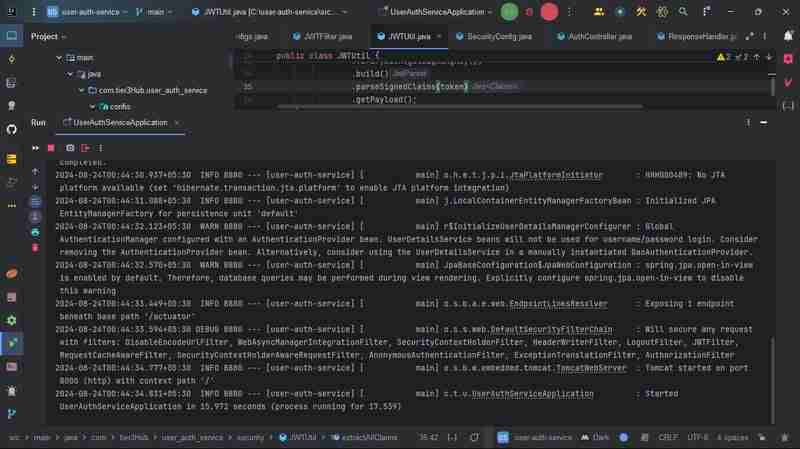
create the class JWTUtil.java
The JWTUtil class manages JWT operations, including extracting usernames and expiration dates from tokens. It generates new tokens using a secret key and validates existing tokens by checking their expiration. The class uses HMAC for signing and includes methods to parse claims and determine if tokens are expired, ensuring secure authentication and authorization in the application.
package com.tier3Hub.user_auth_service.security; import io.jsonwebtoken.Claims; import io.jsonwebtoken.Jwts; import io.jsonwebtoken.security.Keys; import org.springframework.stereotype.Service; import javax.crypto.SecretKey; import java.util.Date; import java.util.HashMap; import java.util.Map; @Service public class JWTUtil { private String SECRET_KEY = "TaK+HaV^uvCHEFsEVfypW#7g9^k*Z8$V"; private SecretKey getSigningKey() { return Keys.hmacShaKeyFor(SECRET_KEY.getBytes()); } public String extractUsername(String token) { Claims claims = extractAllClaims(token); return claims.getSubject(); } public Date extractExpiration(String token) { return extractAllClaims(token).getExpiration(); } private Claims extractAllClaims(String token) { return Jwts.parser() .verifyWith(getSigningKey()) .build() .parseSignedClaims(token) .getPayload(); } private Boolean isTokenExpired(String token) { return extractExpiration(token).before(new Date()); } public String generateToken(String username) { Map claims = new HashMap<>(); return createToken(claims, username); } private String createToken(Map claims, String subject) { return Jwts.builder() .claims(claims) .subject(subject) .header().empty().add("typ","JWT") .and() .issuedAt(new Date(System.currentTimeMillis())) .expiration(new Date(System.currentTimeMillis() + 1000 * 60 * 50)) // 5 minutes expiration time .signWith(getSigningKey()) .compact(); } public Boolean validateToken(String token) { return !isTokenExpired(token); } }
*configure the Spring security and add some modifictaion we create the class SecurityConfig.java *
The SecurityConfig class sets up security for the application using Spring Security. It defines access rules, allowing public endpoints while restricting others based on user roles. The class incorporates a JWT filter to validate tokens and uses BCrypt for password encoding. It also configures an authentication manager with a custom user details service for secure user authentication.
package com.tier3Hub.user_auth_service.config; import com.tier3Hub.user_auth_service.security.JWTFilter; import com.tier3Hub.user_auth_service.service.UserInfoConfigManager; import com.tier3Hub.user_auth_service.utils.AppConstants; import org.springframework.beans.factory.annotation.Autowired; import org.springframework.context.annotation.Bean; import org.springframework.context.annotation.Configuration; import org.springframework.security.authentication.AuthenticationManager; import org.springframework.security.config.annotation.authentication.builders.AuthenticationManagerBuilder; import org.springframework.security.config.annotation.authentication.configuration.AuthenticationConfiguration; import org.springframework.security.config.annotation.web.builders.HttpSecurity; import org.springframework.security.config.annotation.web.configuration.EnableWebSecurity; import org.springframework.security.config.annotation.web.configurers.AbstractHttpConfigurer; import org.springframework.security.crypto.bcrypt.BCryptPasswordEncoder; import org.springframework.security.crypto.password.PasswordEncoder; import org.springframework.security.web.SecurityFilterChain; import org.springframework.security.web.authentication.UsernamePasswordAuthenticationFilter; @Configuration @EnableWebSecurity public class SecurityConfig { @Autowired private JWTFilter jwtFilter; @Autowired private UserInfoConfigManager userInfoConfigManager; @Bean public SecurityFilterChain securityFilterChain(HttpSecurity http) throws Exception { return http.authorizeHttpRequests(request -> request .requestMatchers(AppConstants.PUBLIC_URLS).permitAll() .requestMatchers("/api/test/public/hello/**").hasAnyRole("USER","ADMIN") .requestMatchers("/api/test/private/**").hasRole("ADMIN") .anyRequest() .authenticated()) .csrf(AbstractHttpConfigurer::disable) .addFilterBefore(jwtFilter, UsernamePasswordAuthenticationFilter.class) .build(); } @Autowired public void configureGlobal(AuthenticationManagerBuilder auth) throws Exception { auth.userDetailsService(userInfoConfigManager).passwordEncoder(passwordEncoder()); } @Bean public PasswordEncoder passwordEncoder() { return new BCryptPasswordEncoder(); } @Bean public AuthenticationManager authenticationManager(AuthenticationConfiguration auth) throws Exception { return auth.getAuthenticationManager(); } }
The securityFilterChain method configures access rules for different API endpoints in the Spring application. It permits public URLs and applies role-based access control for user and admin roles. Role-based authentication restricts resource access based on user roles (e.g., USER, ADMIN). In Spring Boot, you define roles and configure security settings in the SecurityConfig class to specify access permissions. During user registration, assign roles, and use annotations like @PreAuthorize to enforce role checks in controllers. This approach enhances security, allows easy permission management, and simplifies user access rights as the application scales. Implementing role-based auth provides flexibility and maintainability for your user management system. CSRF protection is disabled, and a custom JWT filter is added to authenticate requests based on JSON Web Tokens, ensuring secure and controlled access to resources.
configureGlobal method handle configures global authentication settings in a Spring application. It uses a custom user details service for loading user data and a BCrypt password encoder for secure password hashing. Additionally, it provides an AuthenticationManager bean for handling authentication processes, ensuring a secure and efficient user authentication system that leverages strong password management practices.
create the endpoints for register and login
package com.tier3Hub.user_auth_service.Controller; import com.tier3Hub.user_auth_service.dto.LoginDTO; import com.tier3Hub.user_auth_service.dto.LoginResponse; import com.tier3Hub.user_auth_service.dto.RegisterDTO; import com.tier3Hub.user_auth_service.security.JWTUtil; import com.tier3Hub.user_auth_service.service.AuthService; import com.tier3Hub.user_auth_service.service.UserInfoConfigManager; import com.tier3Hub.user_auth_service.utils.ResponseHandler; import jakarta.validation.Valid; import org.springframework.beans.factory.annotation.Autowired; import org.springframework.http.HttpStatus; import org.springframework.http.ResponseEntity; import org.springframework.security.authentication.AuthenticationManager; import org.springframework.security.authentication.UsernamePasswordAuthenticationToken; import org.springframework.security.core.Authentication; import org.springframework.security.core.context.SecurityContext; import org.springframework.security.core.userdetails.UserDetails; import org.springframework.web.bind.annotation.PostMapping; import org.springframework.web.bind.annotation.RequestBody; import org.springframework.web.bind.annotation.RequestMapping; import org.springframework.web.bind.annotation.RestController; @RestController @RequestMapping("/api/auth") public class AuthController { @Autowired JWTUtil jwtUtil; @Autowired AuthService authService; @Autowired AuthenticationManager authenticationManager; @Autowired private UserInfoConfigManager userInfoConfigManager; @PostMapping("/register") public ResponseEntity
This login method in the AuthController handles user login requests. It takes a LoginDTO containing the username and password, validates them, and attempts authentication using the AuthenticationManager. Upon successful authentication, it retrieves user details and generates a JWT token using the JWTUtil class. The token is then included in a LoginResponse object and returned with a success message. If authentication fails, it catches the exception and returns a "Incorrect username or password" response with a 400 status code.
generateToken(String username):This method creates an empty claims map and calls the createToken method with the username as the subject. It serves as the entry point for token generation.
c*reateToken(Map claims, String subject):* This method builds the JWT using the Jwts.builder(). It sets the claims, subject, and token metadata, such as issue date and expiration time (set to 5 minutes). The token is then signed with a secret key and compacted into a string format for transmission.
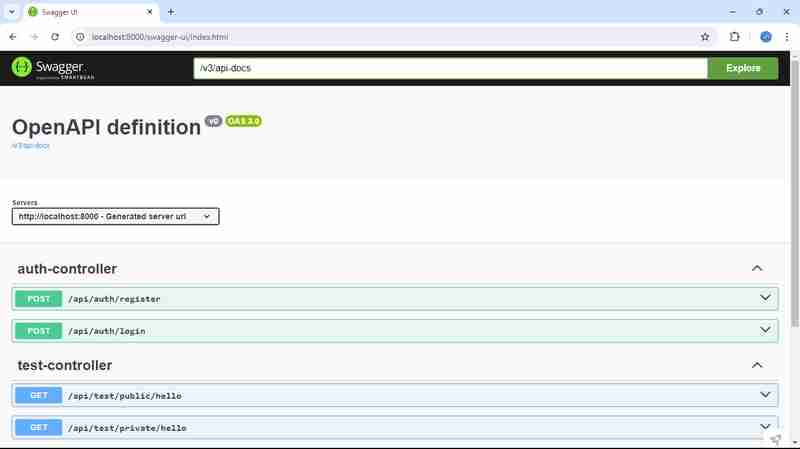
now we run the application
and hit the URL here our application is runing on 8000 port
http://localhost:8000/swagger-ui/index.html
Die Verwendung von Swagger in Ihrem Projekt verbessert die API-Dokumentation und -Tests. Es bietet Entwicklern eine benutzerfreundliche Oberfläche, mit der sie Ihre APIs erkunden, Anforderungs-/Antwortstrukturen verstehen und Endpunkte direkt aus der Dokumentation testen können. Durch die Integration von Swagger ermöglichen Sie die automatische Generierung von API-Dokumenten basierend auf Ihren Codeanmerkungen und erleichtern so sowohl Front-End- als auch Back-End-Entwicklern eine effiziente Zusammenarbeit.
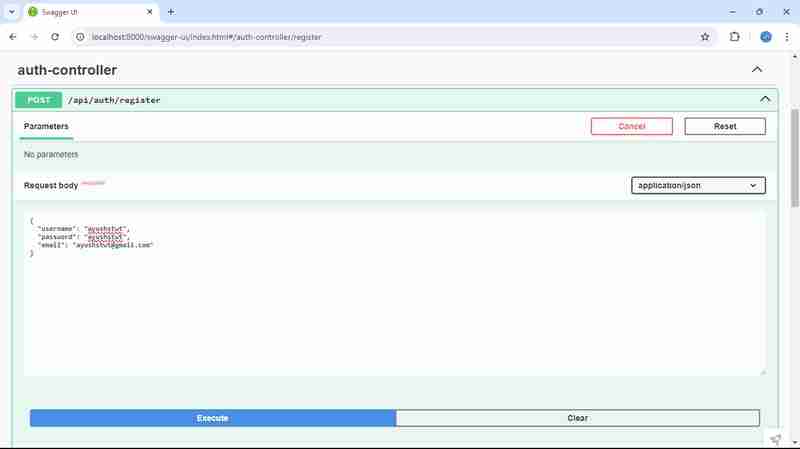
Zuerst registrieren wir den Benutzer
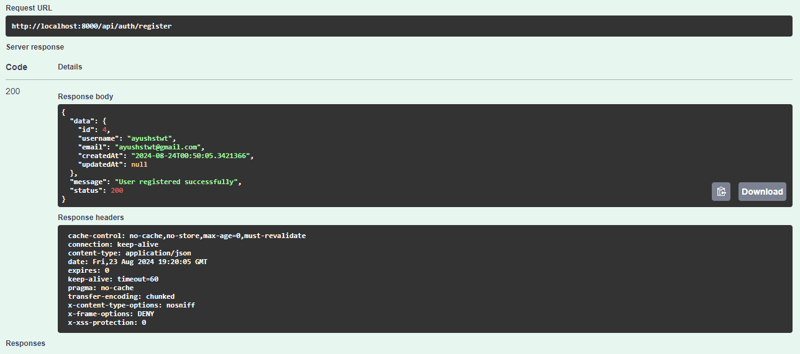
Wir bekommen die Antwort so
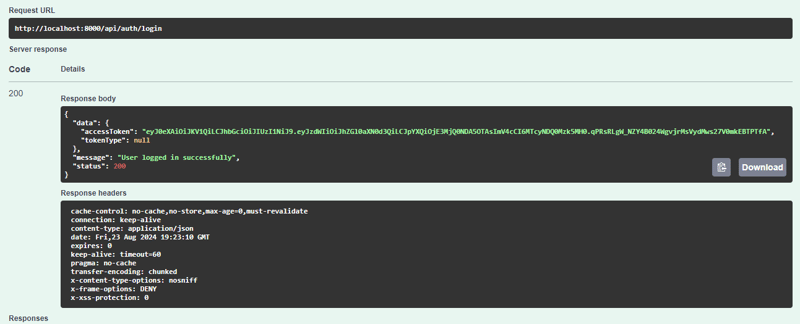
Danach melden wir den Benutzer an
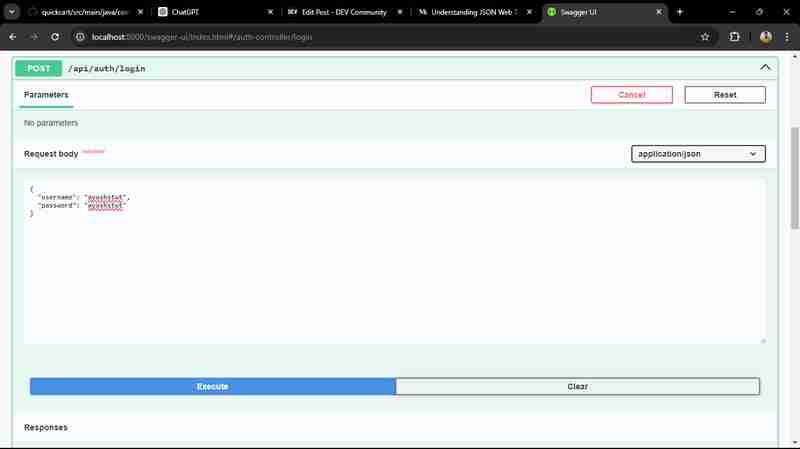
Wir bekommen die Antwort so
Das Projekt implementiert die rollenbasierte Authentifizierung mithilfe von JWT (JSON Web Tokens) in einer Spring Boot-Anwendung. Es verfügt über einen sicheren Authentifizierungsmechanismus, mit dem sich Benutzer registrieren und anmelden können und ein JWT erhalten, das den Zugriff basierend auf den ihnen zugewiesenen Rollen (wie USER oder ADMIN) gewährt. Die SecurityConfig-Klasse konfiguriert Zugriffsberechtigungen und stellt sicher, dass öffentliche Endpunkte für alle zugänglich sind, während vertrauliche Vorgänge nur auf autorisierte Benutzer beschränkt werden. Die JWTUtil-Klasse übernimmt die Tokenerstellung, Validierung und Benutzerextraktion. Insgesamt erhöht dieses Setup die Sicherheit und ermöglicht eine nahtlose und robuste Zugriffskontrolle für die gesamte Anwendung.
Das Projekt verwendet ein umfassendes Sicherheits-Framework, das Spring Security für die Benutzerauthentifizierung und -autorisierung nutzt. Der AuthController erleichtert die Benutzerregistrierung und -anmeldung und generiert bei erfolgreicher Authentifizierung ein JWT. Die Anwendung verwendet einen JWTFilter, um Anfragen abzufangen und Token zu validieren, um sicherzustellen, dass nur authentifizierte Benutzer auf geschützte Ressourcen zugreifen können. Durch die Integration einer rollenbasierten Zugriffskontrolle stellt das Projekt ein flexibles und sicheres Benutzerverwaltungssystem bereit. Dieses Design verbessert nicht nur die Sicherheit, sondern verbessert auch das Benutzererlebnis, indem es die Notwendigkeit wiederholter Anmeldungen minimiert. Insgesamt bildet es eine solide Grundlage für den Aufbau skalierbarer und sicherer Microservices.
Sie können den vollständigen Quellcode für den Benutzerauthentifizierungsdienst in meinem GitHub-Repository erkunden. Dieses Projekt stellt verschiedene Funktionen wie Benutzerregistrierung, Anmeldung und sicheren Zugriff mithilfe von JWT zur Authentifizierung vor. Probieren Sie es einfach aus, tragen Sie dazu bei oder nutzen Sie es als Referenz für Ihre eigenen Projekte!
GitHub-Repository: https://github.com/ishrivasayush/user-auth-service
Für diejenigen, die tiefer in JSON Web Tokens (JWT) eintauchen möchten, empfehle ich den Besuch von jwt.io. Diese Ressource bietet umfassende Informationen über JWT, einschließlich seiner Funktionsweise, seiner Struktur und praktischen Beispielen. Es ist ein hervorragender Ausgangspunkt für das Verständnis der tokenbasierten Authentifizierung und Autorisierung, die für moderne Webanwendungen unerlässlich sind. Egal, ob Sie Einsteiger sind oder Ihr Wissen auffrischen möchten, jwt.io bietet wertvolle Einblicke in die sichere Verwaltung von Benutzersitzungen.
以上がSpring Security によるマイクロサービスの保護: JWT の実装の詳細内容です。詳細については、PHP 中国語 Web サイトの他の関連記事を参照してください。


![[Web フロントエンド] Node.js クイック スタート](https://img.php.cn/upload/course/000/000/067/662b5d34ba7c0227.png)


