
a机器:zabbix服务端(192.168.234.128) b机器:zabbix客户端(192.168.234.125)
在b机器(zabbix客户端)操作:
编辑nginx虚拟主机配置文件:
[root@centos ~]# vi /etc/nginx/conf.d/default.conf
在server{}中添加以下内容:
location /nginx_status { stub_status on; access_log off; allow 127.0.0.1; deny all; }
重载nginx配置:
[root@centos ~]# nginx -s reload
测试:
[root@centos ~]# curl http://127.0.0.1/nginx_status active connections: 1 server accepts handled requests 3 3 3 reading: 0 writing: 1 waiting: 0
#nginx状态信息已显示
状态说明:

添加监控脚本:
vi /usr/local/sbin/ngx_status.sh
添加以下内容:
#!/bin/bash url="http://127.0.0.1/nginx_status" curl=/usr/bin/curl # 检测nginx进程是否存在 function ping { /sbin/pidof nginx | wc -l } # 检测nginx性能 function active { $curl $url 2>/dev/null| grep 'active' | awk '{print $nf}' } function reading { $curl $url 2>/dev/null| grep 'reading' | awk '{print $2}' } function writing { $curl $url 2>/dev/null| grep 'writing' | awk '{print $4}' } function waiting { $curl $url 2>/dev/null| grep 'waiting' | awk '{print $6}' } function accepts { $curl $url 2>/dev/null| awk nr==3 | awk '{print $1}' } function handled { $curl $url 2>/dev/null| awk nr==3 | awk '{print $2}' } function requests { $curl $url 2>/dev/null| awk nr==3 | awk '{print $3}' } $1
添加权限:
[root@centos ~]# chmod 755 /usr/local/sbin/ngx_status.sh
编辑zabbix_agent配置文件:
[root@centos ~]# vi /etc/zabbix/zabbix_agentd.conf
在option:userparameter处添加:userparameter=nginx.status[*],/usr/local/sbin/ngx_status.sh $1

重启服务:
[root@centos ~]# systemctl restart zabbix-agent
在a机器(服务端)测试:
[root@zabbix ~]# zabbix_get -s 192.168.234.125 -k 'nginx.status[accepts]' 6
在本机创建.xml文件并添加以下内容:(文件名称自定义)
4.0 2019-02-11t07:29:29z templates template app nginx template app nginx templates nginx nginx status server accepts 0 nginx.status[accepts] 60 90d 365d 0 3 0 0 0 0 accepts 0 nginx 10 3s 200 1 0 0 0 0 0 0 0 nginx status connections active 0 nginx.status[active] 60 90d 365d 0 3 0 0 0 0 active 0 nginx 3s 200 1 0 0 0 0 0 0 0 nginx status server handled 0 nginx.status[handled] 60 90d 365d 0 3 0 0 0 0 handled 0 nginx 10 3s 200 1 0 0 0 0 0 0 0 nginx status ping 0 nginx.status[ping] 60 30d 365d 0 3 0 0 0 0 is live 0 nginx service state 3s 200 1 0 0 0 0 0 0 0 nginx status connections reading 0 nginx.status[reading] 60 90d 365d 0 3 0 0 0 0 reading 0 nginx 3s 200 1 0 0 0 0 0 0 0 nginx status server requests 0 nginx.status[requests] 60 90d 365d 0 3 0 0 0 0 requests 0 nginx 10 3s 200 1 0 0 0 0 0 0 0 nginx status connections waiting 0 nginx.status[waiting] 60 90d 365d 0 3 0 0 0 0 waiting 0 nginx 3s 200 1 0 0 0 0 0 0 0 nginx status connections writing 0 nginx.status[writing] 60 90d 365d 0 3 0 0 0 0 writing 0 nginx 3s 200 1 0 0 0 0 0 0 0 {template app nginx:nginx.status[ping].last()}=0 0 nginx was down! 0 0 4 nginx进程数:0,请注意 0 0 nginx status connections 900 200 0.0000 100.0000 1 1 0 1 0 0.0000 0.0000 0 0 0 0 0 0 00c800 0 2 0 template app nginx nginx.status[active] 1 0 c80000 0 2 0 template app nginx nginx.status[reading] 2 0 0000c8 0 2 0 template app nginx nginx.status[waiting] 3 0 c800c8 0 2 0 template app nginx nginx.status[writing] nginx status server 900 200 0.0000 100.0000 1 1 0 1 0 0.0000 0.0000 0 0 0 0 0 0 00c800 0 2 0 template app nginx nginx.status[accepts] 1 0 c80000 0 2 0 template app nginx nginx.status[handled] 2 0 0000c8 0 2 0 template app nginx nginx.status[requests] service state 0 down 1 up
在zabbix前端页面点击配置→模板→导入:
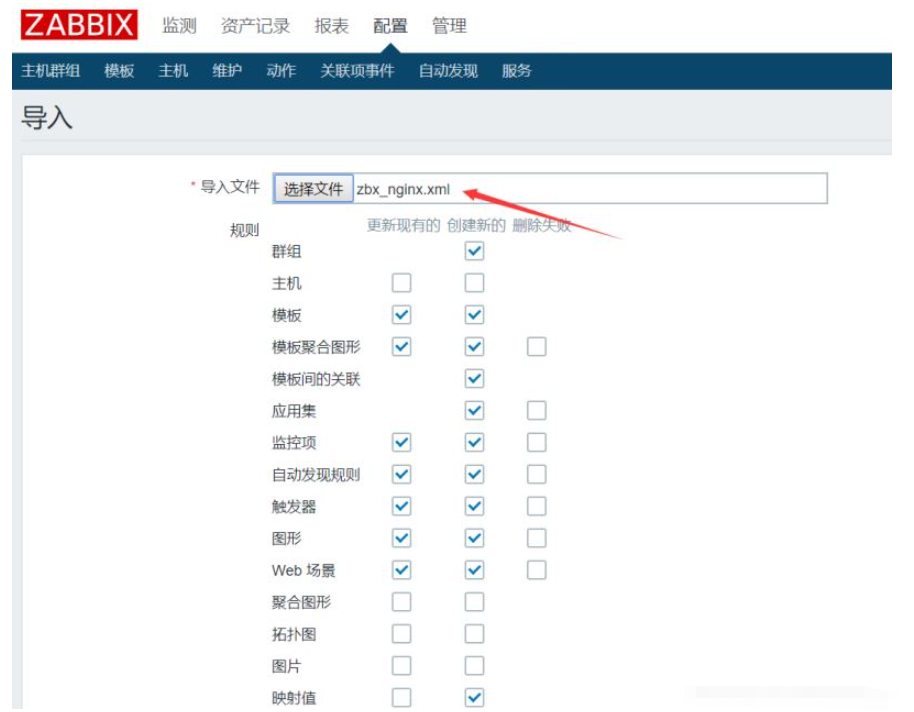
#导入刚才创建的xml文件即可
导入成功后在主机列表页面选择被监控的机器(b机器)链接该模板即可开始监控nginx
a机器:zabbix服务端(192.168.234.128) b机器:zabbix客户端(192.168.234.125)
在a机器安装zabbix-java-gateway:
[root@zabbix ~]# wget https://mirrors.tuna.tsinghua.edu.cn/zabbix/zabbix/4.0/rhel/7/x86_64/zabbix-java-gateway-4.0.14-1.el7.x86_64.rpm [root@zabbix ~]# yum -y localinstall zabbix-java-gateway-4.0.14-1.el7.x86_64.rpm
编辑gateway配置文件:
[root@zabbix ~]# vi /etc/zabbix/zabbix_java_gateway.conf
去掉listen_ip、listen_port(监听端口)、start_pollers(进程数)的注释符号#:
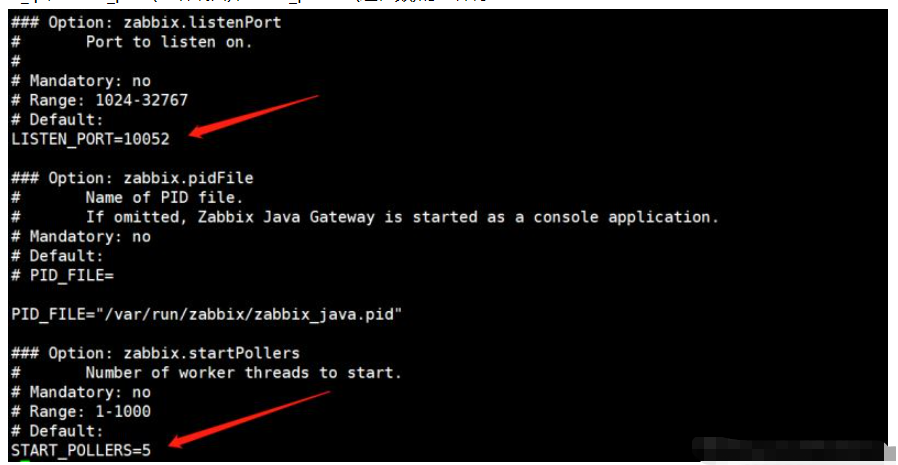
#listen_ip定义被监控机器的地址,不指定默认监听全部机器
编辑server配置文件:
[root@zabbix ~]# vi /etc/zabbix/zabbix_server.conf
定义以下3个配置参数:
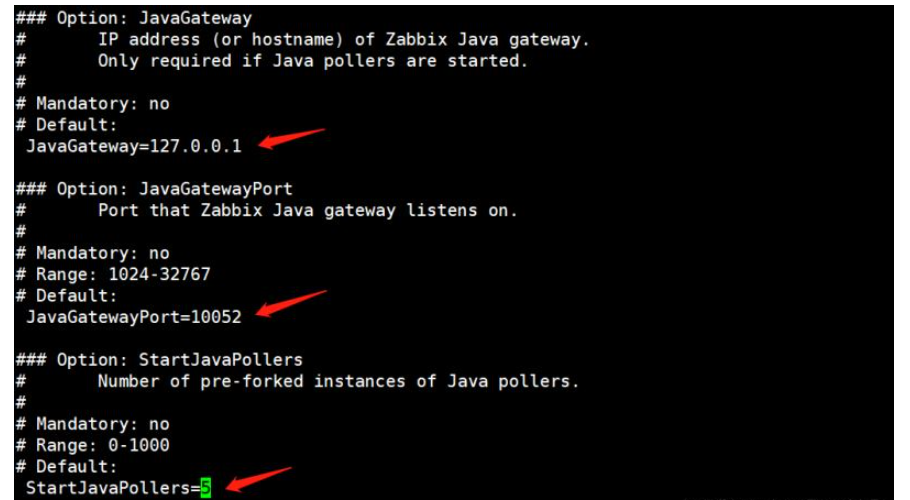
启动zabbix-java-gateway服务:
[root@zabbix ~]# systemctl start zabbix-java-gateway
重启zabbix-server服务:
[root@zabbix ~]# systemctl restart zabbix-server
查看监听端口:
[root@zabbix ~]# netstat -lntp |grep java tcp6 0 0 :::10052 :::* listen 8706/java
开启jmx
在b机器编辑tomcat配置文件:
[root@centos ~]# vi /usr/local/tomcat/bin/catalina.sh
添加以下内容:
export catalina_opts="$catalina_opts -dcom.sun.management.jmxremote -djava.rmi.server.hostname=192.168.234.125 -dcom.sun.management.jmxremote.port=9999 -dcom.sun.management.jmxremote.ssl=false -dcom.sun.management.jmxremote.authenticate=false"
#hostname定义b机器地址,端口9999(默认12345)
重启tomcat:
[root@centos ~]# /usr/local/tomcat/bin/shutdown.sh [root@centos ~]# /usr/local/tomcat/bin/startup.sh
查看监听端口9999:
[root@centos ~]# netstat -lntp |grep 9999 tcp6 0 0 :::9999 :::* listen 25861/java
进入zabbix前端页面添加主机:
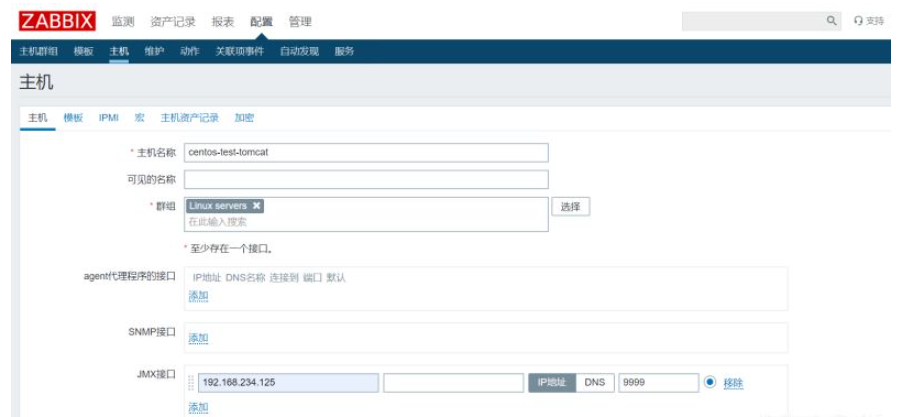
#与普通情况添加监控主机不同,监控b机器的tomcat需要配置jmx接口
模板链接jmx相关的两个模板:
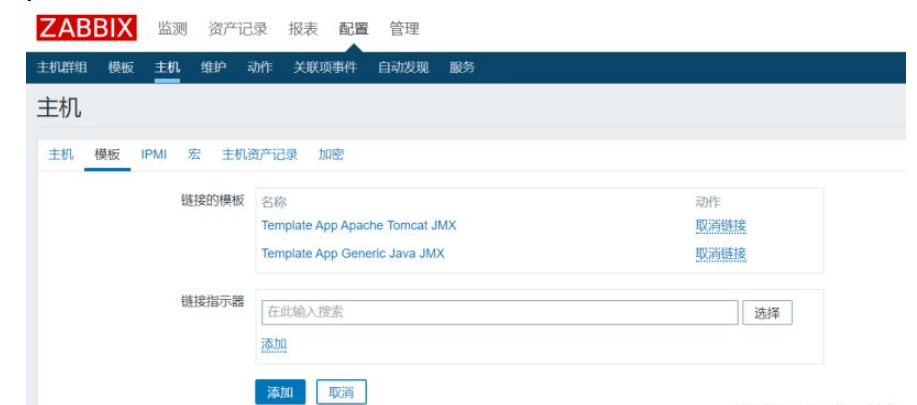
当jmx图标变绿即表示配置成功:

a机器:zabbix服务端(192.168.234.128) b机器:zabbix客户端(192.168.234.125)
zabbix_agent定义mysql监控的配置文件:/etc/zabbix/zabbix_agentd.d/userparameter_mysql.conf
在b机器登录mysql创建用户:
mysql> grant usage,process,replication client on *.* to zamysql@'localhost' identified by 'zamysql';
创建配置文件指定的目录:
[root@centos ~]# mkdir /var/lib/zabbix
创建my.cnf文件:
[root@centos ~]# vi /var/lib/zabbix/.my.cnf
#需要注意该文件是隐藏文件
添加以下内容:
[mysql] host=localhost user=zamysql password='zamysql' socket=/tmp/mysql.sock [mysqladmin] host=localhost user=zamysql password='zamysql' socket=/tmp/mysql.sock
在a机器测试:
[root@zabbix ~]# zabbix_get -s 192.168.234.125 -p 10050 -k mysql.ping 1 [root@zabbix ~]# zabbix_get -s 192.168.234.125 -p 10050 -k mysql.version mysql ver 14.14 distrib 5.6.43, for linux-glibc2.12 (x86_64) using editline wrapper [root@zabbix ~]# zabbix_get -s 192.168.234.125 -p 10050 -k mysql.size 10240
#已成功获取数据
在zabbix前端页面添加主机:
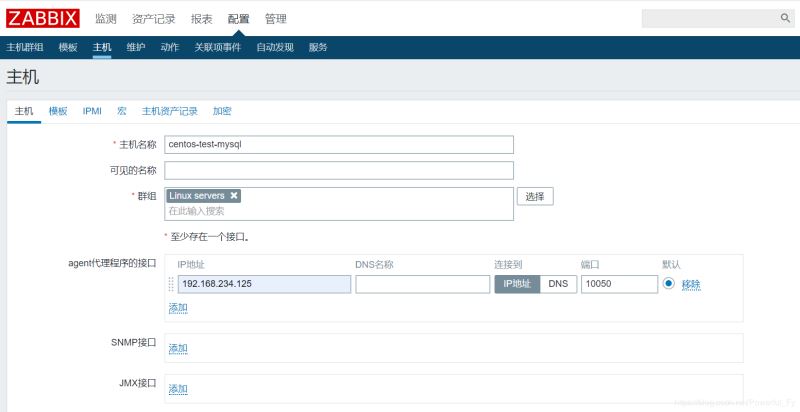
监控模板选择db mysql:

zbx标准变为绿色表示成功:

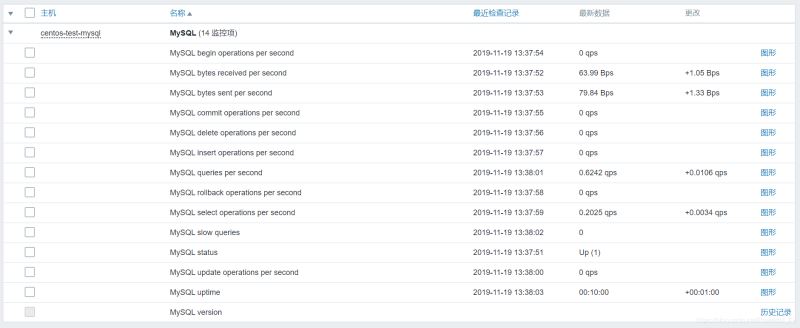
在监测→最新数据页面即可查看mysql监控数据:
Ce qui précède est le contenu détaillé de. pour plus d'informations, suivez d'autres articles connexes sur le site Web de PHP en chinois!
 redémarrage de nginx
 Explication détaillée de la configuration de nginx
 Explication détaillée de la configuration de nginx
 Comment configurer les variables d'environnement Tomcat
 Comment intégrer l'idée avec Tomcat
 Comment afficher le code source de Tomcat
 Quelles sont les vulnérabilités courantes de Tomcat ?
 Comment résoudre les journaux Tomcat tronqués