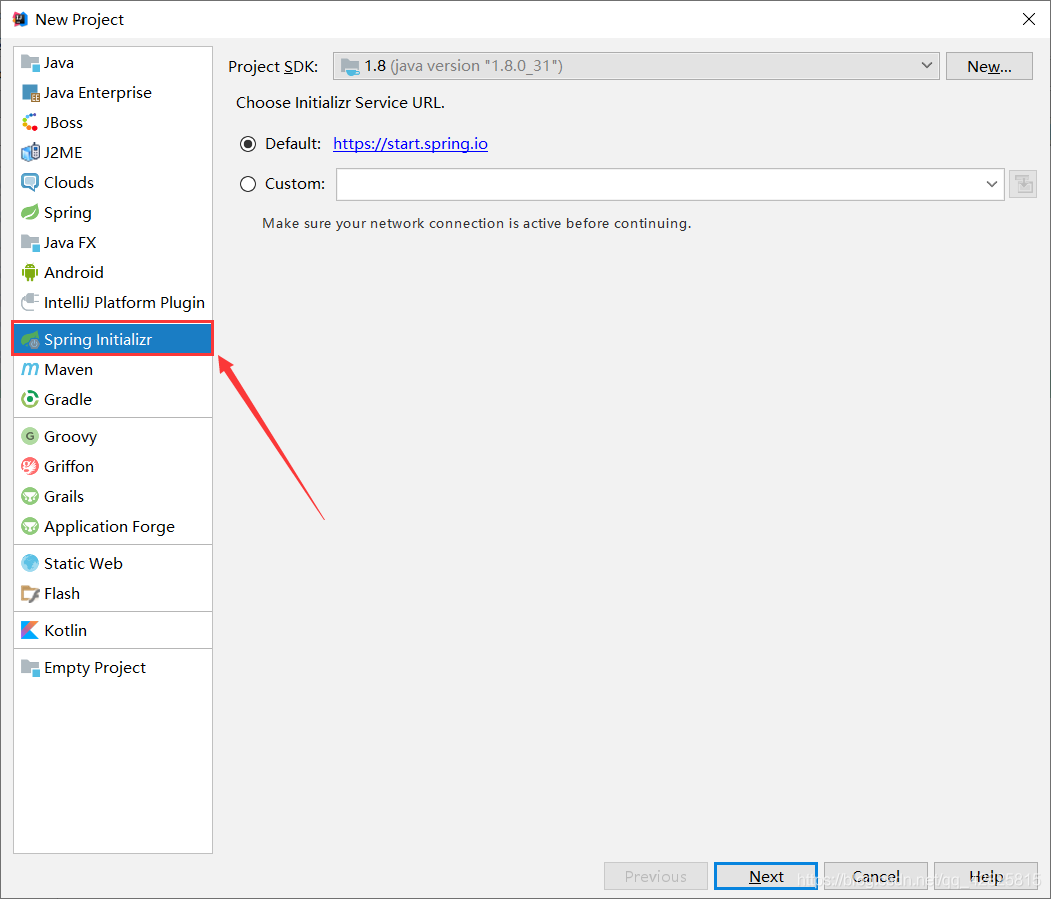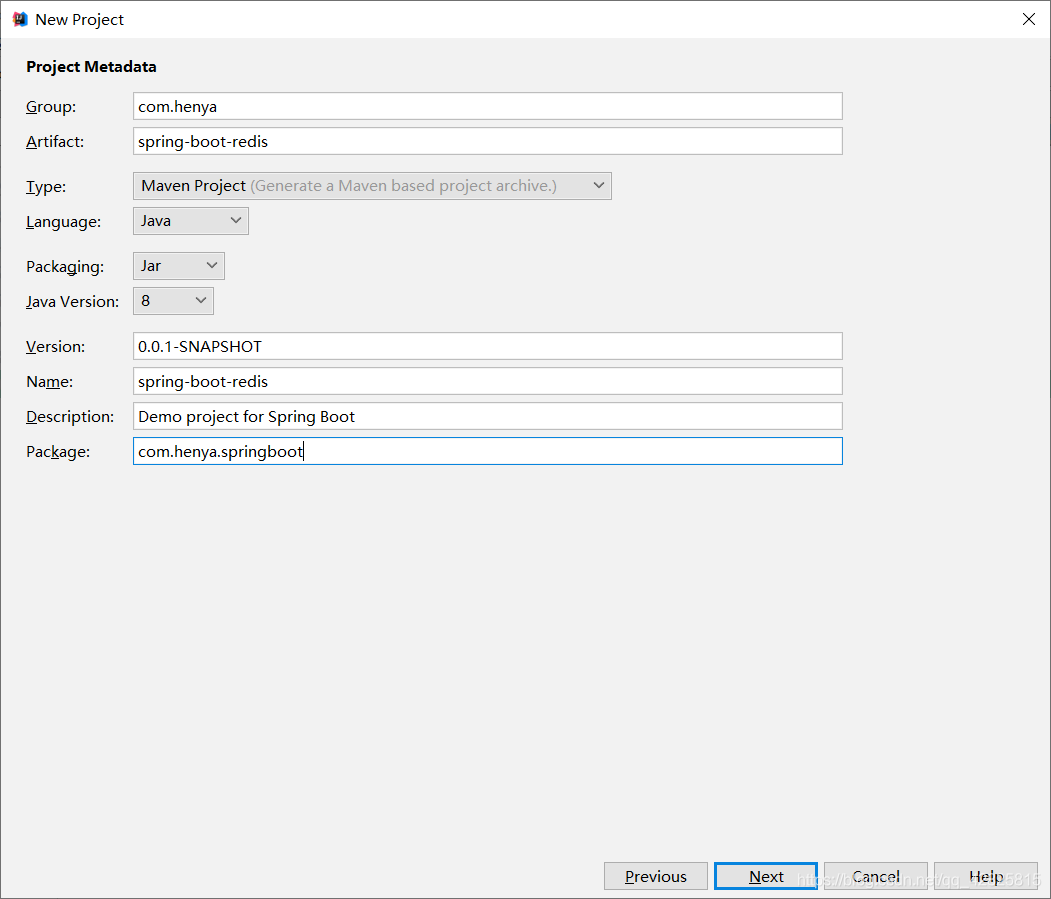

Je ne sais pas quoi écrire, j'ai lu récemment. un article que j'ai déjà écrit sur l'intégration de Springboot par Kafka. Tout le monde a répondu avec beaucoup d'enthousiasme, je pense que cela aide tout le monde, et on peut considérer que j'ai atteint mon objectif. intégrer redis. Parce que je l'ai déjà fait, j'ai du code prêt à l'emploi. Il peut être utilisé après cv, donc j'ai plus de temps, donc je vais vous le donner. Trions l'implémentation du code de l'intégration de Redis par Springboot. De la construction du projet à la mise en œuvre du code source, tout est inclus ci-dessous. Lisez-le patiemment, je pense que cela vous sera utileD'accord, sans plus tarder, commençons. Eh bien, de la même manière, il est toujours recommandé de le faire. implémentez-le sur votre propre PCCompte public personnel : Java Architect Alliance, mise à jour quotidienne des articles techniques1. Utilisez Spring Initializr pour créer un projet Web de projet
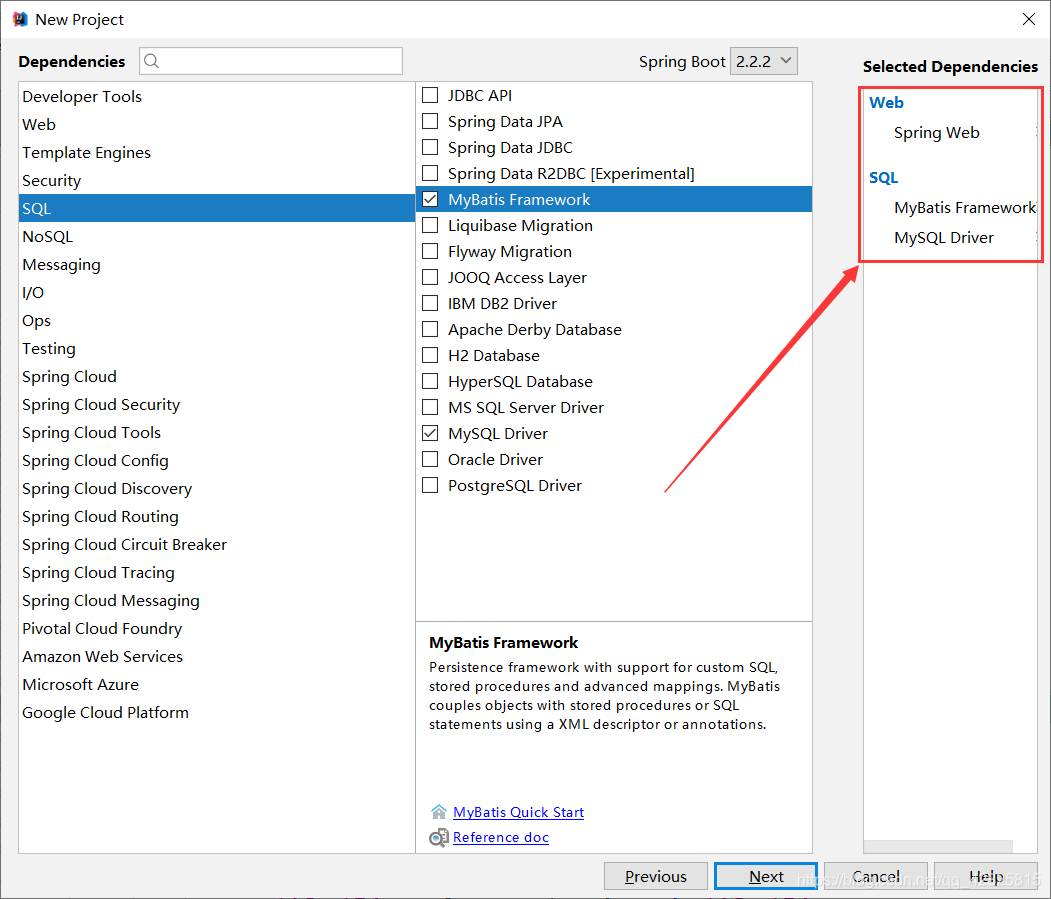
1. →Projet3. Ensuite, comme le montre la figure, vérifiez les dépendances requises et Spring Initializr importera automatiquement le démarreur requis
Une fois le projet créé avec succès, les dépendances dans le fichier. pom.xml sont les suivants
4.0.0 org.springframework.boot spring-boot-starter-parent 2.2.2.RELEASE com.heny spring-boot-redis 0.0.1-SNAPSHOT spring-boot-redis Demo project for Spring Boot 1.8 org.springframework.boot spring-boot-starter-web org.mybatis.spring.boot mybatis-spring-boot-starter 2.1.1 mysql mysql-connector-java runtime org.springframework.boot spring-boot-starter-test test org.junit.vintage junit-vintage-engine org.springframework.boot spring-boot-maven-plugin
5 Ajoutez le démarreur Redis
org.springframework.boot spring-boot-starter-data-redis
package com.henya.springboot.bean; import java.io.Serializable; public class Employee implements Serializable{ private Integer id; private String lastName; private String email; private Integer gender; //性别 1男 0女 private Integer dId; public Employee() { super(); } public Employee(Integer id, String lastName, String email, Integer gender, Integer dId) { super(); this.id = id; this.lastName = lastName; this.email = email; this.gender = gender; this.dId = dId; } public Integer getId() { return id; } public void setId(Integer id) { this.id = id; } public String getLastName() { return lastName; } public void setLastName(String lastName) { this.lastName = lastName; } public String getEmail() { return email; } public void setEmail(String email) { this.email = email; } public Integer getGender() { return gender; } public void setGender(Integer gender) { this.gender = gender; } public Integer getdId() { return dId; } public void setdId(Integer dId) { this.dId = dId; } @Override public String toString() { return "Employee [id=" + id + ", lastName=" + lastName + ", email=" + email + ", gender=" + gender + ", dId=" + dId + "]"; } }
Lors de l'écriture d'objets JavaBean, vous devez implémenter l'interface Serialisable, sinon le L'erreur suivante sera signalée :
Impossible de désérialiser ; l'exception imbriquée est org.springframework.core.serializer.support.SerializationFailedException
7. Fichier de configuration application.properties Configurer les informations de la source de données dans
#serverTimezone用于指定时区,不然会报错 spring.datasource.url=jdbc:mysql://localhost:3306/cache?serverTimezone=UTC spring.datasource.username=root spring.datasource.password=123456 # 开启驼峰命名法规则 mybatis.configuration.map-underscore-to-camel-case=true #日志级别 logging.level.com.henya.springboot.mapper=debug
8. Utilisez la version annotée de Mybatis pour créer Mapper
package com.henya.springboot.mapper; import com.henya.springboot.bean.Employee; import org.apache.ibatis.annotations.*; @Mapper public interface EmployeeMapper { @Select("SELECT * FROM employee WHERE id=#{id}") public Employee getEmpById(Integer id); @Update("UPDATE employee SET lastName=#{lastName},email=#{email},gender=#{gender},d_id=#{dId} WHERE id=#{id}") public void updateEmp(Employee employee); @Delete("DELETE FROM emlpoyee WHERE id=#{id}") public void delEmpById(Integer id); @Insert("INSERT INTO employee(lastName, email, gender, d_id) VALUES (#{lastName}, #{email}, #{gender}, #{dId})") public Employee insertEmp(Employee employee); @Select("SELECT * FROM employee WHERE lastName=#{lastName}") public Employee getEmpByLastName(String lastName); }
Vous devez utiliser l'annotation @MapperScan pour analyser l'interface où se trouve le Mapper. Il vous suffit de l'ajouter à la classe principale du programme. De plus, utilisez @EnableCaching pour activer la mise en cache.
@MapperScan("com.henya.springboot.mapper") @SpringBootApplication @EnableCaching //开启缓存 public class SpringBootRedisApplication { public static void main(String[] args) { SpringApplication.run(SpringBootRedisApplication.class, args); } }
9. Écrivez une classe de service pour accéder à la base de données ou au cache Redis
package com.henya.springboot.service; import com.henya.springboot.bean.Employee; import com.henya.springboot.mapper.EmployeeMapper; import org.springframework.beans.factory.annotation.Autowired; import org.springframework.cache.annotation.*; import org.springframework.stereotype.Service; @CacheConfig(cacheNames = "emp") //抽取缓存的公共配置 @Service public class EmployeeService { @Autowired EmployeeMapper employeeMapper; /** * @param id * @return */ @Cacheable(cacheNames = {"emp"},keyGenerator = "myKeyGenerator") public Employee getEmpById(Integer id) { System.err.println("开始查询"+ id +"号员工"); Employee employee = employeeMapper.getEmpById(id); return employee; } /** * @CachePut:既调用方法(这个方法必须要执行),又更新缓存数据 * @param employee * @return */ @CachePut(value = "emp",key = "#result.id") public Employee updateEmp(Employee employee){ System.err.println("开始更新" + employee.getId() + "号员工"); employeeMapper.updateEmp(employee); return employee; } /** * @CacheEvict:缓存清除 * @param id */ @CacheEvict(value = "emp",beforeInvocation = true) public void deleteEmp(Integer id){ System.err.println("删除" + id + "员工"); int i = 10/0; }
package com.henya.springboot.controller; import com.henya.springboot.bean.Employee; import com.henya.springboot.service.EmployeeService; import org.springframework.beans.factory.annotation.Autowired; import org.springframework.web.bind.annotation.GetMapping; import org.springframework.web.bind.annotation.PathVariable; import org.springframework.web.bind.annotation.RestController; /** * @Description: * @Author:HenYa * @CreatTime:2019/12/1 12:44 */ @RestController public class EmployeeController { @Autowired EmployeeService employeeService; @GetMapping("/emp/{id}") public Employee getEmpById(@PathVariable("id") Integer id){ Employee employee = employeeService.getEmpById(id); return employee; } @GetMapping("/emp") public Employee updateEmp(Employee employee){ Employee emp = employeeService.updateEmp(employee); return emp; } }
1. Accès dans le navigateur, vous pouvez également utiliser la classe de test, l'auteur a utilisé le navigateur pour accéder à http://localhost:8080/emp/1 à des fins de test Lors du premier accès, la console vous demandera de commencer à interroger l'employé n°1, comme indiqué dans la figure.
2. Lors d'un nouvel accès, il n'y a pas de journal SQL dans la console, comme le montre la figure.


static RedisSerializer

3. RedisCacheManager personnalisé
package com.henya.springboot.config; import org.springframework.context.annotation.Bean; import org.springframework.context.annotation.Configuration; import org.springframework.data.redis.cache.RedisCacheConfiguration; import org.springframework.data.redis.cache.RedisCacheManager; import org.springframework.data.redis.cache.RedisCacheWriter; import org.springframework.data.redis.connection.RedisConnectionFactory; import org.springframework.data.redis.serializer.GenericJackson2JsonRedisSerializer; import org.springframework.data.redis.serializer.RedisSerializationContext; import org.springframework.data.redis.serializer.RedisSerializer; /** * @Description: * @Author:HenYa * @CreatTime:2019/12/6 20:50 */ @Configuration public class MyRedisConfig { @Bean public RedisCacheManager empCacheManager(RedisConnectionFactory redisConnectionFactory){ //RedisCacheManager redisCacheManager = new RedisCacheManager(redisConnectionFactory); RedisCacheWriter redisCacheWriter = RedisCacheWriter.nonLockingRedisCacheWriter(redisConnectionFactory); RedisSerializer
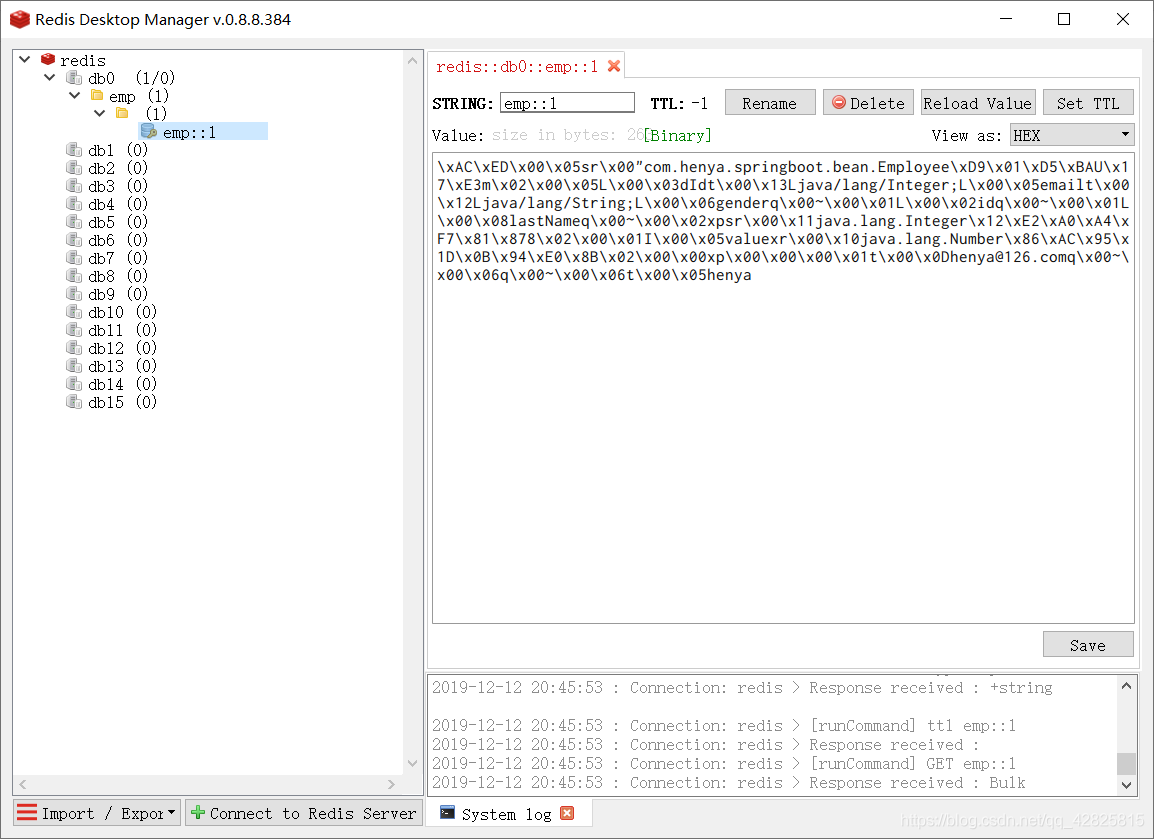
 À ce stade, les données mises en cache dans Redis sont sérialisées au format Json, comme le montre la figure.
Ce qui précède est le contenu détaillé de. pour plus d'informations, suivez d'autres articles connexes sur le site Web de PHP en chinois!
 Quelles sont les plateformes de trading de devises virtuelles ?
 Comment définir le chinois dans vscode
 Migrer les données d'un téléphone Android vers un téléphone Apple
 Comment utiliser la recherche magnétique BTbook
 Comment résoudre le problème des 400 requêtes incorrectes lorsque la page Web s'affiche
 Quels sont les frameworks Spring ?
 Comment configurer les variables d'environnement jdk
 Utilisation du framework DWZ