
Il existe de nombreuses façons d'obtenir l'effet anneau en CSS. Voici cinq méthodes à partager avec vous :
(tutoriel recommandé :CSS. tutoriel)
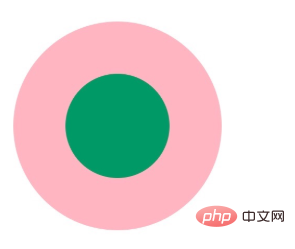
Jetons d'abord un coup d'œil à l'effet de mise en œuvre :

Ensuite, nous présenterons la méthode :
1 . Deux étiquettes Nesting
.element1{ width: 200px; height: 200px; background-color: lightpink; border-radius: 50%; } .child1{ width: 100px; height: 100px; border-radius: 50%; background-color: #009966; position: relative; top: 50px; left: 50px; }
2. Utiliser des pseudo-éléments, avant/après
.element2{ width: 200px; height: 200px; background-color: lightpink; border-radius: 50%; } .element2:after{ content: ""; display: block; width: 100px; height: 100px; border-radius: 50%; background-color: #009966; position: relative; top: 50px; left: 50px; }
3. Utiliser la bordure :
.element3{ width: 100px; height: 100px; background-color: #009966; border-radius: 50%; border: 50px solid lightpink ; }
(vidéo d'apprentissage recommandée :tutoriel vidéo CSS)
4. Utilisez border-shadow
.element4{ width: 100px; height: 100px; background-color: #009966; border-radius: 50%; box-shadow: 0 0 0 50px lightpink ; margin: auto; }
Copier après la connexion.element5{ width: 200px; height: 200px; background-color: #009966; border-radius: 50%; box-shadow: 0 0 0 50px lightpink inset; margin: auto; }Copier après la connexion5. Utilisez radial-gradient
Copier après la connexion..element6{ width: 200px; height: 200px; border-radius: 50%; background: -webkit-radial-gradient( circle closest-side,#009966 50%,lightpink 50%); }Copier après la connexionCe qui précède est le contenu détaillé de. pour plus d'informations, suivez d'autres articles connexes sur le site Web de PHP en chinois!


