


Nous allons utiliser le défi frontal actuel dev.to comme moyen d'explorer comment créer rapidement une application Web de base de fichiers statiques pour la visualisation 3D. Nous utiliserons THREE.js (une de mes bibliothèques préférées) pour créer un outil de base du système solaire qui peut être utilisé pour afficher l'entrée de balisage du défi.
Voici le défi dev.to actuel qui a inspiré ce projet :
https://dev.to/challenges/frontend-2024-09-04
Alors, voyons à quelle vitesse nous pouvons mettre en place quelque chose dans ce sens !
À partir d'un tout nouveau projet Github, nous utiliserons Vite pour lancer le projet avec un remplacement de module à chaud (ou HMR) prêt à l'emploi pour une itération très rapide :
git clone [url]
cd [folder]
yarn create vite --template vanilla .
Cela créera un projet Vite sans framework qui fonctionne immédiatement. Il nous suffit d'installer les dépendances, d'en ajouter TROIS et de lancer le projet de développement "live":
yarn install
yarn add three
yarn run dev
Cela nous donnera une version "live" que nous pourrons développer et déboguer en temps quasi réel. Et maintenant, nous sommes prêts à entrer et à commencer à démonter des trucs !
Si vous n'avez jamais utilisé THREE, il y a certaines choses qui valent la peine d'être connues.
Dans la conception d'un moteur, il y a généralement trois activités ou boucles en cours à un moment donné. Si les trois sont effectués en série, cela signifie que votre « boucle de jeu » principale comporte une séquence de trois types d’activités :
Il existe une sorte d'interrogation ou d'événement d'entrée utilisateur qui doit être géré
Il y a les appels de rendu eux-mêmes
Il existe une sorte de logique interne/comportement de mise à jour
Des éléments tels que la mise en réseau (par exemple, l'arrivée d'un paquet de mise à jour) peuvent être traités comme des entrées ici, car (comme les actions de l'utilisateur) ils déclenchent des événements qui doivent se propager dans une mise à jour de l'état de l'application.

Et bien sûr, derrière tout cela, il y a une certaine représentation de l’État lui-même. Si vous utilisez ECS, il s'agit peut-être d'un ensemble de tables de composants. Dans notre cas, cela commence principalement par une instanciation de TROIS objets (comme une instance Scene).
Dans cet esprit, commençons par rédiger des espaces réservés de base pour notre application.
Nous allons commencer par refactoriser le fichier index.html de niveau supérieur :
Nous n'avons pas besoin des références de fichiers statiques
Nous n'avons pas besoin des hooks Javascript
Nous voudrons une feuille de style de portée mondiale
Nous voudrons accrocher un module ES6 comme point d'entrée de premier niveau à partir du HTML
Cela laisse notre fichier index.html de niveau supérieur ressembler à ceci :
<!doctype html>
<html lang="en">

<head>
  <meta charset="UTF-8" />
  <meta name="viewport" content="width=device-width, initial-scale=1.0" />
  <title>Vite App</title>
  <link rel="stylesheet" href="index.css" type="text/css" />
  <script type="module" src="index.mjs"></script>
</head>

<body>
</body>

</html>
Notre feuille de style de portée globale spécifiera simplement que le corps doit occuper tout l'écran : sans remplissage, marge ou débordement.
body {
    width: 100vw;
    height: 100vh;
    overflow: hidden;
    margin: 0;
    padding: 0;
}
Nous sommes maintenant prêts à ajouter notre module ES6, avec du contenu de base pour nous assurer que notre application fonctionne pendant que nous nettoyons le reste :
/**
 * index.mjs
 */

function onWindowLoad(event) {
    console.log("Window loaded", event);
}

window.addEventListener("load", onWindowLoad);
Maintenant, nous pouvons commencer à retirer des choses ! Nous supprimerons les éléments suivants :
main.js
javascript.svg
counter.js
public/
style.css
Bien sûr, si vous regardez la vue "live" dans votre navigateur, elle sera vide. Mais ça va ! Nous sommes maintenant prêts à passer à la 3D.
Nous commencerons par illustrer le cube rotatif classique TROIS "hello world". Le reste de notre logique se trouvera dans le module ES6 que nous avons créé à l'étape précédente. Nous devrons d’abord importer TROIS :
import * as THREE from "three";
Mais et maintenant ?
THREE dispose d'un pipeline graphique spécifique à la fois simple et puissant. Il y a plusieurs éléments à considérer :
Une scène
Un appareil photo
Un moteur de rendu, qui a (s'il n'est pas fourni) sa propre cible de rendu et une méthode render() qui prend la scène et la caméra comme paramètres
La scène n'est qu'un nœud de graphique de scène de niveau supérieur. Ces nœuds sont une combinaison de trois propriétés intéressantes :
Une transformation (à partir du nœud parent) et un tableau d'enfants
Une géométrie qui définit le contenu et la structure de notre tampon de sommets (et un tampon d'index - essentiellement, les données numériques définissant le maillage)
Un matériau qui définit la manière dont le GPU traitera et restituera les données géométriques
Nous devons donc définir chacune de ces choses pour commencer. Nous commencerons par notre caméra, qui bénéficie de la connaissance des dimensions de nos fenêtres :
const width = window.innerWidth;
const height = window.innerHeight;
const camera = new THREE.PerspectiveCamera(70, width/height, 0.01, 10);
camera.position.z = 1;
Nous pouvons maintenant définir la scène, à laquelle nous allons ajouter un cube de base avec une géométrie "box" et un matériau "maillage normal":
const scene = new THREE.Scene();
const geometry = new THREE.BoxGeometry(0.2, 0.2, 0.2);
const material = new THREE.MeshNormalMaterial();
const mesh = new THREE.Mesh(geometry, material);
scene.add(mesh);
Lastly, we'll instantiate the renderer. (Note that, since we don't provide a rendering target, it will create its own canvas, which we will then need to attach to our document body.) We're using a WebGL renderer here; there are some interesting developments in the THREE world towards supporting a WebGPU renderer, too, which are worth checking out.
const renderer = new THREE.WebGLRenderer({
    "antialias": true
});
renderer.setSize(width, height);
renderer.setAnimationLoop(animate);
document.body.appendChild(renderer.domElement);
We have one more step to add. We pointed the renderer to an animation loop function, which will be responsible for invoking the render function. We'll also use this opportunity to update the state of our scene.
function animate(time) {
    mesh.rotation.x = time / 2000;
    mesh.rotation.y = time / 1000;
    renderer.render(scene, camera);
}
But this won't quite work yet. The singleton context for a web application is the window; we need to define and attach our application state to this context so various methods (like our animate() function) can access the relevant references. (You could embed the functions in our onWindowLoad(), but this doesn't scale very well when you need to start organizing complex logic across multiple modules and other scopes!)
So, we'll add a window-scoped app object that combines the state of our application into a specific object.
window.app = {
    "renderer": null,
    "scene": null,
    "camera": null
};
Now we can update the animate() and onWindowLoad() functions to reference these properties instead. And once you've done that you will see a Vite-driven spinning cube!

Lastly, let's add some camera controls now. There is an "orbit controls" tool built into the THREE release (but not the default export). This is instantiated with the camera and DOM element, and updated each loop. This will give us some basic pan/rotate/zoom ability in our app; we'll add this to our global context (window.app).
import { OrbitControls } from "three/addons/controls/OrbitControls.js";
// ...in animate():
window.app.controls.update();
// ...in onWindowLoad():
window.app.controls = new OrbitControls(window.app.camera, window.app.renderer.domElement);
We'll also add an "axes helper" to visualize coordinate frame verification and debugging inspections.
// ...in onWindowLoad():
app.scene.add(new THREE.AxesHelper(3));
Not bad. We're ready to move on.
Let's pull up what the solar system should look like. In particular, we need to worry about things like coordinates. The farthest object out will be Pluto (or the Kuiper Belt--but we'll use Pluto as a reference). This is 7.3 BILLION kilometers out--which brings up an interesting problem. Surely we can't use near/far coordinates that big in our camera properties!
These are just floating point values, though. The GPU doesn't care if the exponent is 1 or 100. What matters is, that there is sufficient precision between the near and far values to represent and deconflict pixels in the depth buffer when multiple objects overlap. So, we can move the "far" value out to 8e9 (we'll use kilometers for units here) so long as we also bump up the "near" value, which we'll increase to 8e3. This will give our depth buffer plenty of precision to deconflict large-scale objects like planets and moons.
Next we're going to replace our box geometry and mesh normal material with a sphere geometry and a mesh basic material. We'll use a radius of 7e5 (or 700,000 kilometers) for this sphere. We'll also back out our initial camera position to keep up with the new scale of our scene.
// in onWindowLoad():
app.camera.position.x = 1e7;
// ...
const geometry = new THREE.SPhereGEometry(7e5, 32, 32);
const material = new THERE.MeshBasicMaterial({"color": 0xff7700});
You should now see something that looks like the sun floating in the middle of our solar system!

Let's add another sphere to represent our first planet, Mercury. We'll do it by hand for now, but it will become quickly obvious how we want to reusably-implement some sort of shared planet model once we've done it once or twice.
We'll start by doing something similar as we did with the sun--defining a spherical geometry and a single-color material. Then, we'll set some position (based on the orbital radius, or semi-major axis, of Mercury's orbit). Finally, we'll add the planet to the scene. We'll also want (though we don't use it yet) to consider what the angular velocity of that planet's orbit is, once we start animating it. We'll consolidate these behaviors, given this interface, within a factory function that returns a new THREE.Mesh instance.
function buildPlanet(radius, initialPosition, angularVelocity, color) {
    const geometry = new THREE.SphereGeometry(radius, 32, 32);
    const material = new THREE.MeshBasicMaterial({"color": color});
    const mesh = new THREE.Mesh(geometry, material);
    mesh.position.set(initialPosition.x, initialPosition.y, initialPosition.z);
    return mesh;
}
Back in onWindowLoad(), we'll add the planet by calling this function and adding the result to our scene. We'll pass the parameters for Mercury, using a dullish grey for the color. To resolve the angular velocity, which will need to be in radius per second, we'll pass the orbital period (which Wikipedia provides in planet data cards) through a unit conversion:
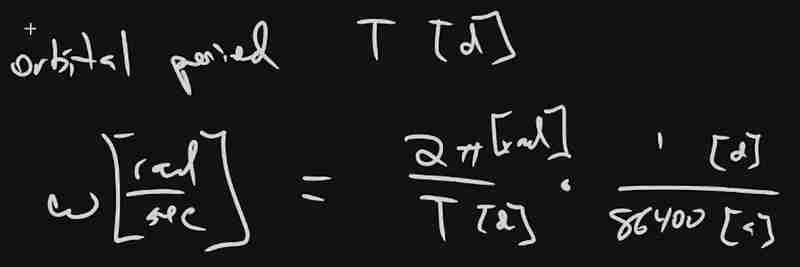
The resulting call looks something like this:
// ...in onWindowLoad():
window.app.scene.add(buildPlanet(2.4e3, new THREE.Vector3(57.91e6, 0, 0), 2 * Math.PI / 86400 / 87.9691, 0x333333));
(We can also remove the sun rotation calls from the update function at this point.)
If you look at the scene at this point, the sun will look pretty lonely! This is where the realistic scale of the solar system starts becoming an issue. Mercury is small, and compared to the radius of the sun it's still a long way away. So, we'll add a global scaling factor to the radius (to increase it) and the position (to decrease it). This scaling factor will be constant so the relative position of the planets will still be realistic. We'll tweak this value until we are comfortable with how visible our objects are within the scene.
const planetRadiusScale = 1e2;
const planetOrbitScale = 1e-1;
// ...in buildPlanet():
const geometry = new THREE.SphereGeometry(planetRadiusScale * radius, 32, 32);
// ...
mesh.position.set(
    planetOrbitScale * initialPosition.x,
    planetOrbitScale * initialPosition.y,
    planetOrbitScale * initialPosition.z
);
You should now be able to appreciate our Mercury much better!

We now have a reasonably-reusable planetary factory. Let's copy and paste spam a few times to finish fleshing out the "inner" solar system. We'll pull our key values from a combination of Wikipedia and our eyeballs' best guess of some approximate color.
// ...in onWindowLoad():
window.app.scene.add(buildPlanet(2.4e3, new THREE.Vector3(57.91e6, 0, 0), 2 * Math.PI / 86400 / 87.9691, 0x666666));
window.app.scene.add(buildPlanet(6.051e3, new THREE.Vector3(108.21e6, 0, 0), 2 * Math.PI / 86400 / 224.701, 0xaaaa77));
window.app.scene.add(buildPlanet(6.3781e3, new THREE.Vector3(1.49898023e8, 0, 0), 2 * Math.PI / 86400 / 365.256, 0x33bb33));
window.app.scene.add(buildPlanet(3.389e3, new THREE.Vector3(2.27939366e8, 0, 0), 2 * Math.PI / 86400 / 686.980, 0xbb3333));
Hey! Not bad. It's worth putting a little effort into reusable code, isn't it?

But this is still something of a mess. We will have a need to reuse this data, so we shouldn't copy-paste "magic values" like these. Let's pretend the planet data is instead coming from a database somewhere. We'll mock this up by creating a global array of objects that are procedurally parsed to extract our planet models. We'll add some annotations for units while we're at it, as well as a "name" field that we can use later to correlate planets, objects, data, and markup entries.
At the top of the module, then, we'll place the following:
const planets = [
    {
        "name": "Mercury",
        "radius_km": 2.4e3,
        "semiMajorAxis_km": 57.91e6,
        "orbitalPeriod_days": 87.9691,
        "approximateColor_hex": 0x666666
    }, {
        "name": "Venus",
        "radius_km": 6.051e3,
        "semiMajorAxis_km": 108.21e6,
        "orbitalPeriod_days": 224.701,
        "approximateColor_hex": 0xaaaa77
    }, {
        "name": "Earth",
        "radius_km": 6.3781e3,
        "semiMajorAxis_km": 1.49898023e8,
        "orbitalPeriod_days": 365.256,
        "approximateColor_hex":  0x33bb33
    }, {
        "name": "Mars",
        "radius_km": 3.389e3,
        "semiMajorAxis_km": 2.27939366e8,
        "orbitalPeriod_days": 686.980,
        "approximateColor_hex":  0xbb3333
    }
];
Now we're ready to iterate through these data items when populating our scene:
// ...in onWindowLoad():
planets.forEach(p => {
    window.app.scene.add(buildPlanet(p.radius_km, new THREE.Vector3(p.semiMajorAxis_km, 0, 0), 2 * Math.PI / 86400 / p.orbitalPeriod_days, p.approximateColor_hex));
});
Next we'll add some "orbit traces" that illustrate the path each planet will take during one revolution about the sun. Since (for the time being, until we take into account the specific elliptical orbits of each planet) this is just a circle with a known radius. We'll sample that orbit about one revolution in order to construct a series of points, which we'll use to instantiate a line that is then added to the scene.
This involves the creation of a new factory function, but it can reuse the same iteration and planet models as our planet factory. First, let's define the factory function, which only has one parameter for now:
function buildOrbitTrace(radius) {
    const points = [];
    const n = 1e2;
    for (var i = 0; i < (n = 1); i += 1) {
        const ang_rad = 2 * Math.PI * i / n;
        points.push(new THREE.Vector3(
            planetOrbitScale * radius * Math.cos(ang_rad),
            planetOrbitScale * radius * Math.sin(ang_rad),
            planetOrbitScale * 0.0
        ));
    }
    const geometry = new THREE.BufferGeometry().setFromPoints(points);
    const material = new THREE.LineBasicMaterial({
        // line shaders are surprisingly tricky, thank goodness for THREE!
        "color": 0x555555
    });
    return new THREE.Line(geometry, material);
}
Now we'll modify the iteration in our onWindowLoad() function to instantiate orbit traces for each planet:
// ...in onWindowLoad():
planets.forEach(p => {
    window.app.scene.add(buildPlanet(p.radius_km, new THREE.Vector3(p.semiMajorAxis_km, 0, 0), 2 * Math.PI / 86400 / p.orbitalPeriod_days, p.approximateColor_hex));
    window.app.scene.add(buildOrbitTrace(p.semiMajoxAxis_km));
});
Now that we have a more three-dimensional scene, we'll also notice that our axis references are inconsistent. The OrbitControls model assumes y is up, because it looks this up from the default camera frame (LUR, or "look-up-right"). We'll want to adjust this after we initially instantiate the original camera:
// ...in onWindowLoad():
app.camera.position.z = 1e7;
app.camera.up.set(0, 0, 1);
Now if you rotate about the center of our solar system with your mouse, you will notice a much more natural motion that stays fixed relative to the orbital plane. And of course you'll see our orbit traces!

Now it's time to think about how we want to fold in the markup for the challenge. Let's take a step back and consider the design for a moment. Let's say there will be a dialog that comes up when you click on a planet. That dialog will present the relevant section of markup, associated via the name attribute of the object that has been clicked.

But that means we need to detect and compute clicks. This will be done with a technique known as "raycasting". Imagine a "ray" that is cast out of your eyeball, into the direction of the mouse cursor. This isn't a natural part of the graphics pipeline, where the transforms are largely coded into the GPU and result exclusively in colored pixels.
In order to back out those positions relative to mouse coordinates, we'll need some tools that handle those transforms for us within the application layer, on the CPU. This "raycaster" will take the current camera state (position, orientation, and frustrum properties) and the current mouse position. It will look through the scene graph and compare (sometimes against a specific collision distance) the distance of those node positions from the mathematical ray that this represents.
Within THREE, fortunately, there are some great built-in tools for doing this. We'll need to add two things to our state: the raycaster itself, and some representation (a 2d vector) of the mouse state.
window.app = {
    // ... previous content
    "raycaster": null,
    "mouse_pos": new THREE.Vector2(0, 0)
};
We'll need to subscribe to movement events within the window to update this mouse position. We'll create a new function, onMouseMove(), and use it to add an event listener in our onWindowLoad() initialization after we create the raycaster:
// ...in onWindowLoad():
window.app.raycaster = new THREE.Raycaster();
window.addEventListener("pointermove", onPointerMove);
Now let's create the listener itself. This simply transforms the [0,1] window coordinates into [-1,1] coordinates used by the camera frame. This is a fairly straightforward pair of equations:
function onPointerMove(event) {
    window.app.mouse_pos.x = (event.clientX / window.innerWidth) * 2 - 1;
    window.app.mouse_pos.y = (event.clientY / window.innerHeight) * 2 - 1;
}
Finally, we'll add the raycasting calculation to our rendering pass. Technically (if you recall our "three parts of the game loop" model) this is an internal update that is purely a function of game state. But we'll combine the rendering pass and the update calculation for the time being.
// ...in animate():
window.app.raycaster.setFromCamera(window.app.mouse_pos, window.app.camera):
const intersections = window.app.raycaster.intersectObjects(window.app.scene.children);
if (intersections.length > 0) { console.log(intersections); }
Give it a quick try! That's a pretty neat point to take a break.
What have we accomplished here:
We have a representation of the sun and inner solar system
We have reusable factories for both planets and orbit traces
We have basic raycasting for detecting mouse collisions in real time
We have realistic dimensions (with some scaling) in our solar system frame
But we're not done yet! We still need to present the markup in response to those events, and there's a lot more we can add! So, don't be surprised if there's a Part Two that shows up at some point.
Ce qui précède est le contenu détaillé de. pour plus d'informations, suivez d'autres articles connexes sur le site Web de PHP en chinois!
 Qu'est-ce que j2ee
 Quelles sont les méthodes pour se connecter au serveur vps
 Comment transformer deux pages en un seul document Word
 Comment créer un clone WeChat sur un téléphone mobile Huawei
 Quels sont les moyens de dégager les flotteurs ?
 largeur de décalage
 Que dois-je faire si le disque temporaire ps est plein ?
 Tableau de mots réparti sur plusieurs pages


![[Web front-end] Démarrage rapide de Node.js](https://img.php.cn/upload/course/000/000/067/662b5d34ba7c0227.png)


