


안녕하세요. 저는 Django에 대한 경험이 풍부한 백엔드 엔지니어 Sam입니다. 저는 한 발 더 나아가 풀 스택 앱의 프런트엔드를 배우고 싶었습니다. 나는 React-with-Django 프로젝트의 힘든 성격을 금방 경험했고 그 고통은 단지 개발 과정의 일부일 뿐이라고 생각했습니다. 그런데 Wasp라는 아주 멋진 새 풀스택 프레임워크를 발견했습니다.
Wasp는 풀 스택 애플리케이션을 위한 놀라운 개발 도구입니다. React, Node.js, Prisma 등을 결합한 Wasp를 사용하면 이전에는 볼 수 없었던 방식으로 개발 속도를 높일 수 있습니다.
이 기사에서는 매우 일반적인 풀 스택 기술에 비해 Wasp의 단순성을 증명하기 위해 Django와 Wasp에서 풀 스택 애플리케이션을 만드는 과정을 살펴보겠습니다. 또한 Django에 연결된 반응 프론트엔드도 만들 예정입니다. 요점은 Django/react에서 발생할 수 있는 비효율성, 어려움 및 문제를 강조하는 것이며
를 통해 훨씬 더 단순해졌습니다.이 기사는 방법을 설명하기 위한 것이 아니지만 Django 앱의 철저한 특성을 강조하기 위해 몇 가지 코드를 제공합니다.

이 부분은 Django와 Wasp가 크게 겹치는 유일한 부분입니다. 둘 다 터미널에서 시작하여 간단한 작업 앱을 만들어 보겠습니다(Django와 Wasp가 설치되어 있고 경로에 있다고 가정합니다).
장고?
말벌?
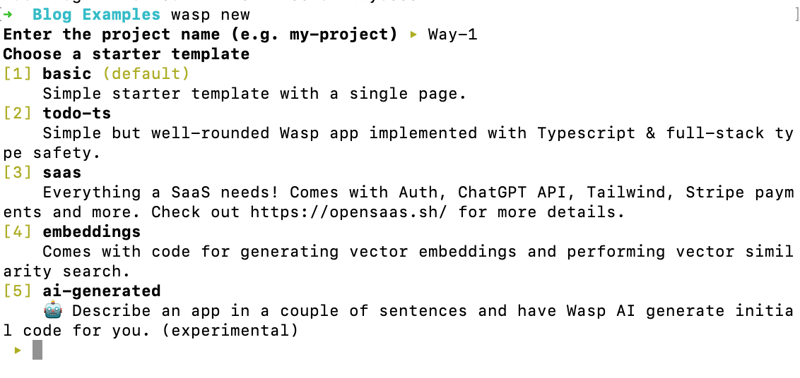
이제 말벌이 문밖으로 뜨거워지기 시작합니다. 아래 제공되는 메뉴를 확인하세요. Wasp는 기본 앱을 시작하거나 사전 제작된 다양한 템플릿(완전히 작동하는 SaaS 앱 포함) 중에서 선택하거나 설명에 따라 AI 생성 앱을 사용할 수도 있습니다!

한편 Django는 프로젝트 내의 앱이 포함된 프로젝트로 작동하며(다시 말하지만 이는 기본적으로 백엔드 작업을 위한 것입니다) 하나의 Django 프로젝트에 여러 앱이 있을 수 있습니다. 따라서 Django 프로젝트 설정에서 각 앱을 등록해야 합니다.
settings.py:
이제 데이터베이스가 필요하며 이는 Wasp가 정말 빛을 발하는 또 다른 영역입니다. Django에서는 models.py 파일에 모델을 생성해야 합니다. 한편 Wasp는 Prisma를 ORM으로 사용하여 필요한 필드를 명확하게 정의하고 이해하기 쉬운 방식으로 데이터베이스 생성을 간단하게 만듭니다.
장고?
models.py:
말벌?
스키마.프리즈마:
Django와 Wasp는 데이터베이스를 마이그레이션하는 비슷한 방법을 공유합니다.
장고?
말벌?
하지만 Wasp를 사용하면 Django에서는 할 수 없는 꽤 멋진 데이터베이스 작업도 수행할 수 있습니다.
지금은 SQLite를 사용하고 있지만 개발용 Posgres 데이터베이스를 즉시 설정해 보는 것은 어떨까요? Wasp는 다음을 사용하여 이를 수행할 수 있습니다.
그렇습니다! 이를 통해 Postgres 인스턴스를 실행하는 Docker 컨테이너가 생겼으며 이는 즉시 Wasp 앱에 연결됩니다. ?
또는 Prisma의 데이터베이스 스튜디오 UI를 통해 실시간으로 데이터베이스를 보고 싶다면 어떻게 해야 할까요? 이는 Django의 타사 확장 기능 없이는 불가능합니다. 이를 위해서는 다음을 실행하세요:
이제 무슨 말인지 이해가 되셨나요?
Django와 Wasp의 경로는 거의 비슷한 패턴을 따릅니다. 하지만 React에 익숙하다면 Wasp의 시스템이 훨씬 뛰어납니다.
Django는 모든 CRUD 작업을 수행하는 백엔드(views.py, 이 기사의 뒷부분에서 설명)를 통해 작동합니다. 이러한 보기 기능은 프로젝트 내의 앱 내 특정 경로와 연결되어 있으며(많이 알고 있습니다) 기본 키와 ID를 사용하기 시작하면 더 복잡해질 수 있습니다. urls.py 파일을 생성하고 특정 보기 파일과 기능을 경로로 지정해야 합니다. 그러면 해당 앱 URL이 프로젝트 URL에 연결됩니다. 휴.
Wasp의 방식: 경로를 정의하고 이를 구성 요소로 지정합니다.
장고?
todo/urls.py:
./urls.py:
말벌?
main.wasp:
여기서 Wasp의 이점이 더욱 분명해지게 됩니다.
Firstly, I am going to revisit the views.py file. This is where magic is going to happen for Django backend. Here is a simple version of what the create, update, and delete functions could look like for our Task/Todo example:
Django?
todo/views.py:
from django.shortcuts import render, redirect from .models import Task from .forms import TaskForm def index(request): tasks = Task.objects.all() form = TaskForm() if request.method == 'POST': form = TaskForm(request.POST) if form.is_valid(): form.save() return redirect('/') context = {'tasks': tasks, 'form': form} return render(request, 'todo/index.html', context) def updateTask(request, pk): task = Task.objects.get(id=pk) form = TaskForm(instance=task) if request.method == 'POST': form = TaskForm(request.POST, instance=task) if form.is_valid(): form.save() return redirect('/') context = {'form': form} return render(request, 'todo/update_task.html', context) def deleteTask(request, pk): task = Task.objects.get(id=pk) if request.method == 'POST': task.delete() return redirect('/') context = {'task': task} return render(request, 'todo/delete.html', context)
app/forms.py:
from django import forms from .models import Task class TaskForm(forms.ModelForm): class Meta: model = Task fields = ['title', 'completed']
Wasp?
main.wasp:
query getTasks { fn: import { getTasks } from "@src/operations", // Tell Wasp that this operation affects the `Task` entity. Wasp will automatically // refresh the client (cache) with the results of the operation when tasks are modified. entities: [Task] } action updateTask { fn: import { updateTask } from "@src/operations", entities: [Task] } action deleteTask { fn: import { deleteTask } from "@src/operations", entities: [Task] }
operations.js:
export const getTasks = async (args, context) => { return context.entities.Task.findMany({ orderBy: { id: 'asc' }, }) } export const updateTask = async ({ id, data }, context) => { return context.entities.Task.update({ where: { id }, data }) } export const deleteTask = async ({ id }, context) => { return context.entities.Task.delete({ where: { id } }) }
So right now, Wasp has a fully functioning backend with middleware configured for you. At this point we can create some React components, and then import and call these operations from the client. That is not the case with Django, unfortunately there is still a lot we need to do to configure React in our app and get things working together, which we will look at below.

At this point we could just create a simple client with HTML and CSS to go with our Django app, but then this wouldn't be a fair comparison, as Wasp is a true full-stack framework and gives you a managed React-NodeJS-Prisma app out-of-the-box. So let's see what we'd have to do to get the same thing set up with Django.
Note that this section is going to highlight Django, so keep in mind that you can skip all the following steps if you just use Wasp. :)
Django?
First thing’s first. Django needs a REST framework and CORS (Cross Origin Resource Sharing):
pip install djangorestframework pip install django-cors-headers
Include Rest Framework and Cors Header as installed apps, CORS headers as middleware, and then also set a local host for the react frontend to be able to communicate with the backend (Django) server (again, there is no need to do any of this initial setup in Wasp as it's all handled for you).
settings.py:
INSTALLED_APPS = [ ... 'corsheaders', ] MIDDLEWARE = [ ... 'corsheaders.middleware.CorsMiddleware', ... ] CORS_ALLOWED_ORIGINS = [ 'http://localhost:3000', ]
And now a very important step, which is to serialize all the data from Django to be able to work in json format for React frontend.
app/serializers.py:
from rest_framework import serializers from .models import Task class TaskSerializer(serializers.ModelSerializer): class Meta: model = Task fields = '__all__'
Now, since we are handling CRUD on the React side, we can change the views.py file:
from rest_framework import viewsets from .models import Task from .serializers import TaskSerializer class TaskViewSet(viewsets.ModelViewSet): queryset = Task.objects.all() serializer_class = TaskSerializer
And now we need to change both app and project URLS since we have a frontend application on a different url than our backend.
urls.py:
from django.contrib import admin from django.urls import path, include urlpatterns = [ path('admin/', admin.site.urls), path('api/', include('todo.urls')), # Add this line ]
from django.urls import path, include from rest_framework.routers import DefaultRouter from .views import TaskViewSet router = DefaultRouter() router.register(r'tasks', TaskViewSet) urlpatterns = [ path('', include(router.urls)), ]
By now you should be understanding why I've made the switch to using Wasp when building full-stack apps. Anyways, now we are actually able to make a react component with a Django backend ?
Ok, so now we can actually get back to comparing Wasp and Django.
Django?
To start, lets create our React app in our Django project:
npx create-react-app frontend
Finally, we can make a component in React. A few things:
I am using axios in the Django project here. Wasp comes bundled with React-Query (aka Tanstack Query), so the execution of (CRUD) operations is a lot more elegant and powerful.
The api call is to my local server, obviously this will change in development.
You can make this many different ways, I tried to keep it simple.
main.jsx:
import React, { useEffect, useState } from 'react'; import axios from 'axios'; const TaskList = () => { const [tasks, setTasks] = useState([]); const [newTask, setNewTask] = useState(''); const [editingTask, setEditingTask] = useState(null); useEffect(() => { fetchTasks(); }, []); const fetchTasks = () => { axios.get('http://127.0.0.1:8000/api/tasks/') .then(response => { setTasks(response.data); }) .catch(error => { console.error('There was an error fetching the tasks!', error); }); }; const handleAddTask = () => { if (newTask.trim()) { axios.post('http://127.0.0.1:8000/api/tasks/', { title: newTask, completed: false }) .then(() => { setNewTask(''); fetchTasks(); }) .catch(error => { console.error('There was an error adding the task!', error); }); } }; const handleUpdateTask = (task) => { axios.put(`http://127.0.0.1:8000/api/tasks/${task.id}/`, task) .then(() => { fetchTasks(); setEditingTask(null); }) .catch(error => { console.error('There was an error updating the task!', error); }); }; const handleDeleteTask = (taskId) => { axios.delete(`http://127.0.0.1:8000/api/tasks/${taskId}/`) .then(() => { fetchTasks(); }) .catch(error => { console.error('There was an error deleting the task!', error); }); }; const handleEditTask = (task) => { setEditingTask(task); }; const handleChange = (e) => { setNewTask(e.target.value); }; const handleEditChange = (e) => { setEditingTask({ ...editingTask, title: e.target.value }); }; const handleEditCompleteToggle = () => { setEditingTask({ ...editingTask, completed: !editingTask.completed }); }; return ( To-Do List
{tasks.map(task => ( - {editingTask && editingTask.id === task.id ? ( ) : ( {task.title} - {task.completed ? 'Completed' : 'Incomplete'} )}
))}
); }; export default TaskList;
Wasp?
And here's the Wasp React client for comparison. Take note how we're able to import the operations we defined earlier and call them here easily on the client with less configuration than the Django app. We also get the built-in caching power of the useQuery hook, as well as the ability to pass in our authenticated user as a prop (we'll get into this more below).
Main.jsx:
import React, { FormEventHandler, FormEvent } from "react"; import { type Task } from "wasp/entities"; import { type AuthUser, getUsername } from "wasp/auth"; import { logout } from "wasp/client/auth"; import { createTask, updateTask, deleteTasks, useQuery, getTasks } from "wasp/client/operations"; import waspLogo from "./waspLogo.png"; import "./Main.css"; export const MainPage = ({ user }) => { const { data: tasks, isLoading, error } = useQuery(getTasks); if (isLoading) return "Loading..."; if (error) return "Error: " + error; const completed = tasks?.filter((task) => task.isDone).map((task) => task.id); return (  {user && user.identities.username && (
 {user.identities.username.id} {`'s tasks :)`}
)} ); }; function Todo({ id, isDone, description }) { const handleIsDoneChange = async ( event ) => { try { await updateTask({ id, isDone: event.currentTarget.checked, }); } catch (err: any) { window.alert("Error while updating task " + err?.message); } }; return ( No tasks yet.
; return (Very nice! In the Wasp app you can see how much easier it is to call the server-side code via Wasp operations. Plus, Wasp gives you the added benefit of refreshing the client-side cache for the Entity that's referenced in the operation definition (in this case Task). And the cherry on top is how easy it is to pass the authenticated user to the component, something we haven't even touched on in the Django app, and which we will talk about more below.

So we already started to get a feel in the above code for how simple it is to pass an authenticated user around in Wasp. But how do we actually go about implementing full-stack Authentication in Wasp and Django.
This is one of Wasp’s biggest advantages. It couldn't be easier or more intuitive. On the other hand, the Django implementation is so long and complicated I'm not going to even bother showing you the code and I'll just list out the stps instead;
Wasp?
main.wasp:
app TodoApp { wasp: { version: "^0.14.0" }, title: "Todo App", auth: { userEntity: User, methods: { usernameAndPassword: {} } } //...
And that's all it takes to implement full-stack Auth with Wasp! But that's just one example, you can also add other auth methods easily, like google: {}, gitHub: {} and discord: {} social auth, after configuring the apps and adding your environment variables.
Wasp allows you to get building without worrying about so many things. I don’t need to worry about password hashing, multiple projects and apps, CORS headers, etc. I just need to add a couple lines of code.
Wasp just makes sense.

Django?
Let's check out what it takes to add a simple username and password auth implementation to a Django app (remember, this isn't even the code, just a checklist!):
Install Necessary Packages:
Update Django Settings:
Set Up URL Routing:
Implement Authentication Context in React:
Create Login Component in React:
Protect React Routes and Components:
Implement Task Update and Delete Functionality:
Add Authentication to Django Views:
I just want to highlight one more aspect of Wasp that I really love. In Django, we're completely responsible for dealing with all the boilerplate code when setting up a new app. In other words, we have to set up new apps from scratch every time (even if it's been done before a million times by us and other devs). But with Wasp we can scaffold a new app template in a number of ways toreallyjump start the development process.
Let's check out these other ways to get a full-stack app started in Wasp.
A simplewasp newin the terminal shows numerous starting options and app templates. If I really want to make a todo app for example, well there you have it, option 2.
Right out of the box you have a to-do application with authentication, CRUD functionality, and some basic styling. All of this is ready to be amended for your specific use case.
Or what if you want to turn code into money? Well, you can also get a fully functioning SaaS app. Interested in the latest AI offereings? You also have a vector embeddings template, or an AI full-stack app protoyper! 5 options that save you from having to write a ton of boilerplate code.
Just throw a name, prompt, and select a few of your desired settings and boom, you get a fully functioning prototype app. From here you can use other other AI tools, like Cursor's AI code editor, to generate new features and help you debug!
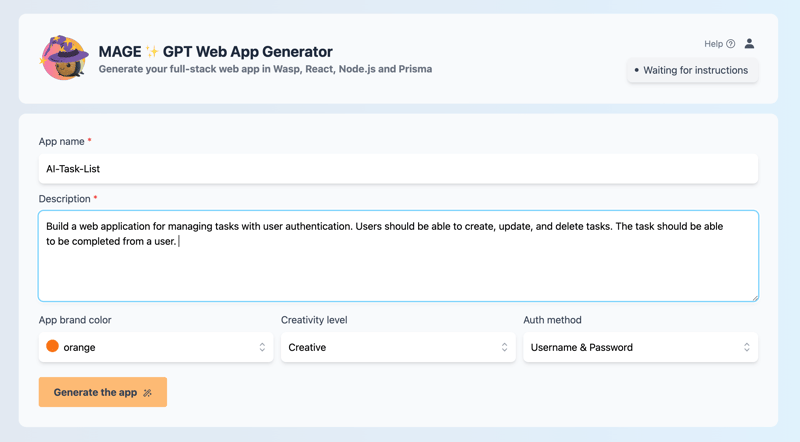
? Note that the Mage functionality is also achievable via the terminal ("ai-generated"), but you need to provide your own open-ai api key for it to work.

Êtes-vous intéressé par plus de contenu comme celui-ci ? Inscrivez-vous à notre newsletter et donnez-nous une étoile sur GitHub ! Nous avons besoin de votre soutien pour continuer à faire avancer nos projets ?
⭐️ Star Wasp sur GitHub ?
Alors voilà. Comme je l'ai dit au début, venant de Django, j'ai été étonné de voir à quel point il était facile de créer des applications full-stack avec Wasp, c'est ce qui m'a inspiré pour écrire cet article.
J'espère avoir pu vous montrer pourquoi rompre avec Django au profit de Wasp peut être bénéfique en termes de temps, d'énergie et d'émotion.
Ce qui précède est le contenu détaillé de. pour plus d'informations, suivez d'autres articles connexes sur le site Web de PHP en chinois!
 Utilisation de la fonction GAMMAINV
 Quel échange est EDX ?
 Quelle est la différence entre les formats guid et mbr
 Quels sont les développements secondaires courants en PHP ?
 Analyse comparative entre la version familiale Win10 et la version professionnelle
 La différence entre le système Hongmeng et le système Android
 Comment utiliser Spyder
 Une liste complète des commandes d'exploitation et de maintenance du serveur Linux


![[Web front-end] Démarrage rapide de Node.js](https://img.php.cn/upload/course/000/000/067/662b5d34ba7c0227.png)


