Play with Git
The biggest difference between distributed and centralized is that developers can submit to local, and each developer copies one on the local machine by cloning (git clone)
complete Git repositories. Compared with the SVN centralized code management that most of us have used, git is more secure for managing code. If the svn server hangs up,
Then its data is likely to be in danger of being lost, but for git, there is no such thing. The code is all git to local, even if the server hangs up,
The code is still intact. Git is a version controller, which is completely different from the traditional svn. svn is a difference comparison, and code cannot be submitted offline. And git saves
With the complete code base local, the code is more secure. Code can be submitted at any time. I have already introduced to you how to build a git server. Next I will
Let’s take a look at the specific use of git commands! I will introduce some commonly used ones here, and for the rest I will recommend a website to everyone, which has a detailed introduction to git
Shao, if you forget, you can check it at any time!
The installation method on windows is to download a git client called git bash tool and install it directly! You can also download the git version of Little Turtle! I’ll introduce it here
is git bash, so that everyone can become familiar with git commands.
The installation method under Linux is simpler, just yum -y install git!
We created a new project TestProject
on the server
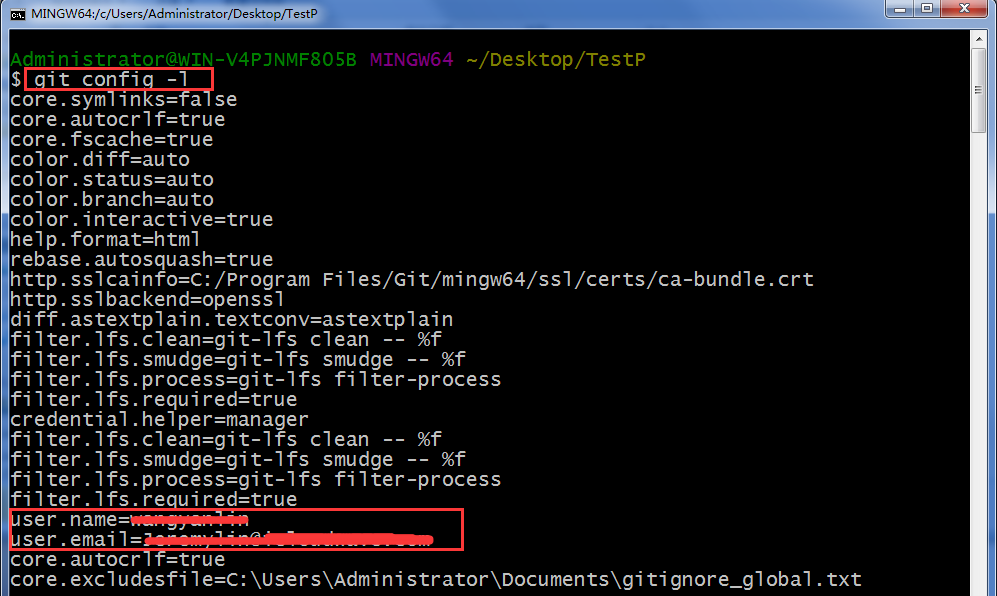
First, you will be assigned a group and username and password, which means you have permission to access this project. Our first step is to set up our username and email address.

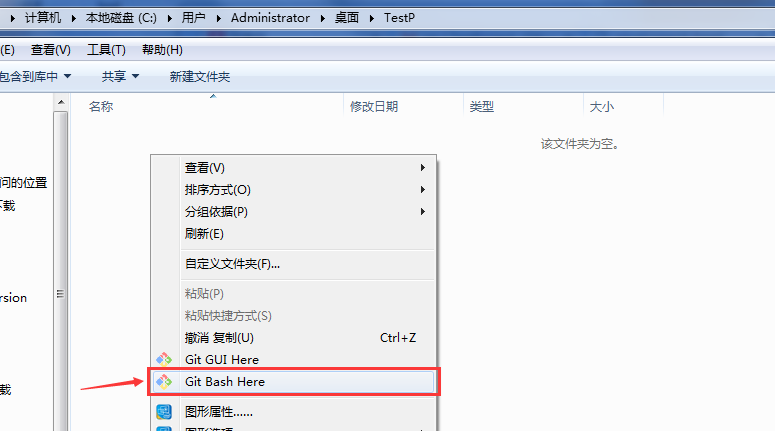
Create a new folder to store the project, enter the file, right-click and select Git Bash Here to enter our git command line interface. The next operation will be performed inside.
git config -l (view configuration file)
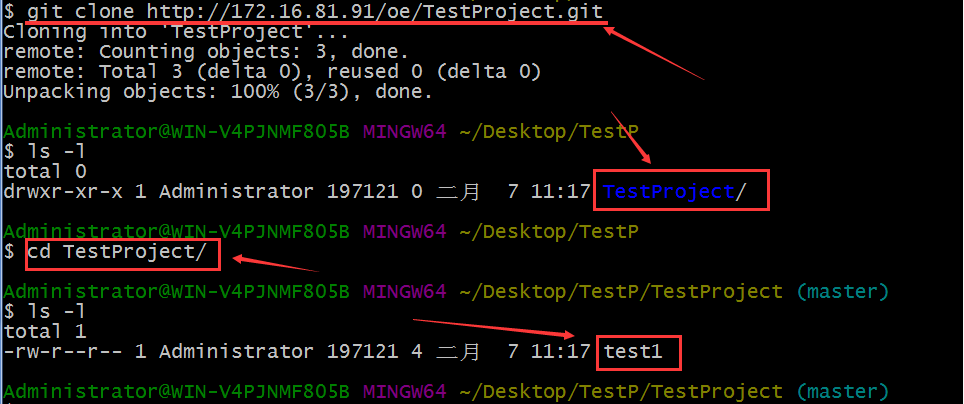
The first case is that the project is uploaded in advance, we only need to pull it locally and use git clone http://172.16.81.91/oe/TestProject.git (equivalent to svn checkout)

git status Check the status of the code at any time, a very useful command

Next let’s modify the test1 file and check the status
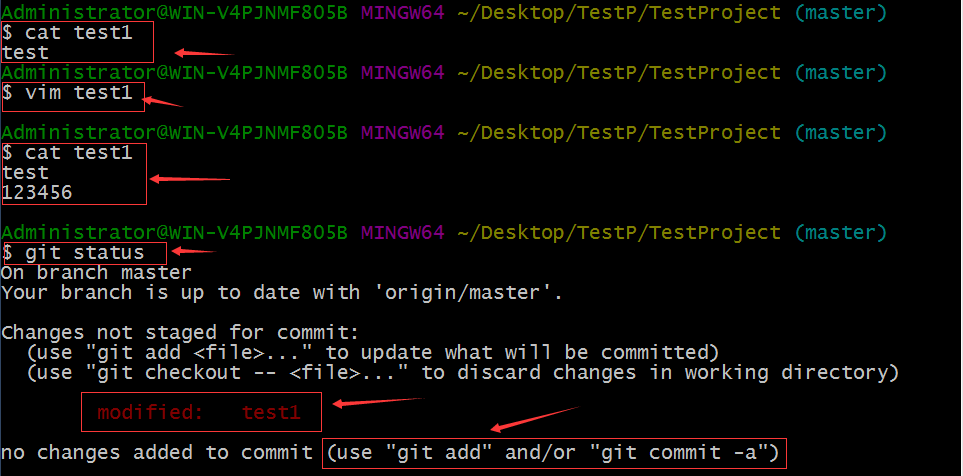
Prompt test1 has been modified, then we need to use git add or git commit -a to submit the code
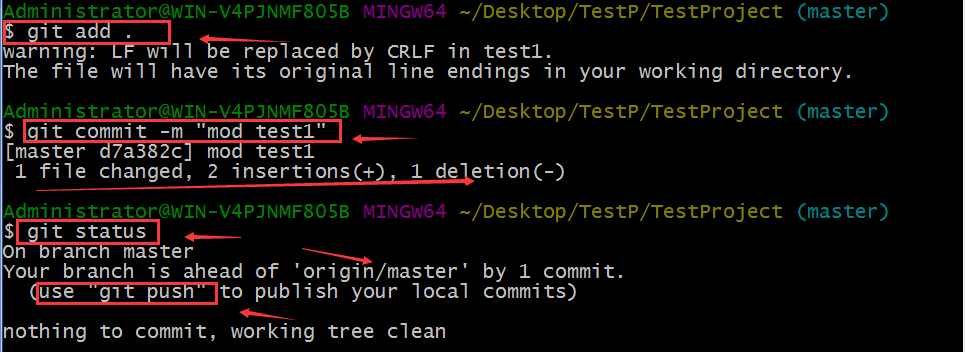
git add. Add modified files to git operation; git commit (submit code, usually followed by -m parameter, indicating adding comments)
The current status of git status is git push (when we complete the submission, we can upload the code to the server)

Let’s go to the server to view the submitted code

Submission completed!
The second situation is that the project files on our server are deleted. We can use git pull locally to update to the latest files (equivalent to svn update)

In the third case, to submit the code to the newly created empty project, we delete the TestProject project from the server and create it again.
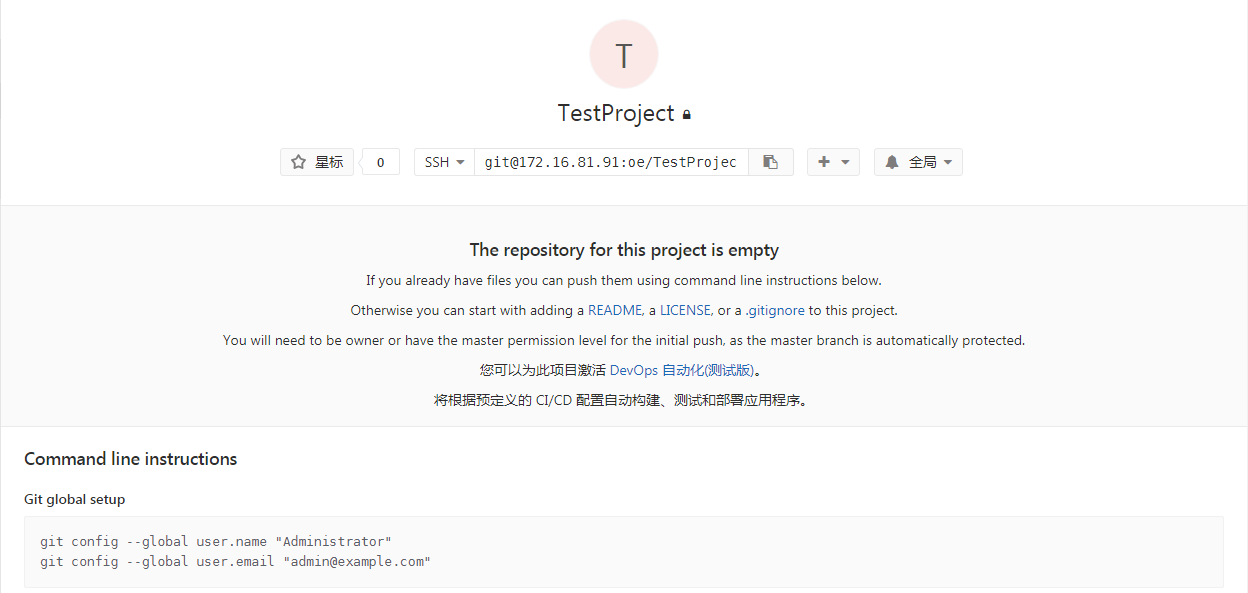
We re-create a folder in the TestP directory, name it project2, and create the test1 file in the directory

We need to initialize the folder git init before uploading the local code to the server

Add local code to the remote server git remote add origin http://172.16.81.91/oe/TestProject.git
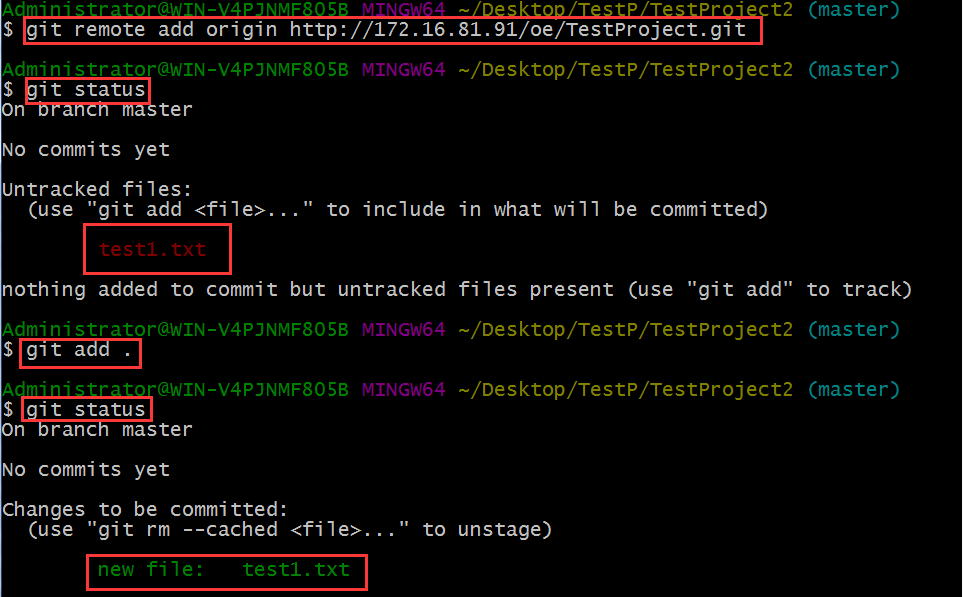
Submit code

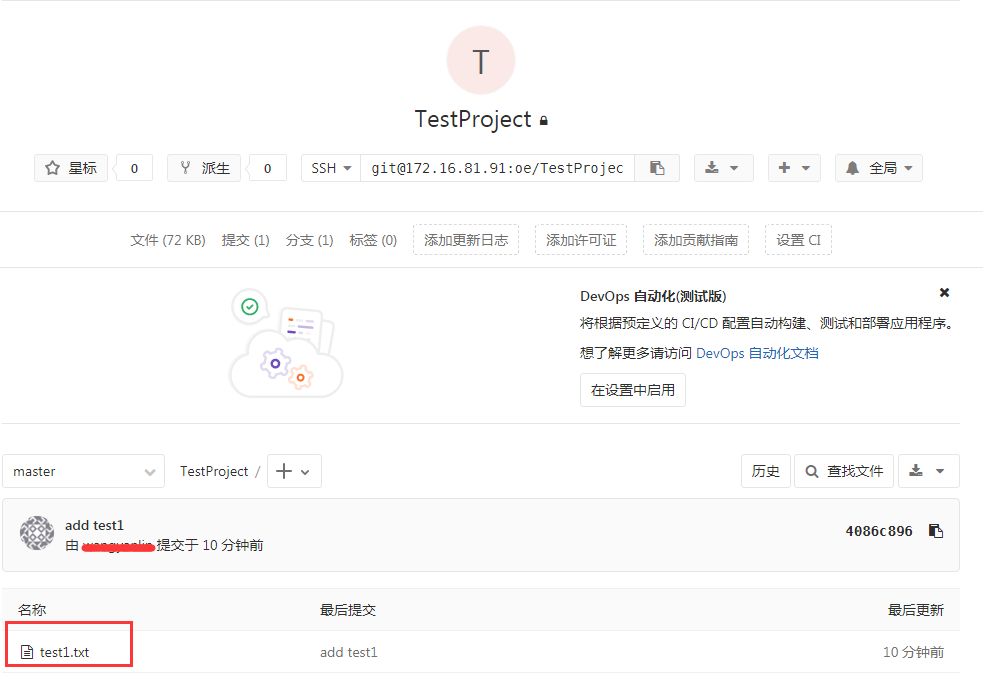
Upload code

View server project verification
The above introduction is what we commonly use. Next, you can check other commands:
查看分支:git branch

创建分支:git branch name

切换分支:git checkout name

创建+切换分支:git checkout –b name

合并某分支到当前分支:git merge name

删除分支:git branch –d name
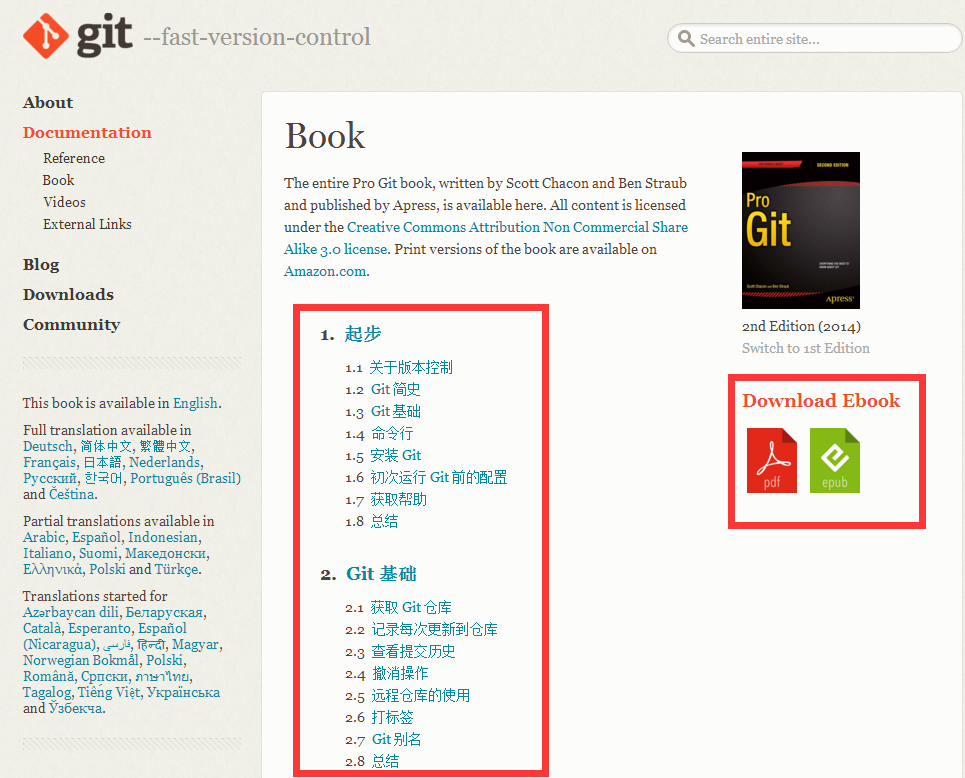
Finally, I will introduce you to a website with detailed information about git: https://git-scm.com/book/zh/v2
You can also download the pdf of the website and read it locally. After reading the first few pictures, you will be a master!
Please point out any errors! Thanks! Let’s learn together!
The above is the detailed content of Play with Git. For more information, please follow other related articles on the PHP Chinese website!

Hot AI Tools

Undresser.AI Undress
AI-powered app for creating realistic nude photos

AI Clothes Remover
Online AI tool for removing clothes from photos.

Undress AI Tool
Undress images for free

Clothoff.io
AI clothes remover

AI Hentai Generator
Generate AI Hentai for free.

Hot Article

Hot Tools

Notepad++7.3.1
Easy-to-use and free code editor

SublimeText3 Chinese version
Chinese version, very easy to use

Zend Studio 13.0.1
Powerful PHP integrated development environment

Dreamweaver CS6
Visual web development tools

SublimeText3 Mac version
God-level code editing software (SublimeText3)

Hot Topics
 1378
1378
 52
52
 Difference between centos and ubuntu
Apr 14, 2025 pm 09:09 PM
The key differences between CentOS and Ubuntu are: origin (CentOS originates from Red Hat, for enterprises; Ubuntu originates from Debian, for individuals), package management (CentOS uses yum, focusing on stability; Ubuntu uses apt, for high update frequency), support cycle (CentOS provides 10 years of support, Ubuntu provides 5 years of LTS support), community support (CentOS focuses on stability, Ubuntu provides a wide range of tutorials and documents), uses (CentOS is biased towards servers, Ubuntu is suitable for servers and desktops), other differences include installation simplicity (CentOS is thin)
 Detailed explanation of docker principle
Apr 14, 2025 pm 11:57 PM
Docker uses Linux kernel features to provide an efficient and isolated application running environment. Its working principle is as follows: 1. The mirror is used as a read-only template, which contains everything you need to run the application; 2. The Union File System (UnionFS) stacks multiple file systems, only storing the differences, saving space and speeding up; 3. The daemon manages the mirrors and containers, and the client uses them for interaction; 4. Namespaces and cgroups implement container isolation and resource limitations; 5. Multiple network modes support container interconnection. Only by understanding these core concepts can you better utilize Docker.
 Centos stops maintenance 2024
Apr 14, 2025 pm 08:39 PM
CentOS will be shut down in 2024 because its upstream distribution, RHEL 8, has been shut down. This shutdown will affect the CentOS 8 system, preventing it from continuing to receive updates. Users should plan for migration, and recommended options include CentOS Stream, AlmaLinux, and Rocky Linux to keep the system safe and stable.
 How to use docker desktop
Apr 15, 2025 am 11:45 AM
How to use Docker Desktop? Docker Desktop is a tool for running Docker containers on local machines. The steps to use include: 1. Install Docker Desktop; 2. Start Docker Desktop; 3. Create Docker image (using Dockerfile); 4. Build Docker image (using docker build); 5. Run Docker container (using docker run).
 What to do after centos stops maintenance
Apr 14, 2025 pm 08:48 PM
After CentOS is stopped, users can take the following measures to deal with it: Select a compatible distribution: such as AlmaLinux, Rocky Linux, and CentOS Stream. Migrate to commercial distributions: such as Red Hat Enterprise Linux, Oracle Linux. Upgrade to CentOS 9 Stream: Rolling distribution, providing the latest technology. Select other Linux distributions: such as Ubuntu, Debian. Evaluate other options such as containers, virtual machines, or cloud platforms.
 What are the backup methods for GitLab on CentOS
Apr 14, 2025 pm 05:33 PM
Backup and Recovery Policy of GitLab under CentOS System In order to ensure data security and recoverability, GitLab on CentOS provides a variety of backup methods. This article will introduce several common backup methods, configuration parameters and recovery processes in detail to help you establish a complete GitLab backup and recovery strategy. 1. Manual backup Use the gitlab-rakegitlab:backup:create command to execute manual backup. This command backs up key information such as GitLab repository, database, users, user groups, keys, and permissions. The default backup file is stored in the /var/opt/gitlab/backups directory. You can modify /etc/gitlab
 How to mount hard disk in centos
Apr 14, 2025 pm 08:15 PM
CentOS hard disk mount is divided into the following steps: determine the hard disk device name (/dev/sdX); create a mount point (it is recommended to use /mnt/newdisk); execute the mount command (mount /dev/sdX1 /mnt/newdisk); edit the /etc/fstab file to add a permanent mount configuration; use the umount command to uninstall the device to ensure that no process uses the device.
 How to install centos
Apr 14, 2025 pm 09:03 PM
CentOS installation steps: Download the ISO image and burn bootable media; boot and select the installation source; select the language and keyboard layout; configure the network; partition the hard disk; set the system clock; create the root user; select the software package; start the installation; restart and boot from the hard disk after the installation is completed.


