


How to configure the server in eclipse

Configuring the server in Eclipse includes creating server configuration, adding deployment targets and configuring startup parameters. Creating a server configuration involves specifying the name and installation directory; adding a deployment target involves selecting the deployment type and path; configuring startup parameters requires adding VM parameters such as setting the heap size, such as: MyServer (Tomcat 9.0) deployment target: WAR, path: /my -app/target/my-app.war; startup parameters: -Xmx512m-Xms256m.

How to configure the server in Eclipse
Eclipse is a popular Java development integrated environment (IDE) that Allows developers to easily configure and manage servers. Configuring the server involves creating the server configuration, adding deployment targets, and configuring startup parameters.
Create a server configuration
- In Eclipse, go to the "Servers" perspective (Window > Show View > Servers).
- Click the "New Server" button.
- Select the server type (for example, Apache Tomcat).
- Specify a name for the server and configure its installation directory.
Add Deployment Targets
- In the Servers perspective, right-click the server and select Add and Remove Deployment Targets.
- Select the type of deployment target (for example, war file or directory) to which you want to deploy the application.
- Configure the path of the target.
Configure startup parameters
- In the Servers perspective, right-click the server and select Properties.
- Switch to the "JVM Parameters" tab.
- In the "VM Parameters" area, add startup parameters. For example, to set the heap size:
-Xmx512m.
Example configuration
- Server name: MyServer
- Server type: Tomcat 9.0
- Installation directory: /usr/local/tomcat9
-
Deployment target:
- Type: Web Application Archive (WAR)
- Path:/my-app/target/my-app.war
-
Startup parameters :
- -Xmx512m
- -Xms256m
##Start server
- In the Servers perspective, right-click the server and select Start.
- The server will start in the "Console" view.
The above is the detailed content of How to configure the server in eclipse. For more information, please follow other related articles on the PHP Chinese website!

Hot AI Tools

Undress AI Tool
Undress images for free

Undresser.AI Undress
AI-powered app for creating realistic nude photos

AI Clothes Remover
Online AI tool for removing clothes from photos.

Clothoff.io
AI clothes remover

Video Face Swap
Swap faces in any video effortlessly with our completely free AI face swap tool!

Hot Article
Hot Tools

Notepad++7.3.1
Easy-to-use and free code editor

SublimeText3 Chinese version
Chinese version, very easy to use

Zend Studio 13.0.1
Powerful PHP integrated development environment

Dreamweaver CS6
Visual web development tools

SublimeText3 Mac version
God-level code editing software (SublimeText3)


 Detailed introduction to each directory of Linux and each directory (reprinted)
May 22, 2025 pm 07:54 PM
Detailed introduction to each directory of Linux and each directory (reprinted)
May 22, 2025 pm 07:54 PM
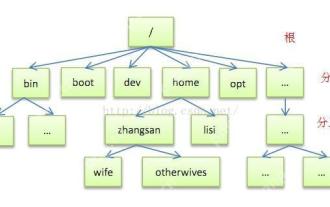
[Common Directory Description] Directory/bin stores binary executable files (ls, cat, mkdir, etc.), and common commands are generally here. /etc stores system management and configuration files/home stores all user files. The root directory of the user's home directory is the basis of the user's home directory. For example, the home directory of the user user is /home/user. You can use ~user to represent /usr to store system applications. The more important directory /usr/local Local system administrator software installation directory (install system-level applications). This is the largest directory, and almost all the applications and files to be used are in this directory. /usr/x11r6 Directory for storing x window/usr/bin Many
 How to execute php code after writing php code? Several common ways to execute php code
May 23, 2025 pm 08:33 PM
How to execute php code after writing php code? Several common ways to execute php code
May 23, 2025 pm 08:33 PM
PHP code can be executed in many ways: 1. Use the command line to directly enter the "php file name" to execute the script; 2. Put the file into the document root directory and access it through the browser through the web server; 3. Run it in the IDE and use the built-in debugging tool; 4. Use the online PHP sandbox or code execution platform for testing.
 Troubleshooting of system performance not recovered after uninstalling Apache service
May 16, 2025 pm 10:09 PM
Troubleshooting of system performance not recovered after uninstalling Apache service
May 16, 2025 pm 10:09 PM
Reasons for system performance not recovered after uninstalling the Apache service may include resource occupancy by other services, error messages in log files, resource consumption by abnormal processes, network connection problems, and file system residues. First, check whether there are other services or processes before uninstalling with Apache; second, pay attention to the operating system's log files and find error messages that may occur during the uninstallation process; second, check the system's memory usage and CPU load, and find out abnormal processes; then, use the netstat or ss command to view the network connection status to ensure that no ports are occupied by other services; finally, clean up the remaining configuration files and log files after uninstallation to avoid occupying disk space.
 How to update Debian Tomcat
May 28, 2025 pm 04:54 PM
How to update Debian Tomcat
May 28, 2025 pm 04:54 PM
Updating the Tomcat version in the Debian system generally includes the following process: Before performing the update operation, be sure to do a complete backup of the existing Tomcat environment. This covers the /opt/tomcat folder and its related configuration documents, such as server.xml, context.xml, and web.xml. The backup task can be completed through the following command: sudocp-r/opt/tomcat/opt/tomcat_backup Get the new version Tomcat Go to ApacheTomcat's official website to download the latest version. According to your Debian system
 Commands and configurations for starting Apache service in macOS system
May 16, 2025 pm 10:00 PM
Commands and configurations for starting Apache service in macOS system
May 16, 2025 pm 10:00 PM
The command to start the Apache service on macOS is sudoapachectlstart, and the configuration file is located in /etc/apache2/. The main steps include: 1. Edit the httpd.conf file, modify the Listen port such as Listen8080; 2. Adjust the DocumentRoot path to the personal directory such as /Users/your_username/Sites, and update the corresponding permission settings; 3. Use the sudoapachectlgraceful command to restart Apache to ensure that the configuration takes effect; 4. Enable the mod_deflate module to compress data to improve page loading speed.
 Solve the problem of file deletion failure during uninstalling Apache
May 16, 2025 pm 10:06 PM
Solve the problem of file deletion failure during uninstalling Apache
May 16, 2025 pm 10:06 PM
The reasons for file deletion failure during Apache uninstall include file permission issues, locking files, and running processes. Solutions include: 1. Stop the Apache service: sudosystemctlstoppapache2; 2. Manually delete the Apache directory: sudorm-rf/etc/apache2/usr/sbin/apache2; 3. Use lsof to find and terminate the process of locking the file: sudolsof|grepapache2, and then sudokill-9; 4. Try to delete the file again.
 Detailed configuration steps for Apache connecting to MySQL database
May 16, 2025 pm 10:12 PM
Detailed configuration steps for Apache connecting to MySQL database
May 16, 2025 pm 10:12 PM
Configuring Apache to connect to MySQL database requires the following steps: 1. Make sure that Apache and MySQL are installed; 2. Configuring Apache to support PHP, by adding LoadModule and AddHandler instructions in httpd.conf or apache2.conf; 3. Configuring PHP to connect to MySQL, enable mysqli extension in php.ini; 4. Create and test the connected PHP file. Through these steps, the connection between Apache and MySQL can be successfully implemented.
 What does java middleware mean? Definition and typical applications of middleware
May 28, 2025 pm 05:51 PM
What does java middleware mean? Definition and typical applications of middleware
May 28, 2025 pm 05:51 PM
Java middleware is a software that connects operating systems and application software, providing general services to help developers focus on business logic. Typical applications include: 1. Web server (such as Tomcat and Jetty), which handles HTTP requests; 2. Message queue (such as Kafka and RabbitMQ), which handles asynchronous communication; 3. Transaction management (such as SpringTransaction), which ensures data consistency; 4. ORM framework (such as Hibernate and MyBatis), which simplifies database operations.
