


Samba: The best file sharing solution between Linux and Windows

Linux系统和Windows系统之间的文件共享一直是一个值得关注的话题。在过去,想要在这两种操作系统之间互相分享文件,需要通过FTP或者HTTP等协议来实现,但是这种方式很繁琐并且不安全。如今,有了Samba这个强大的工具,你可以很容易地在Linux和Windows系统之间实现文件共享,而不必担心安全问题。
Samba让你可以在Linux系统上模拟文件和打印服务。你可能并不完全了解这样的系统能为你做什么,但简而言之,使用Samba创建基于Linux的文件和打印服务器,有望为你省钱并简化管理。

一、不需要域
不必实施Windows Active Directory(AD)域即可使用Samba文件和打印共享。如果你有域,也不必为了向Windows系统提供文件和打印服务而将Linux系统加入域。但需要做两件事才能使这两个操作系统无缝运行,如同拥有一个AD域那样:同步密码,并匹配域或工作组名称。
注意:我不反对AD域,相反支持AD域。我也是Windows管理员,明白拥有AD域的价值。如果你没有AD域,或者不想将Linux系统加入域,有一些变通方法。
同步那些密码
在没有AD域的情况下实施Samba时你要做的一件事就是同步密码。在Linux系统上,将密码设为与Windows系统(或域)上使用的密码为同一个。请记住,你得使用smbpasswd命令来这么做。passwd命令仅适用于Linux用户帐户,不影响Samba用户的密码。
添加Samba用户实际上是两个步骤的过程。首先要添加新用户:
$ sudo smbpasswd -a mjones
其次需要启用新用户。这是最常被遗忘的步骤:
$ sudo smbpasswd -e mjones
之后,使用smbpasswd命令更改Samba用户的密码:
$ sudo smbpasswd mjones
有一种方法可以使用/etc/samba/smb.conf文件中的全局配置设置来同步用户和密码,但是该选项不在本文探讨的范围。
匹配域或工作组名称
设置Samba时,使用Windows系统使用的域或工作组名称。默认工作组名称(SAMBA)在Windows环境中可能没有用。匹配名称将帮助你浏览Windows系统,允许Windows系统顺畅无阻地浏览Linux系统的共享区。
启用了Samba的Linux系统还会出现在域计算机的浏览列表中。不过由于该系统不是正式的域成员,因此Windows管理员无法以任何方式执行策略或管理系统。提醒一下,应获得以这种方式配置Linux系统的权限。
二、启用Samba的Linux系统看起来像Windows系统
如果你的网络上有正确配置的启用Samba的Linux系统,很难将它与Windows系统区分开来。你甚至可以模仿所选择的Windows版本,让Linux系统报告自己是Windows系统。大多数用户不会知道有何区别,也不会关心在网络浏览器中看到的一个或多个系统运行Linux。
将驱动器映射到Samba共享区
若没有AD域,你要创建一个CMD(比如LOGIN.CMD)文件,并将其放入每个用户的Startup文件夹中,该文件夹将驱动器映射到Linux Samba文件服务器。优秀的Windows管理员可以实现映射的驱动器,无需接触每个系统。简单的PowerShell脚本可以将CMD文件部署到网络上的每个Windows系统。如果你有域,可以创建组策略,将驱动器映射到系统及其共享区。在这两种情况下,假设你的Linux文件服务器名为FS1,并且有两个共享区:Public和Projects。以平常的方式从Windows计算机映射驱动器:
NET USE P: \\FS1\Public
NET USE Q: \\FS1\Projects
如果一切设置正确,驱动器将会映射,没有密码提示,就像你使用Windows文件服务器一样。标准共享区可锁定起来,供特定的用户或组使用。Public驱动器之类的共享区通常对所有人开放,可以读取写入。
管理共享区不包括在内
Windows管理员会注意到,他们心爱的管理共享区(C和等)在Samba中不存在,也不应该存在。当然,你可以创建管理共享区,但除非你出于某个原因想要破坏Linux系统的安全性,否则就没有理由这么做。
打印机共享/服务
通过Samba设置打印机共享是相当复杂的过程。你得为Windows驱动程序和spooling打印作业创建共享区,必须单独共享每台打印机。正确设置后,Samba打印机共享或服务效果很好。进行这项设置时务必要耐心,因为相比Windows服务器的安装设置(几乎是自动的),其安装设置可能令人沮丧。
三、可选的Samba功能和部署
Using Samba, your Linux system can become a browser host, domain controller or domain member without any commercial software. Of course, the feature list will never quite compare to an actual Windows server, but for cost savings and overall ease of setup, you can't go wrong with Samba if you want to integrate with a Windows system.
Want to use Windows, just create Samba enabled Linux. In other words, once you have Samba set up, configured, and running, you don't need to perform any special operations on your Windows system. From this perspective, Samba is easy to implement, and the only deployment is what you would expect from a Windows server, since there are no third-party agents to install, and no special configuration is required to use the Samba server.
NOTE: Due to the way browsing on Windows networks, Shares and Systems may not appear for up to 45 minutes. Be patient, and don't think something is wrong when Community Zones and Systems don't immediately appear in the browse list.
4. Summary
For years, IT administrators have deployed tools to integrate Windows and Linux/Unix systems on corporate networks. NFS software for Windows, terminal emulation software for Windows, FTP clients, and SSH clients are common tools deployed on Windows systems to interface with these systems, yet Samba works almost out of the box. Samba requires very little computational overhead to run. Any Linux system can be used. First released in 1992, Samba has proven its place in modern networking and provides free interoperability for your heterogeneous environments. Enjoy!
In short, Samba is a very powerful tool that makes file sharing between Linux and Windows very simple. In just a few steps, you can easily set up a Samba share and transfer files between the two operating systems in real time. We strongly recommend Samba as the tool of choice for file sharing, it will bring you faster speeds, stronger security, and a better user experience.
The above is the detailed content of Samba: The best file sharing solution between Linux and Windows. For more information, please follow other related articles on the PHP Chinese website!

Hot AI Tools

Undress AI Tool
Undress images for free

Undresser.AI Undress
AI-powered app for creating realistic nude photos

AI Clothes Remover
Online AI tool for removing clothes from photos.

Clothoff.io
AI clothes remover

Video Face Swap
Swap faces in any video effortlessly with our completely free AI face swap tool!

Hot Article
Hot Tools

Notepad++7.3.1
Easy-to-use and free code editor

SublimeText3 Chinese version
Chinese version, very easy to use

Zend Studio 13.0.1
Powerful PHP integrated development environment

Dreamweaver CS6
Visual web development tools

SublimeText3 Mac version
God-level code editing software (SublimeText3)


 How to install Linux alongside Windows (dual boot)?
Jun 18, 2025 am 12:19 AM
How to install Linux alongside Windows (dual boot)?
Jun 18, 2025 am 12:19 AM
The key to installing dual systems in Linux and Windows is partitioning and boot settings. 1. Preparation includes backing up data and compressing existing partitions to make space; 2. Use Ventoy or Rufus to make Linux boot USB disk, recommend Ubuntu; 3. Select "Coexist with other systems" or manually partition during installation (/at least 20GB, /home remaining space, swap optional); 4. Check the installation of third-party drivers to avoid hardware problems; 5. If you do not enter the Grub boot menu after installation, you can use boot-repair to repair the boot or adjust the BIOS startup sequence. As long as the steps are clear and the operation is done properly, the whole process is not complicated.
 What Are the Steps to Install Redis on a Linux System?
Jun 11, 2025 am 12:11 AM
What Are the Steps to Install Redis on a Linux System?
Jun 11, 2025 am 12:11 AM
ToinstallRedisonaLinuxsystem,followthesesteps:1)DownloadandextractRedisfromtheofficialGitHubrepository,2)CompileRedisusingthe'make'command,3)InstallRediswith'sudomakeinstall',4)ConfigureRedisbycopyingandeditingtheconfigurationfile,and5)StartRedisusin
 How to enable the EPEL (Extra Packages for Enterprise Linux) repository?
Jun 17, 2025 am 09:15 AM
How to enable the EPEL (Extra Packages for Enterprise Linux) repository?
Jun 17, 2025 am 09:15 AM
The key to enabling EPEL repository is to select the correct installation method according to the system version. First, confirm the system type and version, and use the command cat/etc/os-release to obtain information; second, enable EPEL through dnfinstallepel-release on CentOS/RockyLinux, and the 8 and 9 version commands are the same; third, you need to manually download the corresponding version of the .repo file and install it on RHEL; fourth, you can re-import the GPG key when encountering problems. Note that the old version may not be supported, and you can also consider enabling epel-next to obtain the test package. After completing the above steps, use dnfrepolist to verify that the EPEL repository is successfully added.
 How to choose a Linux distro for a beginner?
Jun 19, 2025 am 12:09 AM
How to choose a Linux distro for a beginner?
Jun 19, 2025 am 12:09 AM
Newbie users should first clarify their usage requirements when choosing a Linux distribution. 1. Choose Ubuntu or LinuxMint for daily use; programming and development are suitable for Manjaro or Fedora; use Lubuntu and other lightweight systems for old devices; recommend CentOSStream or Debian to learn the underlying principles. 2. Stability is preferred for UbuntuLTS or Debian; you can choose Arch or Manjaro to pursue new features. 3. In terms of community support, Ubuntu and LinuxMint are rich in resources, and Arch documents are technically oriented. 4. In terms of installation difficulty, Ubuntu and LinuxMint are relatively simple, and Arch is suitable for those with basic needs. It is recommended to try it first and then decide.
 How to add a new disk to Linux
Jun 27, 2025 am 12:15 AM
How to add a new disk to Linux
Jun 27, 2025 am 12:15 AM
The steps to add a new hard disk to the Linux system are as follows: 1. Confirm that the hard disk is recognized and use lsblk or fdisk-l to check; 2. Use fdisk or parted partitions, such as fdisk/dev/sdb and create and save; 3. Format the partition to a file system, such as mkfs.ext4/dev/sdb1; 4. Use the mount command for temporary mounts, such as mount/dev/sdb1/mnt/data; 5. Modify /etc/fstab to achieve automatic mount on the computer, and test the mount first to ensure correctness. Be sure to confirm data security before operation to avoid hardware connection problems.
 Where are system logs located in Linux?
Jun 24, 2025 am 12:15 AM
Where are system logs located in Linux?
Jun 24, 2025 am 12:15 AM
Logs in Linux systems are usually stored in the /var/log directory, which contains a variety of key log files, such as syslog or messages (record system logs), auth.log (record authentication events), kern.log (record kernel messages), dpkg.log or yum.log (record package operations), boot.log (record startup information); log content can be viewed through cat, tail-f or journalctl commands; application logs are often located in subdirectories under /var/log, such as Apache's apache2 or httpd directory, MySQL log files, etc.; at the same time, it is necessary to note that log permissions usually require s
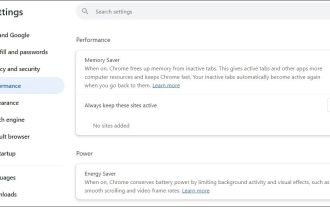 Fixed the failure to upload files in Windows Google Chrome
Jul 08, 2025 pm 02:33 PM
Fixed the failure to upload files in Windows Google Chrome
Jul 08, 2025 pm 02:33 PM
Have problems uploading files in Google Chrome? This may be annoying, right? Whether you are attaching documents to emails, sharing images on social media, or submitting important files for work or school, a smooth file upload process is crucial. So, it can be frustrating if your file uploads continue to fail in Chrome on Windows PC. If you're not ready to give up your favorite browser, here are some tips for fixes that can't upload files on Windows Google Chrome 1. Start with Universal Repair Before we learn about any advanced troubleshooting tips, it's best to try some of the basic solutions mentioned below. Troubleshooting Internet connection issues: Internet connection
 What is the sudo command and when should I use it?
Jul 02, 2025 am 12:20 AM
What is the sudo command and when should I use it?
Jul 02, 2025 am 12:20 AM
sudo stands for "substituteuserdo" or "superuserdo", allowing users to run commands with permissions of other users (usually root). Its core uses include: 1. Perform system-level operations such as installing software or editing system files; 2. Accessing protected directories or logs; 3. Manage services such as restarting nginx; 4. Modify global settings such as /etc/hosts. When using it, the system will check the /etc/sudoers configuration and verify the user password, provide temporary permissions instead of continuously logging in as root, ensuring security. Best practices include: only when necessary, avoid blindly executing network commands, editing sudoers files with visudo, and considering continuous operations.
