


Word2003 makes article directory:
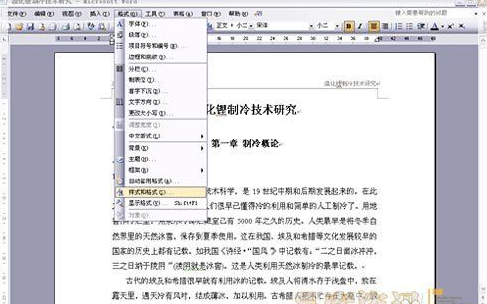
Modifying the formatting of title styles is one of the common tasks in essay writing. The built-in heading styles of Word usually cannot meet the requirements of the paper format, so they need to be modified manually. Specific steps are as follows: 1. Click "Format | Style" on the menu bar, and then select "All Styles" in the list drop-down box. 2. Find the corresponding heading style, such as Heading 1, Heading 2 or Heading 3, and click the "Change" button. 3. In the pop-up dialog box, you can modify the font, paragraphs, tab stops, numbering, etc. to meet the format requirements of the paper. 4. Modify the format of Titles 1-3 one by one according to specific needs to ensure that they are consistent with the paper format. Through the above steps, we can manually modify the title style in Word to meet the paper format requirements. This will make the title of the paper more standardized and unified in format.
In each chapter, the corresponding format should be used to set the title paragraph. Chapter titles should use the "Title 1" style, section titles should use the "Title 2" style, and third-level titles should use the "Title 3" style. By using styles to format headings, you have the important advantage that changing the heading format becomes very easy. For example, if you want to change the font size of all first-level titles to a smaller 3-point size, you only need to change the format settings of the "Title 1" style, and then it will be updated automatically. The font size of all chapter titles will automatically be changed to a smaller 3-point size, avoiding the need to manually modify them one by one. Troublesome and error-prone problems. For details on how to apply styles and automatically update styles, please refer to the Word Help documentation.
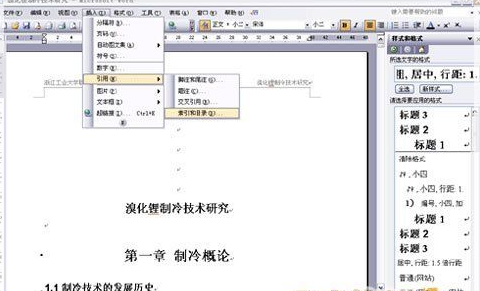
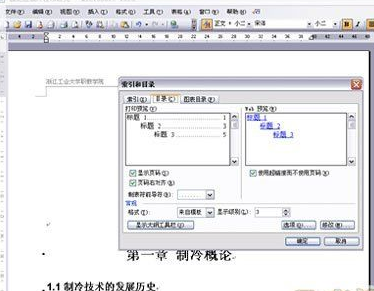
3) Extract directory. According to the paper format, the table of contents is placed at the front of the text. Insert a new page before the main text (insert a page break before the title of the first chapter), move the cursor to the beginning of the new page, add the word "Table of Contents", and set the format. Start a new paragraph, select "Insert | Index and Table of Contents" in the menu bar, click the "Table of Contents" tab, and set the "Display Level" to level 3. No other changes are required. Word will automatically generate a table of contents after confirmation. If a chapter title is not in the table of contents, it must be that the title style is not used or is used improperly. It is not a problem with Word's table of contents generation. Please check the corresponding chapter. If the chapter title changes or the page number changes later, just update the table of contents.
1. First apply a title style to the title that you want to display in the table of contents.
2. Position the cursor to the location where you want to create a table of contents. The table of contents is usually located at the beginning of the document.
3. Execute "Insert" → "Index and Table of Contents" → "Table of Contents" tab.
4. The settings of "Page Number", "Tab Character", "Format", etc. are the same as those for indexing and will not be described again. In the display level box, set the number of directory levels to be displayed (the default is 3). For example, this example uses a three-level heading style. To display a three-level directory, set it to "3", or click "Options" ” button, set manually in the Directory Options dialog box.
5. To change the display effect of the directory, click the "Change" button to open the "Style" dialog box, in which directory 1 manages the first-level directory, and so on. Select the directory level where you want to change the effect, and click "Modify" to set it separately. After setting, click "OK" to return to the "Style" dialog box.
6. Click the "OK" button to return to the "Index and Table of Contents" dialog box, click "OK", and the table of contents will be inserted at the specified location.
Tips: Click the table of contents entry or page number to jump directly to its corresponding title.
2. Update directory
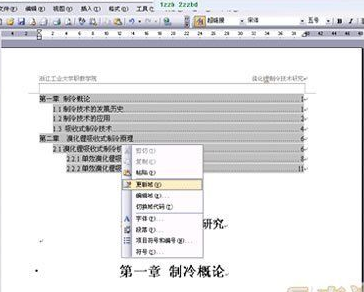
Word creates a table of contents in the form of a domain. If the page numbers or titles in the document change, you need to update the table of contents to make it consistent with the content of the document. Right-click the directory and select "Update Domain". You can also select the directory and press the F9 key to update the domain.
If you want to change the display format of the directory, you can re-execute the operation of creating the directory. Finally, a dialog box will pop up asking whether you want to replace the selected directory. Select "Yes" to replace it.
Answered by: qin6459399 - Newbie Level 2 5-15 16:58
Click Format >> Style and Format, a format selection box will appear on the right side of the page. Click >> New Style >> on the top right of the page. Fill in the first-level title in the name of the pop-up box, and select Paragraph in the style type. , based on the style, select Title 1, select the text in the subsequent paragraphs, and then set the font, font size, number of points left before and after the paragraph, etc. of the title text according to your needs. There is also a row of Save to Template options at the bottom of this window. If you plan to use this style in future documents, click Save to Template. If there are still changes in the future, leave it unchecked. Click OK, and your first-level title format is set. At this time, an additional style name called "Level 1 Title" is added to the style and format box.
Go back to your article, select the first-level titles of your article, that is, the titles of your chapters one by one, and click the "First-level Title" in the style box on the right. It will be the same as what you just set.
Set your second-level and third-level headings in the same way, name the second-level heading based on heading 2, and the third-level heading based on heading 3, and return to the text to apply them one by one.
After setting the format of all your titles, return the cursor to your article, click Insert-Quote-Table of Contents, and set the table of contents display level to 3. In this way, your table of contents will be generated, and the table of contents will include your third-level titles and above. Includes all third-level headings.
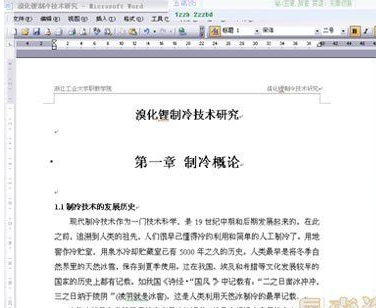
Before generating the table of contents, open your document structure diagram and display it on the left. Here you can clearly see the structure of your article. This structure is the basis for automatically generating the table of contents. If your document structure diagram is messy, The automatically generated directory is messy.
The above is an excerpt from "yuanyuanlyz"'s answer.
As for the format of the text, such as fonts, line spacing, etc., it depends on the document.
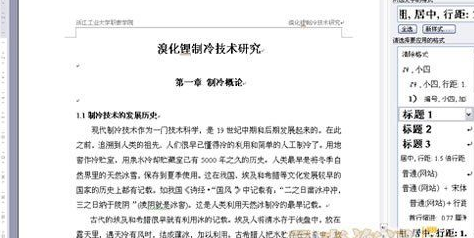
Open the word document and select [Style and Format] in [Format]
A "Style Format" column appears on the right, which mainly uses Title 1, Title 2, and Title 3. Apply Title 1, Title 2, and Title 3 to the titles of each chapter in the text. For example: We need to use Title 1 to define "Chapter 1 Introduction to Refrigeration" in the text. "1.1 Development History of Refrigeration Technology" is defined by Title 2. If there is 1.1.1*** then use title 3 to define it.
Of course, the properties of Title 1, Title 2, and Title 3 (such as font size, centering, bold, etc.) can be modified by yourself. Modification method: Right-click "Title 1" and select "Modify". A modification menu will pop up. You can modify it according to your own needs.
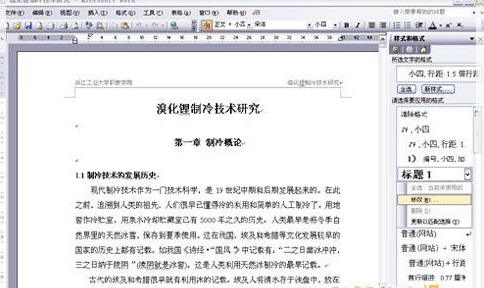
Use headings 1, 2, and 3 to define each chapter in the text. It is very convenient to define, just point the cursor on "Chapter 1 Introduction to Refrigeration", and then click the left mouse button on the title 1 on the right, and it is defined; in the same way, use the titles 2 and 3 to define 1.1; 1.1.1; By analogy, Chapter 2 and Chapter 3 are also defined in this way until the end of the full text.
When everything is defined, we can generate the directory. Move the cursor to the blank position at the beginning of the article where you want to insert the table of contents, and select [Insert]–[Quote]–[Index and Table of Contents]
Select the second tab [Directory], and then click OK on the lower right. That's OK.
After you re-modify the article content, you need to update the table of contents. The method is: right-click in the table of contents area and select [Update Domain]
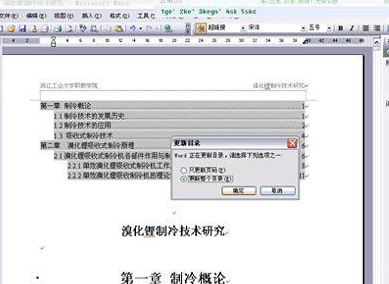
After selecting [Update Domain], the check box in the picture above will appear. Select the second "Update Entire Directory" and click OK. That's OK.
Method 1. Automatically generate directory
In the typed document, open the Style and Format dialog box:
1. Select the first-level title of the full text and click the first-level title in Style and Format;
2. Second level, third level... The method is as above. At the same time, you can also modify the format of the first, second and third level titles. The method is: right-click the title in the "Style and Format" to be modified (such as the first level). Open "Modify Style", where you can modify the required font size, color, etc., and the paragraph spacing can be modified in "Format" in the lower left corner;
3. After finishing the titles at all levels of the full text, click "Insert", "Citation" and "Index and Table of Contents" to confirm.
Using WORD to automatically generate a table of contents is not only fast, but also very convenient when reading and searching content. Just hold down Ctrl and click on a chapter in the table of contents to jump directly to the page. More importantly, it is convenient for future modifications, because The finished article will inevitably be revised many times, adding or deleting content. If you label the table of contents manually, it will be a headache to change all subsequent page numbers if the content in the middle is changed. If you use WORD to automatically generate a table of contents, you can modify the article content at will. Finally, if you update the table of contents, the table of contents will be mapped to the corresponding page numbers again.
-
Method 2: Manually create directory
1. Enter Chinese characters in the directory, press the tab key and then enter the page number, complete in one go
For example: Chapter 1 Enterprise Management (press the tab key) 01
Chapter 2 Management Method (Click the tab key) 05
Complete with this
2. Set the text format, then select the entire directory, click 'Format' in the toolbar, there is a 'tab stop' inside, click
3. Set the 'tab stop position' (that is, the page number position) to 40 (can be adjusted according to your needs),
'Alignment' selects right alignment, 'Leader' generally selects 5
4. Click ‘OK’ after setting, and your directory will be OK
Hopefully my answer is of help to you
The above is the detailed content of How to create a table of contents in word2003. For more information, please follow other related articles on the PHP Chinese website!


![[Web front-end] Node.js quick start](https://img.php.cn/upload/course/000/000/067/662b5d34ba7c0227.png)


