


If you have hosted a plugin on a WordPress repository, you will be quite familiar with SVN and some of its commands. In this tutorial, I'll show you how to use Git, another version control system popularized by GitHub, to publish and maintain your plugin.
Git and SVN are both examples of version control systems. WordPress's repository uses the latter (if you have a plugin hosted on WordPress, you will be familiar with "checking in" to make changes to this repository). They both allow you to track changes to your code, but there are big differences in how they do it.
SVN relies on a single "central repository" of code (in our context: WordPress plugin repository). Every time you want to edit a plugin, you need to make a local copy, make your changes, and then "check in" those changes to the WordPress repository.
Git is a decentralized version control system. Not only do you have a local copy of the plugin, you also have a complete clone of the plugin repository, with all its changes. The repository now exists independently on your computer. You can commit and track changes, revert changes, or "branch" the plugin in different directions on your local machine. Only if you are willing to update the plugin will you push the changes to the WordPress repository to make them public.
In this tutorial, I am assuming that you already have a plugin hosted on the WordPress plugin repository, or at least that your hosting request has been approved. If you’re not sure how to get your plugin hosted by WordPress, I recommend reading our article on how to publish to a WordPress plugin repository.
There are many arguments for and against using Git instead of SVN (and decentralized version control systems in general). Many of these stem from the fundamentally different ways Git and SVN track changes. CodeForest's Git vs SVN article provides a great, in-depth analysis of Git and SVN, but for WordPress developers:
git svn, it's actually not that difficult and this article is here to guide you through it.
excellentresources if you're new to Git). How you install Git will depend on your operating system, and what GUI programs are available to you. In this tutorial, I'll do everything via the command line - I encourage you to do the same. At the end of the article, I'll recommend some GUI programs you can use, but generally, I only use them to help visualize the branches of a repository.
Plugins". Once there, we want to tell Git where to find our plugin. As of this writing, there are nearly 20,000 plugins hosted in the WordPress repository with over 500,000 revisions. We don't want to wait for Git to go through each one to find our plugin. So first, we find the starting version of the plugin (we want it to be the entire history). To do this, we get the first log of the plugin (when it was initially added to the repository):
svn log -r 1:HEAD --limit 1 http://plugins.svn.wordpress.org/your-plug-in-name
r520657 | plugin-master | 2012-03-19 03:56:31 +0000 (Mon, 19 Mar 2012) | 1 line
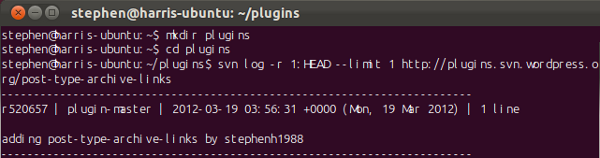
我的插件的第一个数字“520657”是第一个修订版。我们将在下一个命令中使用它,告诉 Git 克隆我们插件的历史记录。将 XXXXXX 替换为您的修订号。
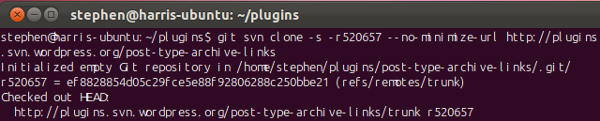
git svn clone -s -rXXXXXX --no-minimize-url http://plugins.svn.wordpress.org/your-plug-in-name cd your-plugin-name git svn fetch git svn rebase
“-s”告诉 Git 期望 SVN 存储库的标准(标签、主干、分支)布局。 '--no-minimize-url' 会阻止它在插件文件夹之外查找。确保它没有丢失。如果您忽略它,您最终可能会复制整个 WordPress 插件存储库。-rXXXXXX告诉 Git 要查找的修订版本。如果你忽略它,Git 将搜索存储库的整个历史记录。修改次数超过 500,000 次。我有一次遗漏了这个,花了大约两个小时。安装完毕后,应该只需要几分钟。
完成后,您应该会发现它在“插件”文件夹中创建了一个名为“您的插件名称”的文件夹。让我们来探索一下。导航到“您的插件名称”文件夹并运行命令以查看存在哪些“分支”:
git branch -a
这将列出所有分支,本地和远程。唯一的本地分支应该是 Master (星号表示这是您所在的分支)。其他分支是“主干”,如果有的话,每个标签都有一个分支(SVN 将标签视为分支,但 Git 比这更聪明)。
转到“本地文件夹”“plugins/your-plugin-name”,您应该会看到插件文件(如果有)。在其中创建或编辑任何文件之前,我们将创建一个单独的分支来处理。
更新:由于 Neerav 和 John Eckman 在下面的评论中指出的问题,上述命令已更新。上面的代码现在反映了 Stephen Harris 的建议。
使用 Git 的好处之一是您可以轻松地在 GitHub 上维护插件的版本。这使得其他开发人员更容易访问您的插件,他们可能会提出改进建议,甚至进行自己的修改,您可以将其拉入您自己的存储库中。如果您已经设置了 GitHub,此时您可能希望将插件推送到您的帐户。为此,首先在 GitHub 帐户上为自己创建一个新存储库,然后将其作为远程分支添加到本地存储库:
git remote add origin git@github.com:/ .git
“your-user-name”是指您的 GitHub 用户名,“your-repo-name”是指您在其上创建的存储库的名称GitHub。然后你只需推送本地存储库:
git push origin master
我们将创建一个新的分支“work”。我们将在这个分支内更改插件、进行更改并添加功能等。这意味着我们的“主”分支保持其原始状态。这允许我们切换回 Master 分支,并再次分支。特别是,假设当您在“工作”分支中开发一些新功能时,您的插件中发现了一个主要错误。您可以切换回您的“主”分支(其中不包括您当前正在处理的任何功能),提交错误修复,然后将其推送到 WordPress 存储库。然后,您可以切换回工作分支并从上次中断的地方继续。 (注意:Git 不会创建文件的副本 - 您的本地文件夹中始终只有一组文件。这些文件包含的内容取决于您所在的分支。)< /p>
事实上,为要添加到插件中的每个新功能创建一个分支是个好主意。完成后,您只需将它们合并回主分支即可。如果这导致任何“冲突”,系统会要求您手动解决这些问题。
首先创建一个名为“work”的分支:
git branch work
然后“签出”(转到)分支“工作”:
git checkout work
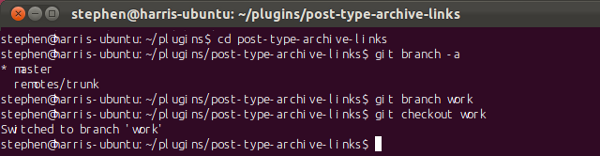
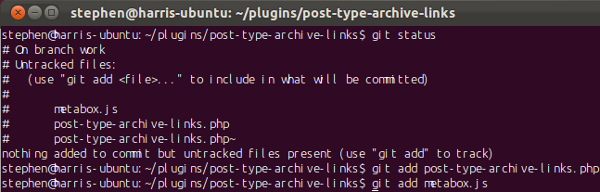
一条消息将告诉您您已切换到“工作”分支。现在,使用您最喜欢的文本编辑器打开本地文件夹中的插件文件(如果还没有任何文件,则创建它们)。创建一些文件后,您可能想查看更改了哪些文件。您可以使用简单的命令来完成此操作:
git status
这将列出已跟踪和未跟踪文件的更改。可能存在您不希望 Git 跟踪的文件(例如临时文件),但如果您向该文件夹添加了任何新文件,则需要告诉 Git 跟踪它们。您可以使用以下命令执行此操作:
git add
我在本地文件夹中创建了两个文件“post-type-archive-links.php”和“metabox.js”,因此我添加了他们告诉 Git 跟踪他们。您必须确保您正在跟踪您的自述文件。
您还可以查看自上次提交以来的更改(这是 GUI 程序变得非常方便的地方)
git diff
一旦您想要将更改提交到本地存储库:
git commit -a -m "Did abc to xyz"
提供提交中包含的更改的(详细)消息。

在进行更改的过程中,您可以(并且应该)尽可能频繁地提交 - 但以合乎逻辑的方式,最好为您所做的每件“事情”进行一次提交。您还应该确保您的提交中没有明显的错误。 “撤消”一次提交既快速又轻松:您可以通过执行另一次提交来逆转前一次提交来完成此操作:
git revert HEAD
(系统会提示您输入一条消息来描述此提交。)
假设您现在想要将所有更改推送到 SVN 存储库。在这样做之前,我们需要记住一些事情。 Git 鼓励您经常提交,对于开发而言,这样做是一个很好的实践。不过,您的 WordPress 插件存储库可供分发。它不需要每一次提交。事实上,正如 Otto(WordPress 核心贡献者)警告的那样,它也确实不想要它:
“如果我发现你[分别推送每个提交],那么我将禁止你访问 WordPress.org。SVN 只需要提交你的最终工作版本,而不是数百个的整个历史记录。您使用 Git 所做的更改。将您的更改扁平化为单个提交。”
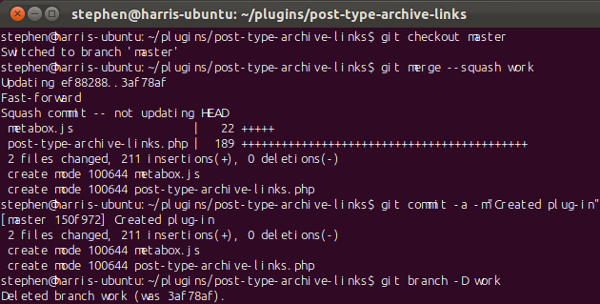
为了避免这种情况,当我们准备好推送到 WordPress 存储库时,我们会将所有提交合并为一个提交。有几种方法可以做到这一点。我们将把工作分支中的更改合并(并同时压缩)到主分支中。然后我们所有的更改都会作为主分支上的一次提交出现。然后我们删除工作分支并将主分支推送到插件的 SVN 主干。
首先,我们要切换回 Master 分支:
git checkout master
然后将工作分支更改压缩并合并到主分支中:
git merge --squash work
如果对主分支进行了更改,则合并中可能会出现冲突。系统会提示您在合并完成之前手动解决这些冲突。合并后,提交更改(这一提交将包含我们工作分支的所有提交):
git commit -a -m "Made changes a,b,c,d"
最后,我们删除工作分支
git branch -D work
如果您有多个分支想要合并,那么您可以对每个分支执行此操作。还有一些替代方法可以扁平化您的历史记录(例如交互式变基),我不会介绍这些方法。
此时,如果您愿意,您可以将最新更改推送到您的 GitHub 帐户:
git push -u origin master
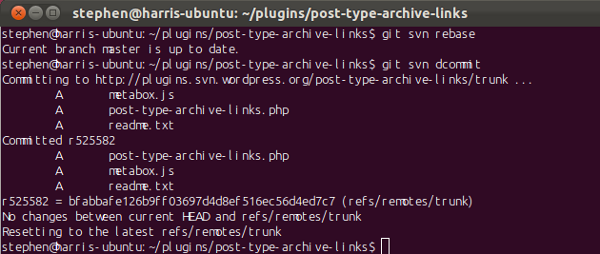
要推送到 WordPress 存储库,我们首先确保我们的本地存储库是“最新的”:
git svn rebase
然后,Git 将获取您的 subversion 存储库,并将其中的任何更改与我们刚刚所做的更改合并。通常情况下,WordPress 存储库不应有任何更改,因此您应该看到以下消息:当前分支 master 已更新。
现在我们可以将更改推送到 WordPress 存储库
git svn dcommit
然后,Git 可能会提示您输入 WordPress.org 凭据。输入后,您的更改将提交到 WordPress 存储库。很快您就会收到来自 WordPress 存储库的一封电子邮件,通知您提交情况。
目前,这些更改将放在后备箱中。如果我们想标记插件的新版本怎么办?为插件创建下一个版本时,您应该更新自述文件,以便稳定标签指向您的新版本(例如“2.0”)。您还应该在your-plug-in-name.php文件中更新插件的标头信息。如果您忘记执行此操作,只需执行上述过程并进行这些更改即可。
一旦您的“主干”完全更新(包括最新版本信息),我们只需在 WordPress 存储库中创建新标签即可:
git svn tag "2.0"
这会将 trunk 中的所有内容复制到tags/2.0中(通常使用svn cp trunktags/2.0在 SVN 中实现的效果)。

如果您想在本地存储库中标记版本:
git tag -a 2.0 -m"Tagging 2.0"
与我们对 WordPress 存储库所做的类似,确保我们的存储库同意,然后推送我们的更改和标签:
git pull --rebase origin master git push origin master git push origin --tags
最后,还有一些可能会派上用场的 Git “备忘单”:此处和此处。
The above is the detailed content of Publishing WordPress plugins using Git. For more information, please follow other related articles on the PHP Chinese website!


![[Web front-end] Node.js quick start](https://img.php.cn/upload/course/000/000/067/662b5d34ba7c0227.png)


