


The WordPress customizer has been actively developed since its inception. APIs are constantly evolving, including JavaScript APIs. However, it is one of the least documented APIs in the WordPress Codex. As a result, there are only a few detailed records showing how toactuallyexploit the JavaScript API.
Taking advantage of the JavaScript API in the WordPress Customizer actually allows us to provide a more compelling real-time experience when customizing a theme, rather than just casting changes from the control to the preview window.
You may be familiar with how to use the Customizer JavaScript API to cast changes to the preview window in real time. To do this, we set thetransportmode topostMessageand add the corresponding JavaScript code as shown below.
wp.customize( 'blogname', function( value ) { value.bind( function( to ) { $( '.site-title a' ).text( to ); } ); } );
However, we can also extend the API further, such as hiding, showing or moving parts, panels, controls, changing the value of a setting based on the value of another setting, and interconnecting previews and control interactions. These are what we will look at in this tutorial.
We’ve covered the WordPress Customizer quite extensively over several articles and series, covering the details of the Customizer API.
I think you have grasped the core concepts of the WordPress Customizer and components such as panels, sections, settings, and controls. Otherwise, I highly recommend you spend some time studying our tutorials and video courses on the topic before going any further.
First we will examine the Settings and Controls added in the Customizer for this tutorial. We'll also look at the code to put them in place.

In this tutorial, we will focus on the website "Site Title". As you can see above, we have two controls: the native WordPress “Site Title” input field and a custom checkbox to enable or disable the “Site Title”. These two controls are located in the Site Identification section. To the right of the image is a preview where you can see the "Site Title" being rendered.
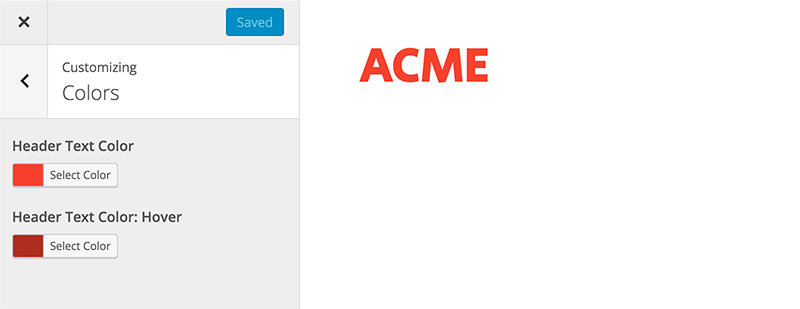
Additionally, as you can see below, we have two controls located in the Colors section for changing the Site Title color and itshoverstatus color.
Our theme is based on underscore, where all customizer related code is placed in the/inc/customizer.phpfile.
function tuts_customize_register( $wp_customize ) { $wp_customize->get_setting( 'blogname' )->transport = 'postMessage'; $wp_customize->get_setting( 'blogdescription' )->transport = 'postMessage'; $wp_customize->get_control( 'blogdescription' )->priority = '12'; $wp_customize->get_setting( 'header_textcolor' )->default = '#f44336'; $wp_customize->get_setting( 'header_textcolor' )->transport = 'postMessage'; // Checkbox to Display Blogname $wp_customize->add_setting( 'display_blogname', array( 'transport' => 'postMessage', ) ); $wp_customize->add_control( 'display_blogname', array( 'label' => __( 'Display Site Title', 'tuts' ), 'section' => 'title_tagline', 'type' => 'checkbox', 'priority' => 11, ) ); // Add main text color setting and control. $wp_customize->add_setting( 'header_textcolor_hover', array( 'default' => '#C62828', 'sanitize_callback' => 'sanitize_hex_color', 'transport' => 'postMessage', ) ); $wp_customize->add_control( new WP_Customize_Color_Control( $wp_customize, 'header_textcolor_hover', array( 'label' => __( 'Header Text Color: Hover', 'tuts' ), 'section' => 'colors', 'priority' => '11' ) ) ); } add_action( 'customize_register', 'tuts_customize_register' );
As you can see above, we made some modifications to the code to meet the needs of this tutorial.
blogdescriptionto12so that the checkbox settingdisplay_blognameappears below the "Site Title" input field.display_blogname. We setpriorityto11, which in our example is between the Site Title and Tagline input fields.header_textdefault color to#f44336and thetransporttype topostMessage.header_text_color. Likewise, we'll also set the priority to11so that it appears below theheader_textcolorsetting.All these settings are set viapostMessage, not viarefresh. ThepostMessageoption allows values to be transferred asynchronously and displayed in the preview window in real time. However, we also have to write our own JavaScript to handle the changes.
We need to create two JavaScript files: one filecustomizer-preview.jsto handle the preview, and another filecustomizer-control.jsto handle the inside of the customizer panel of controls. < /p>
js ├── customizer-preview.js // 1. File to handle the Preview ├── customizer-control.js // 2. File to handle the Controls ├── navigation.js └── skip-link-focus-fix.js
Include the following code incustomizer-preview.js.
( function( $ ) { // Codes here. } )( jQuery );
It is currently an empty enclosing JavaScript function. We'll discuss more specifically how to preview changes in the preview window in the next tutorial in this series.
In another filecustomizer-control.js, we add the following code:
(function( $ ) { wp.customize.bind( 'ready', function() { var customize = this; // Codes here } ); })( jQuery );
As you can see above, we will wrap this code in this file in the customizerreadyevent. This will ensure that everything in the customizer, including settings, panels, and controls, is completely ready before we start executing any custom functionality.
Finally, after adding the code, we will load these two JavaScript files in two different locations.
// 1. customizer-preview.js function tuts_customize_preview_js() { wp_enqueue_script( 'tuts_customizer_preview', get_template_directory_uri() . '/js/customizer-preview.js', array( 'customize-preview' ), null, true ); } add_action( 'customize_preview_init', 'tuts_customize_preview_js' ); // 2. customizer-control.js function tuts_customize_control_js() { wp_enqueue_script( 'tuts_customizer_control', get_template_directory_uri() . '/js/customizer-control.js', array( 'customize-controls', 'jquery' ), null, true ); } add_action( 'customize_controls_enqueue_scripts', 'tuts_customize_control_js' );
customizer-preview.js文件将通过customize_preview_init操作挂钩加载到定制器预览窗口中。customizer-control.js文件将加载到定制程序后端,其中的设置和控制元素可通过customize_controls_enqueue_scripts操作挂钩访问。
WordPress 自成立以来一直在 PHP 方面进行了大量投资。因此,支持该生态系统的大多数开发人员对 PHP API 比 JavaScript API 更加熟练和熟悉也就不足为奇了。
直到最近,它才通过定制器和 WP-API 广泛集成了 JavaScript。掌握 WordPress 定制器中的 JavaScript API 可能是一个相当大的挑战。如前所述,WordPress 的这一面目前记录最少。因此,我们将彻底讨论这个主题。
同时,如果您正在寻找其他实用程序来帮助您构建不断增长的 WordPress 工具集,或者学习代码并更加精通 WordPress,请不要忘记查看我们提供的内容可在 Envato 市场购买。
在此,我们已准备好使用 WordPress JavaScript API 的所有基本元素。我们就到此结束。在本系列的下一部分中,我们将揭示 WordPress 中 JavaScript API 背后的更多内容,并开始编写可立即在主题中实现的功能脚本。
敬请期待!
The above is the detailed content of Getting Started: Understanding the WordPress Customizer JavaScript API. For more information, please follow other related articles on the PHP Chinese website!
 what is server
 Introduction to java core technology content
 Where should I fill in my place of birth: province, city or county?
 How to modify the registry
 How to use dc.rectangle
 How to modify the text on the picture
 Word page number starts from the third page as 1 tutorial
 How to open win11 control panel


![[Web front-end] Node.js quick start](https://img.php.cn/upload/course/000/000/067/662b5d34ba7c0227.png)


