


NETTUTS Tutorial Example
Page content...


In this tutorial, I will show you how to create a style switcher using jQuery and PHP. The end result will be an unobtrusive and fully degradable dynamic style switcher that will be fast and easy to implement.

First we need to create the basic HTML file and save it as index.php:
Style Switcher
You'll see some PHP underneath the header title attribute. It's very simple - all it does is check for a cookie called "style" - if it exists, it assigns it to a local variable (also called "style"), if the cookiedoesn'texist, it Assign the default theme ("day") to the$stylevariable. This variable is then echoed in the link element's href attribute (href="css/.css").
You will see the style switcher div included in the HTML above. There is no need to use JavaScript to add this as the method we use will allow the style switcher to work when JavaScript is disabled. Both links (night and day) take the user to a file named style-switcher.php with a query string appended specifying the corresponding theme (e.g.href="style-switcher.php?style=day "). < /p>
I also called a jQuery plug-in called styleSwitcher. This hasn't been developed yet (well, it will be by the time you read this), so wait! ...we will write this plugin in step 4 of this tutorial.
Now, we need to create a few CSS stylesheets for the HTML. I decided to create just two stylesheets - one themed "Day" and one themed "Night" and I have named them appropriately. (Day.css and Night.css)
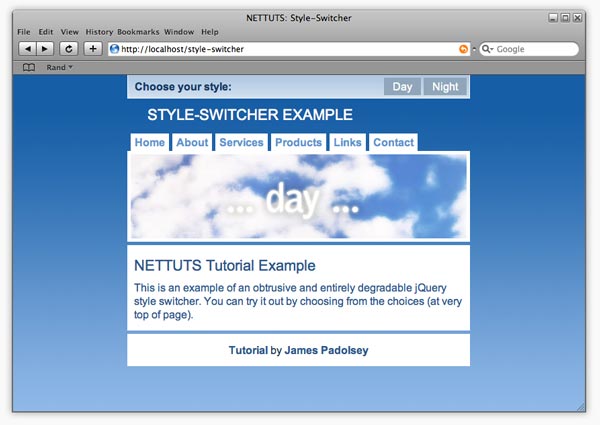
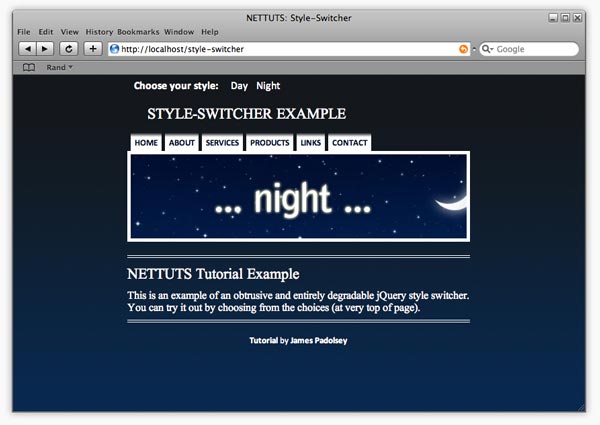
It's better to start with one style and then copy all selectors to the alternative stylesheet - then all that needs to be changed are the various CSS rules and declarations. Obviously you can have as many style sheets as you want, but in this tutorial we'll use two for illustration purposes. And day and night get along great together as a duo!
#dummy-element{width:2px;} /* Necessary to check if StyleSheet has loaded */ /* Quick Reset */ body,ul,ol,li,img,form,p,h1,h2,h3,h4,h5,h6,blockquote { margin: 0; padding: 0; border: none; list-style: none; font-weight: normal; } /* General / Header */ body {background: #98beeb url(../img/day-body-bg.jpg) repeat-x; } #container { width: 60%; margin: 0 auto; min-width: 400px; max-width: 800px; position: relative; } h1 { text-align: left; text-transform: uppercase; color: white; font-size: 1.4em; padding: 45px 30px 10px 30px; } /* Navigation */ #nav { padding: 5px 5px 0 0; overflow: hidden; } #nav li {display: inline;} #nav a { float: left; color: #6195ce; font-weight: bold; text-decoration: none; padding: 3px 6px; margin-left: 5px; background: white; } #nav a:hover {color: #2c5a8c;} /* Banner */ #banner { height: 125px; background: url(../img/day-banner.jpg) center; border: 5px solid white; clear: both; } /* Content Area */ #content { border: 10px solid white; background: white; color: #2c5a8c; margin: 5px 0; } #content a {font-weight: bold;} #content a:hover {text-decoration: underline;} h2 { padding: 0.3em 0; font-size: 1.4em; } p {padding: 0.3em 0;} /* Footer */ #foot { background: white; color: #1f3a57; text-align: center; border: 10px solid white; clear: both; } #foot a { text-decoration: none; font-weight: bold; color: #2c5a8c; } #foot a:hover {text-decoration: underline;} /* Style-Switcher */ #style-switcher { position: absolute; width: 100%; top: 0; left: 0; right: 0; height: 34px; background: #79a3cc url(../img/day-ss-bg.jpg); border-bottom: 1px solid white; } #style-switcher ul { border-right: 1px solid white; float: right; } #style-switcher h4 { display: inline; color: #153c67; font-weight: bold; line-height: 34px; padding: 0 10px; float: left; border-left: 1px solid white; } #style-switcher li {display: inline;} #style-switcher li a { float: left; line-height: 26px; color: white; background: #90a6bb; text-decoration: none; padding: 0 13px; display: inline; margin: 4px 4px 4px 0; } #style-switcher li a:hover {background: #3a5a7c;}
#dummy-element{width:2px;} /* Necessary to check if StyleSheet has loaded */ /* Quick Reset */ body,ul,ol,li,img,form,p,h1,h2,h3,h4,h5,h6,blockquote { margin: 0; padding: 0; border: none; list-style: none; font-weight: normal; } /* General / Header */ body { font-family: Calibri,"Arial Narrow",Arial,Sans-Serif; background: #072952 url(../img/night-body-bg.jpg) repeat-x; } #container { width: 60%; margin: 0 auto; min-width: 400px; max-width: 800px; position: relative; } h1 { text-align: left; text-transform: uppercase; color: white; font-size: 1.4em; padding: 45px 30px 10px 30px; font-family: "Times New Roman", Times, serif; } /* Navigation */ #nav { padding: 5px 5px 0 0; overflow: hidden; } #nav li {display: inline;} #nav a { float: left; color: #010e2e; font-weight: bold; text-decoration: none; padding: 8px 6px 3px 6px; font-size: 0.8em; text-transform: uppercase; font-weight: 700; margin-left: 5px; background: white url(../img/night-nav-bg2.jpg) repeat-x; } #nav a:hover {color: #2c5a8c;} /* Banner */ #banner { height: 125px; background: url(../img/night-banner.jpg) center; border: 5px solid white; clear: both; } /* Content Area */ #content { color: white; margin: 20px 0; padding: 5px 0; border-top: 4px double white; border-bottom: 4px double white; font-family: "Times New Roman", Times, serif; } #content a {font-weight: bold;} #content a:hover {text-decoration: underline;} h2 { padding: 0.3em 0; font-size: 1.4em; } p {padding: 0.3em 0;} /* Footer */ #foot { color: white; font-size: 0.8em; clear: both; } #foot p { text-align: center; padding: 0; } #foot a { text-decoration: none; font-weight: bold; color: white; } #foot a:hover {text-decoration: underline;} /* Style-Switcher */ #style-switcher { position: absolute; width: 100%; top: 0; left: 0; right: 0; height: 34px; } #style-switcher ul {float: left;} #style-switcher h4 { display: inline; color: white; font-weight: bold; line-height: 34px; padding: 0 10px; float: left; } #style-switcher li {display: inline;} #style-switcher li a { float: left; line-height: 34px; color: white; text-decoration: none; padding: 0 4px; margin-left: 5px; display: inline; } #style-switcher li a:hover { background: white; color: #13181c; background: white url(../img/night-ss-bg.jpg) repeat-x left bottom; }
This isn't really a CSS tutorial, so I won't delve into any of the above, but if you have any questions, feel free to ask in the comments section. Yes, I know older browsers don't support min-width! ;)
This is where we write the core functionality of the style switcher. It's really just a few lines of very basic PHP code. You should create a new file called "style-switcher.php" and copy the following content into it:
So what the code above does is assign the "style" GET variable to the local$stylevariable. In other words, it will take the value of the style attribute in the query string (style-switcher.php?style=day). It then sets a cookie called "style" (which lasts for one week) - we will be able to retrieve this cookie on the main index.php using the code shown in step 1 (remember that little one inheadBlock PHP?). Next, it checks if "js" is appended to the query string. If it is, then we know that JavaScript (which we haven't written yet) has requested this PHP script. The else condition occurs when the user does not have JavaScript enabled and redirects the user to the referrer (i.e. the page they just came from) - this will become clearer once we write the jQuery content!
You can stop right here if you want! ...the solution so far will work perfectly, but as I said in the introduction, we're going to make it even cooler with some jQuery power! Not only will we allow users to change themes without refreshing the page, but we'll also be adding a really cool fade effect... I mean, what type of jQuery tutorial would this be without a fade! ? ! ?
Obviously this is all possible without creating a plugin, but I think it will be a great learning experience for all of you, and it allows us to adapt or transfer code quickly and easily.
First, let's create a file called "styleswitcher.jquery.js".
Creating a new plugin in jQuery is very simple; all that is required is the following code:
jQuery.fn.styleSwitcher = function(){ // The code goes here... }
So, first we want to specify what happens when one of the stylesheet links (the link indiv#style-switcher) is clicked:
/* "this" refers to each instance of the selected element, * So, if you were to call the plugin like this: * $('a').styleSwitcher(); then the following would occur * when clicking on any anchor within the document: */ $(this).click(function(){ // We're passing this element object through to the // loadStyleSheet function. loadStyleSheet(this); // And then we're returning false. return false; });
现在我们需要编写loadStyleSheet函数:
function loadStyleSheet(obj) { // Append new div to body: $('body').append(''); // Give body a height of 100% (to fix IE6 issue): $('body').css({height:'100%'}); // Select newly created div and apply some styles: $('#overlay') .css({ display: 'none', position: 'absolute', top:0, left: 0, width: '100%', height: '100%', zIndex: 1000, background: 'black url(img/loading.gif) no-repeat center' }) // Now fade in the div (#overlay): .fadeIn(500,function(){ // The following will happen when the div has finished fading in: // Request PHP script (obj.href) with appended "js" query string item: $.get( obj.href+'&js',function(data){ // Select link element in HEAD of document (#stylesheet) and change href attribute: $('#stylesheet').attr('href','css/' + data + '.css'); // Check if new CSS StyleSheet has loaded: cssDummy.check(function(){ // When StyleSheet has loaded, fade out and remove the #overlay div: $('#overlay').fadeOut(500,function(){ $(this).remove(); }); }); }); }); }
我希望评论能充分解释这一点。细心的你会注意到我们正在调用一个当前未定义的函数(cssDummy.check())。别担心,因为这是下一步......
我们需要一种方法来测试样式表是否已加载。如果它已经加载,那么我们可以让覆盖层 div 消失,但如果它没有加载,我们必须继续检查,直到它加载。我在网上进行了一些搜索,找到了测试此类事情的可靠方法。它涉及测试虚拟元素的计算宽度。该元素的宽度将在 CSS 中定义 - 因此,当样式表加载时,计算出的元素宽度将仅等于 CSS 中定义的宽度。我希望您现在明白为什么我们必须在每个 CSS 文件中包含“#dummy-element”规则...
所以,这里是:
var cssDummy = { init: function(){ // Appends "dummy-element" div to body: $('').appendTo('body'); }, check: function(callback) { // Checks if computed with equals that which is defined in the StyleSheets (2px): if ($('#dummy-element').width()==2) callback(); // If it has not loaded yet then simple re-initiate this // function every 200 milliseconds until it had loaded: else setTimeout(function(){cssDummy.check(callback)}, 200); } }
并且,在插件的最后,我们将调用cssDummy.init函数:
cssDummy.init();
我们完成了!整个插件现在看起来像这样:
jQuery.fn.styleSwitcher = function(){ $(this).click(function(){ loadStyleSheet(this); return false; }); function loadStyleSheet(obj) { $('body').append(''); $('body').css({height:'100%'}); $('#overlay') .css({ display: 'none', position: 'absolute', top:0, left: 0, width: '100%', height: '100%', zIndex: 1000, background: 'black url(img/loading.gif) no-repeat center' }) .fadeIn(500,function(){ $.get( obj.href+'&js',function(data){ $('#stylesheet').attr('href','css/' + data + '.css'); cssDummy.check(function(){ $('#overlay').fadeOut(500,function(){ $(this).remove(); }); }); }); }); } var cssDummy = { init: function(){ $('').appendTo('body'); }, check: function(callback) { if ($('#dummy-element').width()==2) callback(); else setTimeout(function(){cssDummy.check(callback)}, 200); } } cssDummy.init(); }
我们现在可以像这样调用 jQuery 插件:
$('#style-switcher a').styleSwitcher();
如果您不确定文件结构,请下载 src 文件来查看。我希望您喜欢阅读本教程。一如既往,如果您有任何疑问,请随时在下面提问!如果您喜欢这篇文章,请挖掘它!
The above is the detailed content of Create an Incredible jQuery Style Switcher: A Step-by-Step Guide. For more information, please follow other related articles on the PHP Chinese website!


![[Web front-end] Node.js quick start](https://img.php.cn/upload/course/000/000/067/662b5d34ba7c0227.png)


