


Testing code is a confusing practice for many developers. This is understandable, as writing tests requires more effort, time, and the ability to foresee possible use cases. Startups and developers working on small projects often tend to ignore testing altogether due to lack of resources and manpower.
However, I think you should test your components for a few reasons:
React is no different. Tests can provide stability and consistency when your entire application starts to turn into a bunch of components that are difficult to maintain. Writing tests from day one will help you write better code, catch bugs easily, and maintain a better development workflow.
In this article, I’ll walk you through everything you need to know to write tests for React components. I'll also cover some best practices and techniques. let's start!
Testing is the process of verifying that our test assertions are correct and that they remain correct throughout the lifetime of the application. A test assertion is a Boolean expression that returns true unless there is an error in the code.
For example, the assertion could be as simple as this: "When the user navigates to /login, the schema with id #login should be rendered." So if it turns out that you If you mess up the login component in this way, the assertion will return false. Assertions are not limited to what is rendered, you can also make assertions about how your application responds to user interactions and other operations.
Front-end developers can use many automated testing strategies to test their code. We will limit our discussion to three popular software testing paradigms in React: unit testing, functional testing, and integration testing.
Unit testing is one of the testing veterans that is still popular in testing circles. As the name suggests, you'll test individual pieces of code to verify that they function independently as expected. Because of React’s component architecture, unit testing is a natural choice. They're also faster because you don't have to rely on a browser.
Unit testing helps you think about each component in isolation and treat them as functions. Unit tests for a specific component should answer the following questions:
Functional testing is used to test the behavior of a part of the application. Functional tests are usually written from the user's perspective. A feature is usually not limited to a single component. It can be a complete form or an entire page.
For example, when you build a registration form, it might involve components for form elements, alerts, and errors (if any). Components that are rendered after the form is submitted are also part of this functionality. This does not require a browser renderer as we will be testing with an in-memory virtual DOM.
Integration testing is a testing strategy in which all individual components are tested as a group. Integration testing attempts to replicate the user experience by running tests on an actual browser. This is much slower than functional and unit tests because each test suite is executed on the live browser.
In React, unit tests and functional tests are more popular than integration tests because they are easier to write and maintain. That's what we'll cover in this tutorial.
You need certain tools and dependencies to start unit and functional testing of your React application. I've listed them below.
Jest is a testing framework that requires zero configuration, making it easy to set up. It is more popular than testing frameworks like Jasmine and Mocha because it is developed by Facebook. Jest is also faster than other approaches because it uses a clever technique to parallelize test runs across worker threads. In addition to this, each test is run in a sandbox environment to avoid conflicts between two consecutive tests.
If you are using create-react-app, it comes with Jest. If not, you may need to install Jest and some other dependencies. You can read more about it on the official Jest documentation page.
Even if you are using create-react-app, you need to install this package to render snapshots. Snapshot tests are part of the Jest library. Therefore, you can use a test renderer to quickly generate serializable HTML output from a virtual DOM instead of rendering the entire application's UI. You can install it as follows:
yarn add react-test-renderer
react-dom/test-utils Contains some testing utilities provided by the React team. Alternatively, you can use the Enzyme package released by Airbnb. Enzyme is much better than ReactTestUtils because it is easy to assert, manipulate, and iterate over the output of React components. We'll start testing using React utils and then transition to Enzyme.
To install Enzyme, run the following command.
yarn add enzyme enzyme-adapter-react-16
Add code to src/SetupTests.js.
import { configure } from 'enzyme';
import Adapter from 'enzyme-adapter-react-16';

configure({ adapter: new Adapter() });
create-react-app page.
We will write tests for a simple demo application that displays a master/detail view of a product list. You can find the demo application in our GitHub repository. The application consists of a container component named ProductContainer and three presentation components: ProductList, ProductDetails, and ProductHeader .
.
├── package-lock.json
├── package.json
├── public
│   ├── index.html
│   └── manifest.json
├── src
│   ├── components
│   │   ├── App.js
│   │   ├── ProductContainer.js
│   │   ├── ProductDetails.jsx
│   │   ├── ProductHeader.js
│   │   ├── ProductList.jsx
│   ├── index.js
│   └── style.css
This demo is great for unit testing and functional testing. You can test each component individually and/or test the entire product list functionality.
After downloading the demo, create a directory named __tests__ in /src/components/. You can then store all test files related to this feature in the __tests__ directory. Testers usually name their test files .spec.js or .test.js, for example, ProductHeader.test.js or >ProductHeader .spec.js.
Create the ProductHeader.test.js file if it has not been created yet. Our test basically looks like this:
describe('ProductHeader', () => {

  it('passing test', () => {
    expect(true).toBeTruthy();
  })

  it('failing test', () => {
    expect(false).toBeTruthy();
  })
})
The test suite starts with a describe block, which is a global Jest function that accepts two parameters. The first parameter is the title of the test suite and the second parameter is the actual implementation. Each it() in a test suite corresponds to a test or a specification. A test contains one or more expectations that check the state of the code.
expects(true).toBeTruthy();
In Jest, an expectation is an assertion that returns true or false. A specification is said to pass when all assertions in it are true. Otherwise, the test will fail.
For example, we created two test specifications. The first should obviously pass and the second should fail.
Note: toBeTruthy() is a predefined matcher. In Jest, each matcher compares the expected value to the actual value and returns a boolean value. There are many more matchers available, and we'll cover them later.
create-react-app has everything needed to execute the test suite set up. All you need to do is run the following command:
yarn test
You should see something like this:
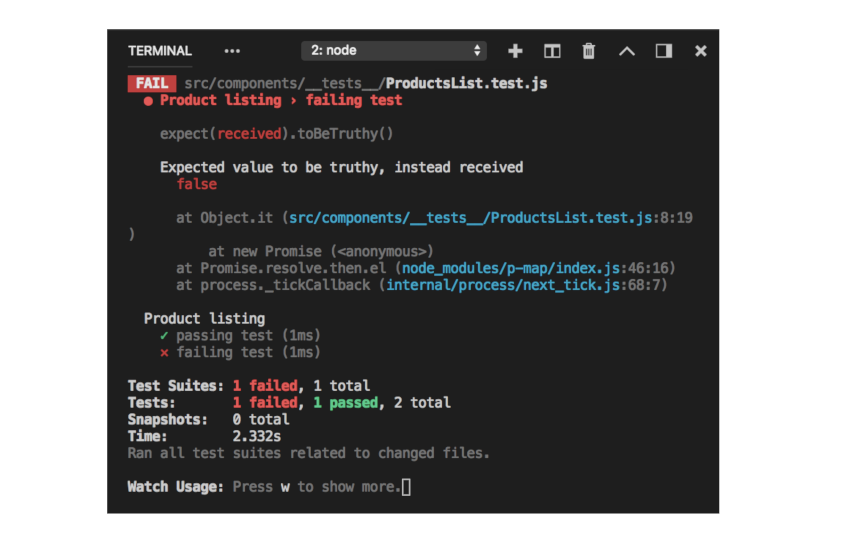
To make a failing test pass, you must replace the toBeTruthy() matcher with toBeFalsy().
expects(false).toBeFalsy();
That's it!
As mentioned before, Jest uses matchers to compare values. You can use it to check equality, compare two numbers or strings, and verify the truth of an expression. Below is a list of popular matchers available in Jest.
toBe();toBeNull()toBeDefined()toBeUndefine()toBeTruthy()toBeFalsy()toBeGreaterThan()
toBeLesserThan()toMatch()toContain()It's just a taste. You can find all available matchers in the reference documentation.
First, we will write some tests for the ProductHeader component. Open the ProductHeader.js file if it is not already open.
import React, {Component} from 'react';

class ProductHeader extends Component  {
    render() {
        return(
            <h2 className="title"> Product Listing Page </h2>
        );
    }
};
export default ProductHeader;
Are you wondering why I'm using class components here instead of function components? The reason is that it is difficult to test functional components using ReactTestUtils. If you're wondering why, this Stack Overflow discussion has the answer.
We can write tests using the following assumptions:
h2 标记。h2 标记应该有一个名为 title 的类。为了渲染组件并检索相关的 DOM 节点,我们需要 ReactTestUtils。删除虚拟规格并添加以下代码:
import React from 'react';
import ReactTestUtils from 'react-dom/test-utils';
import ProductsList from '../ProductsList';
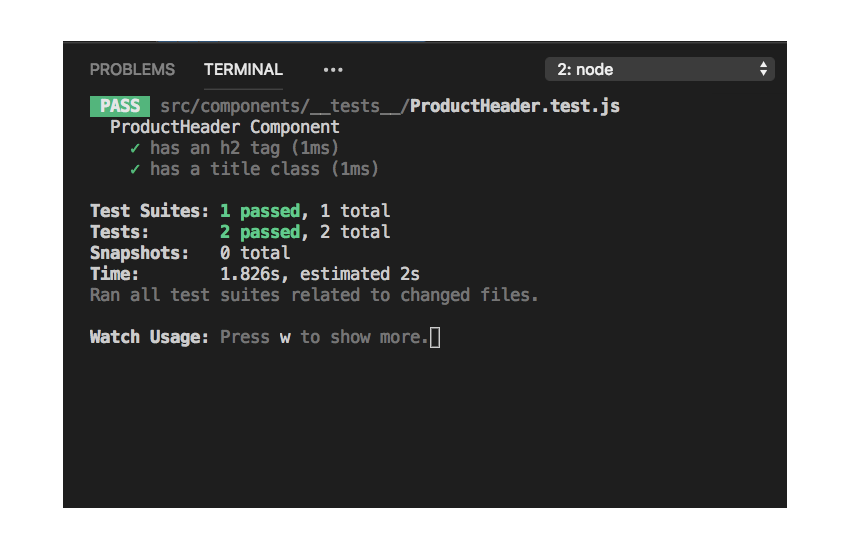
describe('ProductHeader Component', () => {
it('has an h2 tag', () => {
//Test here
});
it('is wrapped inside a title class', () => {
//Test here
})
})
要检查 h2 节点是否存在,我们首先需要将 React 元素渲染到文档中的 DOM 节点中。您可以借助 ReactTestUtils 导出的一些 API 来完成此操作。例如,要渲染我们的 <ProductHeader/> 组件,您可以执行以下操作:
const component = ReactTestUtils.renderIntoDocument(<ProductHeader/>);
然后,您可以借助 findRenderedDOMComponentWithTag('tag-name') 从组件中提取 h2 标签。它检查所有子节点并找到与 tag-name 匹配的节点。
这是整个测试规范。
    it('has an h2 tag', () => {

      const component = ReactTestUtils.renderIntoDocument(<ProductHeader/>);
      var h2 = ReactTestUtils.findRenderedDOMComponentWithTag(
       component, 'h2'
     );

  });
尝试保存它,您的测试运行程序应该向您显示测试已通过。这有点令人惊讶,因为我们没有像前面的示例中那样的 expect() 语句。 ReactTestUtils 导出的大多数方法都内置了期望。在这种特殊情况下,如果测试实用程序无法找到 h2 标记,它将抛出错误并且测试将自动失败。
现在,尝试为第二个测试创建代码。您可以使用 findRenderedDOMcomponentWithClass() 来检查是否有任何带有“title”类的节点。
    it('has a title class', () => {

      const component = ReactTestUtils.renderIntoDocument(<ProductHeader/>);
      var node = ReactTestUtils.findRenderedDOMComponentWithClass(
       component, 'title'
     );
    })
就是这样!如果一切顺利,您应该会看到绿色的结果。
虽然我们刚刚编写了两个测试规范,但我们已经在此过程中涵盖了很多基础知识。在下一篇文章中,我们将为我们的产品列表页面编写一些完整的测试。我们还将用 Enzyme 替换 ReactTestUtils。为什么? Enzyme 提供了一个非常易于使用且对开发人员友好的高级界面。请继续关注第二部分!
如果您在任何时候感到困难或需要帮助,请在评论中告诉我们。
The above is the detailed content of Basic Tutorial: Testing React Components with Jest. For more information, please follow other related articles on the PHP Chinese website!


![[Web front-end] Node.js quick start](https://img.php.cn/upload/course/000/000/067/662b5d34ba7c0227.png)


