


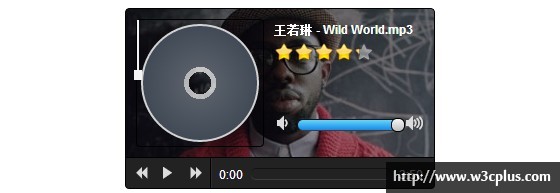
The picture above is the UI interface diagram of this audio player, which also hides a playlist of songs. The entire player UI is drawn with CSS and font-face except for the background portrait and the star rating of the song, which are all drawn with CSS and font-face. The only areas that seem to be difficult are the production of CDs and disc players. In the song Both the CD and the disc player have animated interactive effects during playback, which will be explained in a later section. Click on the CD in the player to open the playlist~
Because this tutorial is mainly to demonstrate the use of the new
Main functions:1. Play, pause, previous song, next song, volume increase or decrease
2. Click CD to open and close the playlist
3. You can drag local music files to the player to play
Html structure
audio tag
In the above structure we can find the new audio tag in HTML5, which has a controls attribute. As the name suggests, it is the controller of the player. The controls attribute specifies that the browser provides playback controls for audio, such as in the chrome browser If you set this attribute in the audio tag under

However, due to the different rendering effects of audio tags under different browsers, this simple method is not suitable for use under cross-browsers, and the functions provided by the browser's default player control are really too limited. Less. . Therefore, we usually hide the browser's default playback controls by not setting this attribute, and manually add additional tags and styles to customize the player's UI interface.
Playback ControlsAfter the UI interface of the player is drawn, the first thing we need to do is to add corresponding event listeners for the three main control buttons: play, previous song, and next song.
In the above button click event monitoring, we control the play and pause of the audio by calling the play() and pause() methods of the original audio element. In addition, the audio element provides the currentSrc attribute, which represents the file source of the currently playing file. We control the currently playing song track by setting this attribute.
Volume controlNext, let’s add event monitoring to the two small speakers on both sides of the volume bar, so that the volume of the current playback can be reduced and increased by clicking on the two small speakers on the left and right. To set the volume of the player, we can call the volume attribute provided in the audio element. The maximum volume value is 1 and the minimum is 0. Here we control the volume by increasing or decreasing the volume by 0.1 each time we click the speaker. Of course you can also use other values. But it should be noted that the JavaScript language cannot provide precise control over decimals, so each time the volume is reduced by 0.1, the volume actually reduced is slightly greater than 0.1, which results in 0.09 remaining when the volume reduction button is clicked 9 times in a row. xxxx volume, and then you will find out why the player cannot be muted. . . Of course this problem is easy to fix (shown below), just a little reminder.
In addition, we also need to implement the function of using the slider or clicking a certain position of the volume bar to control the volume. With the above foundation, this is easy to complete. . First, let's take a look at the function of clicking a certain position of the volume bar to control the volume: click a certain position of the volume bar, calculate the length value from the starting point of the volume bar to that position, and then divide this value by the total length of the volume bar. (Here it is 100) Get the percentage value, then multiply the percentage value by the maximum volume value 1 to get the volume value you want to jump to, and then assign it to volume. The method of controlling the volume through a slider is similar to this. The main thing is to know how to calculate the position value of the slider on the volume bar. I won’t explain it in detail here. If you have any questions, please leave a message below.
Time Control
Okay, now the player is basically working, but we also want to be able to directly skip a part of the audio to a specific time point. So how to achieve it? ? ! The committee members who formulate the standard are not fools. Such commonly used functions cannot be omitted. So quickly browse the API and you will find that the audio element provides an attribute called currentTime, which is a very concise and easy-to-understand name. (In fact, most attributes are easy to understand). Setting this attribute can set the current playback time point.
Here, we also need to use another attribute of audio, duration, which refers to the total time length of the currently playing file. So depending on the volume control implementation, we can do this:
1. Click a certain position of the progress bar, and calculate the percentage value of the length from the starting point of the progress bar to that position to the total length of the progress bar (for example, click on the middle position of the progress bar, then the length from the starting point of the progress bar to that position will be The length of the position accounts for 50% of the total progress bar length), recorded as percentage.
2. Then multiply the percentage by the total duration of the file to get the value of the time point you want to jump to, and then assign the value to currentTime to complete the function to be implemented.
At this point, the player has basically taken shape. There are some insignificant UI interaction implementations left (actually, they are the most important to me, haha). If you are interested, you can check it out in the source code. If you have any questions, you can leave a comment below. I hope we can communicate and learn more.


![[Web front-end] Node.js quick start](https://img.php.cn/upload/course/000/000/067/662b5d34ba7c0227.png)


