Introduction to how to fix default font in Windows 10
Windows 10 is suitable for system font changes, but some users still find the initial font style beautiful after using other fonts for a period of time. So how to restore the default font style? The method is very simple. You first open the control panel, click Font to enter, and then click Font Settings on the left. You will see a "Restore Default Font Settings" button. Click on it to restore the system's initial font style.
How to restore the default font style in Windows 10:
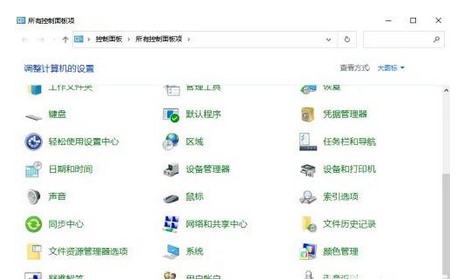
1. Click the taskbar search box or search icon, enter Control Panel, and click the search result to open the Control Panel.

#2. Click the font under the large icon of the query method.

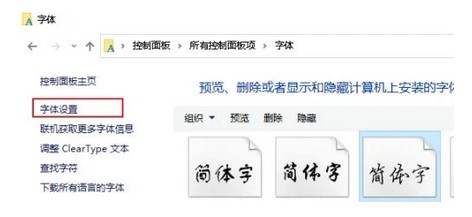
#3. Click on the font settings in the left column.

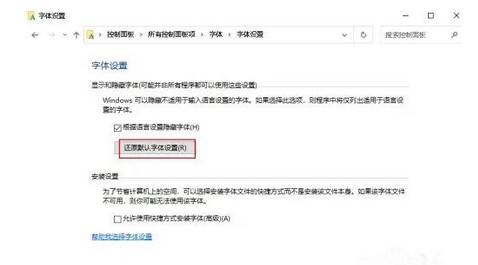
#4. Click to restore the default font settings.

The above is how to restore the default font style in Windows 10 and how to repair the default font in Windows 10.
The above is the detailed content of Introduction to how to fix default font in Windows 10. For more information, please follow other related articles on the PHP Chinese website!

Hot AI Tools

Undress AI Tool
Undress images for free

Undresser.AI Undress
AI-powered app for creating realistic nude photos

AI Clothes Remover
Online AI tool for removing clothes from photos.

Clothoff.io
AI clothes remover

Video Face Swap
Swap faces in any video effortlessly with our completely free AI face swap tool!

Hot Article

Hot Tools

Notepad++7.3.1
Easy-to-use and free code editor

SublimeText3 Chinese version
Chinese version, very easy to use

Zend Studio 13.0.1
Powerful PHP integrated development environment

Dreamweaver CS6
Visual web development tools

SublimeText3 Mac version
God-level code editing software (SublimeText3)
 How to solve touchpad not working issues on Windows?
Aug 05, 2025 am 09:21 AM
Checkifthetouchpadisdisabledbyusingthefunctionkey(Fn F6/F9/F12),adedicatedtogglebutton,orensuringit’sturnedoninSettings>Devices>Touchpad,andunplugexternalmice.2.UpdateorreinstallthetouchpaddriverviaDeviceManagerbyselectingUpdatedriverorUninstal
 How to fix a '0x800f0954' error when installing optional features in Windows
Aug 05, 2025 am 09:30 AM
First, run Windows Update troubleshooter to automatically repair common problems, 1. Run Windows Update troubleshooter; 2. Check network connection and proxy settings to ensure that you can access the Windows Update Server; 3. Use DISM command to repair component storage, and specify the local Windows ISO source if necessary; 4. Manually specify the ISO source path when installing optional functions through PowerShell; 5. Reset Windows Update component services and clear cache; 6. Run sfc/scannow and chkdsk to check system and disk errors; finally ensure that the system is updated to the latest and use official ISO first to solve the problem of missing files, and in most cases, you can successfully repair 0x800f0954 errors
 How to restore the original system font in Windows
Aug 04, 2025 am 08:46 AM
To restore Windows system fonts, please first check whether you have modified the font using a third-party tool. If so, reset the "Restore Default" option of the tool; if no tool is available, you can manually locate HKEY_LOCAL_MACHINE\SOFTWARE\Microsoft\WindowsNT\CurrentVersion\Fonts through the registry editor to ensure that the font value of SegoeUI is correctly pointed to segoeui.ttf and other files, and back up the registry if necessary; then run the command prompt as an administrator and execute the sfc/scannow command to repair the system files; finally go to Settings → Personalization → Theme, and select Windows to light it by default.
 Is mac os more secure than windows
Aug 05, 2025 am 09:55 AM
macOSistargetedlessduetosmallermarketshare,reducingmalwarevolume.2.Apple’stighthardware-softwareintegrationenablesstrongbuilt-insecuritylikeGatekeeper,SIP,andappsandboxing.3.Faster,moreuniformupdatesensurevulnerabilitiesarepatchedpromptly.4.macOSisno
 What to do when the Windows installation is stuck
Aug 06, 2025 am 03:45 AM
Wait1–2hoursifdiskactivitycontinues,asWindowsSetupmayappearfrozenduringfileexpansionorupdateinstallation.2.Recognizenormalslowphaseslike"Gettingdevicesready"orfirstboot.3.Forcerestartonlyafter2 hoursofnoactivitybyholdingthepowerbutton.4.Use
 How to check for memory problems in Windows
Aug 04, 2025 am 06:23 AM
StartwithWindowsMemoryDiagnosticbyrunningmdsched.exetocheckforRAMissueseitherimmediatelyoratnextboot,thenreviewresultsinEventViewerunderWindowsLogs>SystemforMemoryDiagnostics-Results.2.UseTaskManager(Ctrl Shift Esc)tochecktotalandcurrentmemoryusag
 How to configure DNS client settings in Windows
Aug 04, 2025 am 08:10 AM
Open the network adapter settings: Press Windows R, enter ncpa.cpl, right-click the current connection selection properties; 2. Configure TCP/IPv4DNS: Select "Use the following DNS server address", enter the preferred and alternate DNS (such as 8.8.8.8 and 8.8.4.4), check the verification settings when exit, and click OK; 3. Optional command line configuration: Use the PowerShell command Set-DnsClientServerAddress or netsh to set DNS; 4. Clear the DNS cache: Run the command prompt as an administrator and execute ipconfig/flushdns. No restart is required after the change, the settings take effect immediately, suitable for speed improvement,
 How to set app-specific volume levels in Windows
Aug 04, 2025 pm 02:36 PM
OpenVolumeMixerbyright-clickingthetaskbarspeakericonandselecting"OpenVolumemixer"toseeindividualappvolumesliders.2.Adjusteachapp’svolumeindependentlybydraggingitsslider,ensuringtheappisactivelyplayingaudiotoappear.3.Alternatively,gotoSettin


