Detailed explanation of how to set up shared folders in win7
Setting up shared folders in the same LAN can increase the convenience of file transfer and sharing and improve office efficiency. Different systems have different methods of setting up shared folders. Some netizens are unclear about how to set up shared folders on win7. The editor below will teach you how to set up shared folders in win7.
The specific steps are as follows:
1. First open the guest account, click on the network in the lower right corner of the desktop, right-click "Properties" and the Network Sharing Center will appear, follow the picture.
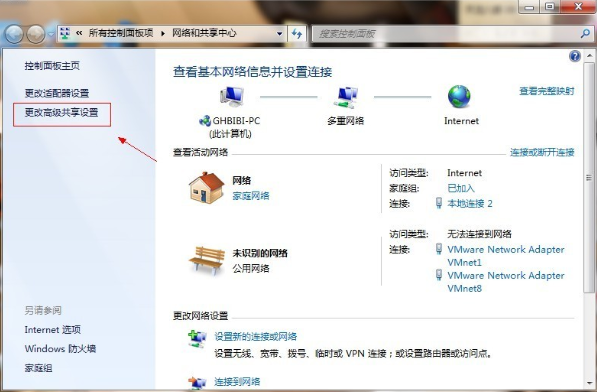
#2. Click "Change Advanced Sharing Settings" at the location marked in the picture and the following interface will appear.
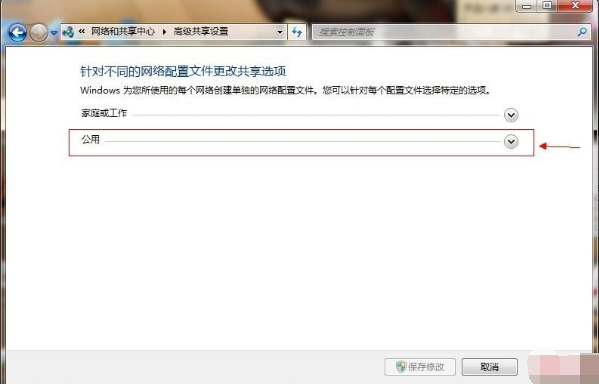
#3. Double-click the position in the red circle in the picture, and a list will appear. Find the content shown.

#4. Click "Turn off password-protected sharing" - "Save changes" to end.
5. Then select the disk partition or folder that needs to be shared, right-click "Properties" - "Sharing" - "Advanced Sharing".
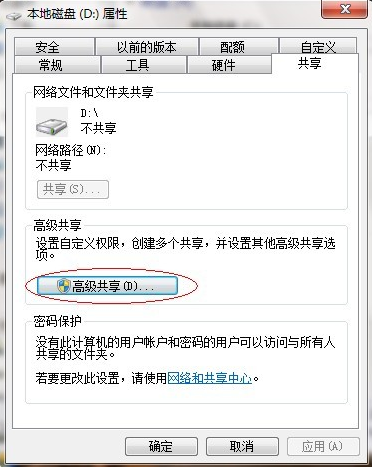
#6. Click the check box in the picture to share.
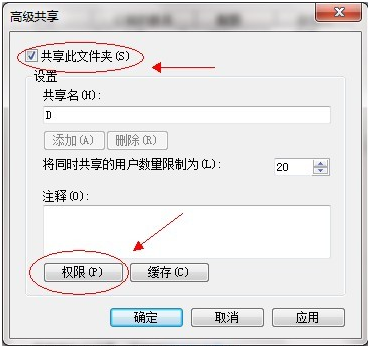
7. Click "Share this folder" - "Permissions".
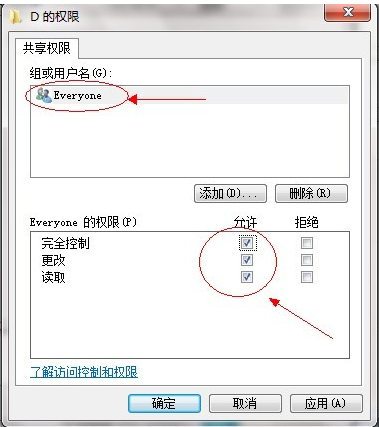
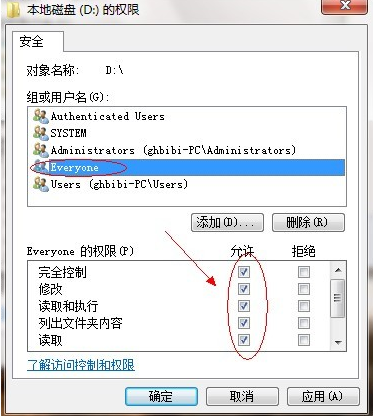
8. Observe that there should be a user named everyone under the "Group or User Name" in the above picture. If not, click "Add" to add the user. The permissions of everyone below Just set it up as shown in the picture. Click "OK". Find the "Security" tab below and click Edit.
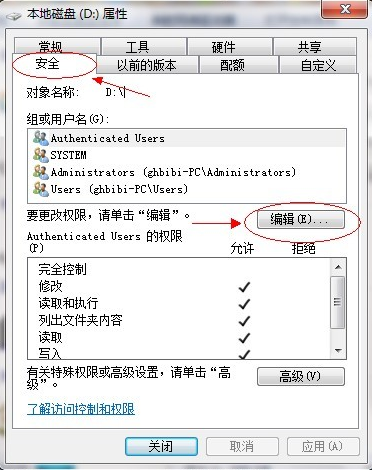
#9. Please note when clicking "Add". Generally, by default, there is no "Everyone" user in it. You need to add it manually. Generally, it cannot be shared. Most of the problems arise here.
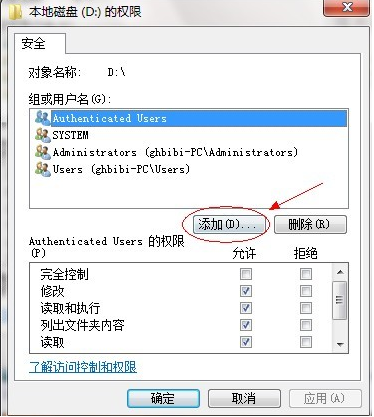
10. Click "Advanced" in the picture.
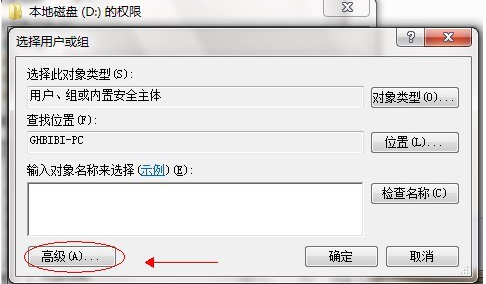
#11. Click "Find Now" and the user list will be listed below. Find the everyone user and double-click it to confirm.
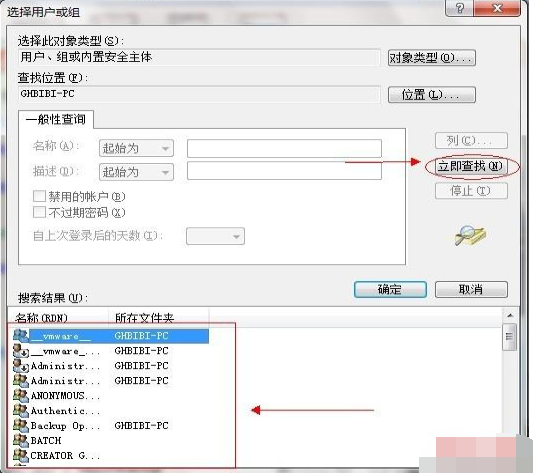
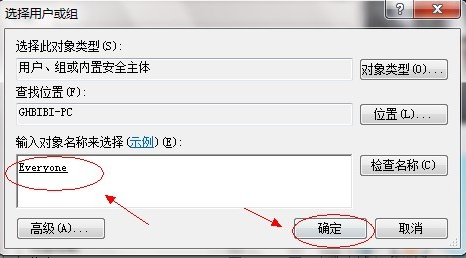
12. Set permissions for everyone user as shown in the figure, click "OK". At this point, the sharing settings are basically completed.
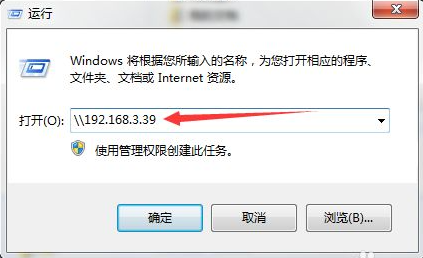
#13. Change the computer to open the run menu and enter the \\ ip address to access.
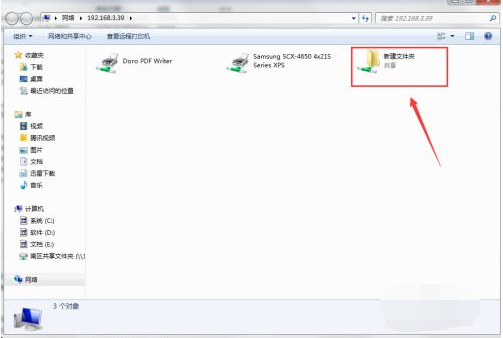
#14. You can see the shared folder after accessing it.
#The above is how to set up win7 shared folders, I hope it can help everyone.
The above is the detailed content of Detailed explanation of how to set up shared folders in win7. For more information, please follow other related articles on the PHP Chinese website!

Hot AI Tools

Undress AI Tool
Undress images for free

Undresser.AI Undress
AI-powered app for creating realistic nude photos

AI Clothes Remover
Online AI tool for removing clothes from photos.

Clothoff.io
AI clothes remover

Video Face Swap
Swap faces in any video effortlessly with our completely free AI face swap tool!

Hot Article

Hot Tools

Notepad++7.3.1
Easy-to-use and free code editor

SublimeText3 Chinese version
Chinese version, very easy to use

Zend Studio 13.0.1
Powerful PHP integrated development environment

Dreamweaver CS6
Visual web development tools

SublimeText3 Mac version
God-level code editing software (SublimeText3)
 How to set the scheduled time for publishing works on Douyin? How does it set the video duration?
Mar 27, 2024 pm 06:11 PM
Publishing works on Douyin can attract more attention and likes, but sometimes it may be difficult for us to publish works in real time. In this case, we can use Douyin's scheduled release function. Douyin’s scheduled release function allows users to automatically publish works at a scheduled time, which can better plan the release plan and increase the exposure and influence of the work. 1. How to set the scheduled time for publishing works on Douyin? To set a scheduled release time, first go to Douyin's personal homepage, find the "+" button in the upper right corner, and click to enter the release page. There is a clock icon in the lower right corner of the publishing page. Click to enter the scheduled publishing interface. In the interface, you can choose the type of work you want to publish, including short videos, long videos, and live broadcasts. Next, you need to set a time for your work to be published. TikTok provides
 How to use shortcut keys to take screenshots in Win8?
Mar 28, 2024 am 08:33 AM
How to use shortcut keys to take screenshots in Win8? In our daily use of computers, we often need to take screenshots of the content on the screen. For users of Windows 8 system, taking screenshots through shortcut keys is a convenient and efficient operation method. In this article, we will introduce several commonly used shortcut keys to take screenshots in Windows 8 system to help you take screenshots more quickly. The first method is to use the "Win key + PrintScreen key" key combination to perform full
 Do Not Disturb Mode Not Working in iPhone: Fix
Apr 24, 2024 pm 04:50 PM
Even answering calls in Do Not Disturb mode can be a very annoying experience. As the name suggests, Do Not Disturb mode turns off all incoming call notifications and alerts from emails, messages, etc. You can follow these solution sets to fix it. Fix 1 – Enable Focus Mode Enable focus mode on your phone. Step 1 – Swipe down from the top to access Control Center. Step 2 – Next, enable “Focus Mode” on your phone. Focus Mode enables Do Not Disturb mode on your phone. It won't cause any incoming call alerts to appear on your phone. Fix 2 – Change Focus Mode Settings If there are some issues in the focus mode settings, you should fix them. Step 1 – Open your iPhone settings window. Step 2 – Next, turn on the Focus mode settings
 How to set Douyin playback to automatically close? Why does the playback process automatically exit?
Apr 01, 2024 pm 12:06 PM
Douyin is one of the most popular short video platforms today. While enjoying the fun of short videos, users also hope to have better control over their time. Recently, some users reported that Douyin would automatically close during playback, which troubled them very much. 1. How to set the Douyin playback to automatically turn off? 1. Check the Douyin version. Please make sure that the Douyin version you are using is the latest. Douyin will be updated regularly to fix known issues. If your version of TikTok is too old, it may automatically close. You can check and update TikTok in the App Store. 2. Check the mobile phone system version. The automatic shutdown of Douyin playback may also be related to the mobile phone system version. Please make sure your mobile phone system version is the latest. If the mobile phone system version is too old, it may cause Douyin to run unstable. you can
 Detailed steps to install Go language on Win7 computer
Mar 27, 2024 pm 02:00 PM
Detailed steps to install Go language on Win7 computer Go (also known as Golang) is an open source programming language developed by Google. It is simple, efficient and has excellent concurrency performance. It is suitable for the development of cloud services, network applications and back-end systems. . Installing the Go language on a Win7 computer allows you to quickly get started with the language and start writing Go programs. The following will introduce in detail the steps to install the Go language on a Win7 computer, and attach specific code examples. Step 1: Download the Go language installation package and visit the Go official website
 How to set up scheduled publishing on Weibo_Tutorial on how to set up scheduled publishing on Weibo
Mar 29, 2024 pm 03:51 PM
1. Open the Weibo client, click the three little dots on the editing page, and then click Scheduled Post. 2. After clicking on scheduled posting, there will be a time option on the right side of the publishing time. Set the time, edit the article, and click on the yellow words in the lower right corner to schedule posting. 3. The mobile version of Weibo does not currently support scheduled publishing. This function can only be used on the PC client!
 How to set the countdown to grab tickets in Damai
Apr 01, 2024 pm 07:01 PM
When buying tickets on Damai.com, in order to ensure that the ticket purchase time can be accurately grasped, users can set a floating clock to grab tickets. The detailed setting method is below, let us learn together. How to bind the floating clock to Damai 1. Click to open the floating clock app on your phone to enter the interface, and click on the location where the flash sale check is set, as shown in the figure below: 2. After coming to the page of adding new records, click on Damai.com Copy the ticket purchase link page copied in. 3. Next, set the flash sale time and notification time below, turn on the switch button behind [Save to Calendar], and click [Save] below. 4. Click to turn on [Countdown], as shown in the figure below: 5. When the reminder time comes, click the [Start Picture-in-Picture] button below. 6. When the ticket purchase time comes
 How to install Go language under Win7 system?
Mar 27, 2024 pm 01:42 PM
Installing Go language under Win7 system is a relatively simple operation. Just follow the following steps to successfully install it. The following will introduce in detail how to install Go language under Win7 system. Step 1: Download the Go language installation package. First, open the Go language official website (https://golang.org/) and enter the download page. On the download page, select the installation package version compatible with Win7 system to download. Click the Download button and wait for the installation package to download. Step 2: Install Go language


