


The graph is an abstract data structure, the essence of which is the same as the tree structure.
Compared with trees, graphs are closed, and the tree structure can be regarded as the predecessor of the graph structure. If you apply horizontal connections between sibling nodes or child nodes to a tree structure, you can create a graph structure.
Tree is suitable for describing a one-to-many data structure from top to bottom, such as a company's organizational structure.
Graphs are suitable for describing more complex many-to-many data structures, such as complex group social relationships.

When using computers to solve problems in the real world, in addition to storing the data in the real world information, and also need to correctly describe the relationship between the information.
For example, when developing a map program, it is necessary to correctly simulate the relationship between cities or roads in the city on the computer. Only on this basis can algorithms be used to calculate the best path from one city to another, or from a specified starting point to a destination point.
Similarly, there are flight route maps, train route maps, and social communication maps.
The graph structure can effectively reflect the complex relationships between information as mentioned above in the real world. This algorithm can be used to easily calculate the shortest path in a flight route, the best transfer plan in a train route, who has the best relationship with whom in the social circle, and who is the most compatible with whom in the marriage network...
Vertex:Vertex is also called a node, and a graph can be considered to be a collection of vertices. The vertices themselves have data meaning, so the vertices will carry additional information, called "payload".
Vertices can be cities, place names, station names, people in the real world...
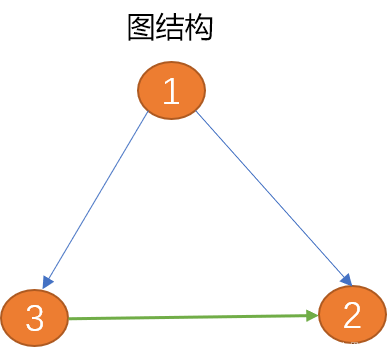
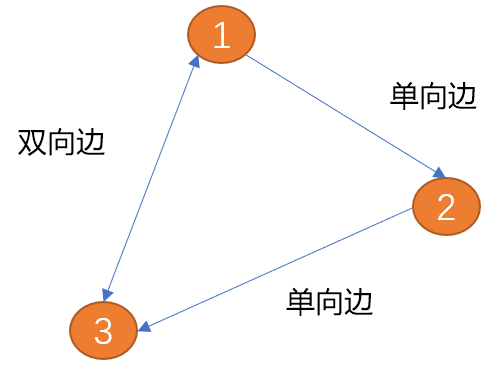
##Edge:in the picture The edges are used to describe the relationship between vertices. Edges can have direction or no direction. Directional edges can be divided into unidirectional edges and bidirectional edges.
As shown in the figure below, the edge between (item 1) and (vertex 2) has only one direction (the arrow shows the direction),is called a one-way edge. Similar to a one-way street in the real world.
The edge between (vertex 1) and (vertex 2) has two directions (bidirectional arrows),is called a bidirectional edge.The relationship between cities is a two-way edge.
Weight:Value information can be added to the edge, and the added value is calledweight. Weighted edges describe the strength of a connection from one vertex to another.
For example, in a real-life subway route, the weight can describe the time length, kilometers, and fares between two stations... The edges describe the relationship between the vertices. , the weight describes the difference in connection.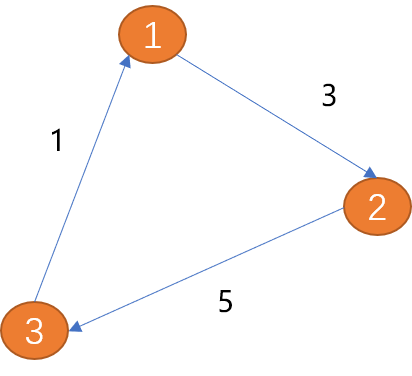 Path:
Path:
First understand the concept of path in the real world
For example: To drive from one city to another, you need to determine the route first. That is,Which cities must be passed through from the departure point to the destination? How many miles will it take?
It can be said that a path is a sequence of vertices connected by edges. Because there is more than one path, the path description from one item point to another item point does not refer to one type.
How to calculate paths in graph structures?
The length of an unweighted path is the number of edges on the path.
Loop:
Starting from the starting point and finally returning to the starting point (the end point is also the starting point) will form a loop. A loop is a special path. As above(V1, V2, V3, V1)is a ring.Types of graphs:
In summary, graphs can be divided into the following categories:
1.2 Define the graph
All vertices form a set of information, which is represented here byV(for example, in a map program, all cities are formed in a vertex set).
All edges constitute set information, represented here by E (description of the relationship between cities).
How to describe edges?
Edges are used to represent the relationship between item points. So an edge can include 3 metadata (start point, end point, weight). Of course, the weights can be omitted, but generally when studying graphs, they refer to weighted graphs.
IfGis used to represent the graph, thenG = (V, E). Each edge can be described by a tuple(fv, ev)or a triplet(fv,ev,w).
fvrepresents the starting point,evrepresents the end point. Andfv,evdata must be referenced in theVcollection.
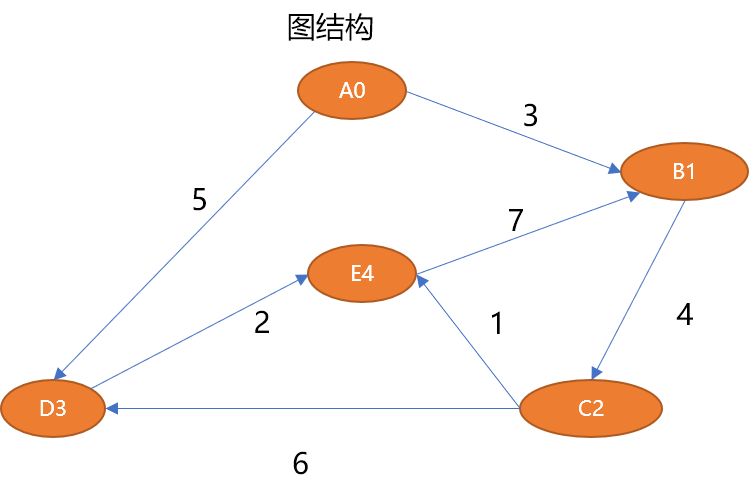
The above graph structure can be described as follows:
# 5 个顶点 V={A0,B1,C2,D3,E4} # 7 条边 E={ (A0,B1,3),(B1,C2,4),(C2,D3,6),(C2,E4,1),(D3,E4,2),(A0,D3,5),(E4,B1,7)}
The abstract data description of the graph must at least Some methods:
Graph ( ): Used to create a new graph.
add_vertex( vert ): Add a new node to the graph, the parameter should be an object of node type.
add_edge(fv,tv): Establish an edge relationship between two item points.
add_edge(fv,tv,w): Establish an edge between 2 item points and specify the connection weight.
find_vertex( key ): Find vertices in the graph based on the keyword key.
find_vertexs( ): Query all vertex information.
find_path(fv,tv): Find the path from one vertex to another vertex.
There are two main types of graph storage implementation: adjacency matrix and link list. This article mainly introduces the adjacency matrix.
Use a two-dimensional matrix (array) to store the relationship between vertices.
For example,graph[5][5]can store the relational data of 5 vertices. The row number and column number represent the vertices. The cells in the intersecting cells of row v and column w The value represents the weight of the edge from vertex v to vertex w. For example,grap[2][3]=6means that the C2 vertex and the D3 vertex are connected (adjacent), and the weight is 6
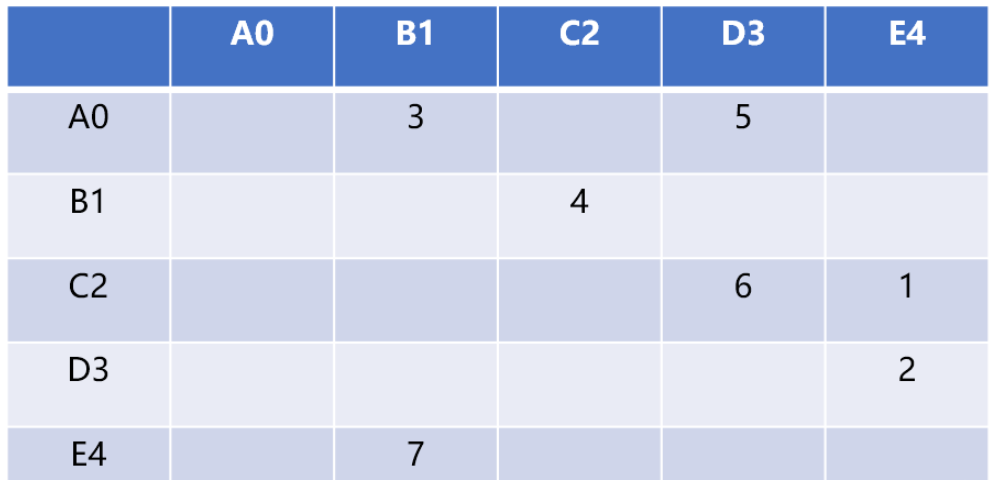
The advantage of the adjacency matrix is that it is simple and can clearly indicate which vertices are connected. Because not every pair of vertices is connected, there is a lot of unused space in the matrix, often called a "sparse matrix."
The matrix will be filled only if each vertex has a relationship with other vertices. If the relationship between the graph structure is not too complex, using this structure to store graph data will waste a lot of space.
The adjacency matrix is suitable for representing graph structures with complex relationships, such as links between web pages on the Internet and social relationships between people in social circles...2.2 Encoding to achieve adjacency Matrix
""" 节(顶)点类 """ class Vertex: def __init__(self, name, v_id=0): # 顶点的编号 self.v_id = v_id # 顶点的名称 self.v_name = name # 是否被访问过:False 没有 True:有 self.visited = False # 自我显示 def __str__(self): return '[编号为 {0},名称为 {1} ] 的顶点'.format(self.v_id, self.v_name)
andv_namein the vertex class are easy to understand. Why add avisited?This variable is used to record whether the vertex has been searched during the path search process to avoid repeated search calculations.
The graph class has many methods, here we introduce them method by method.
Initialization method
class Graph: """ nums:相邻矩阵的大小 """ def __init__(self, nums): # 一维列表,保存节点,最多只能有 nums 个节点 self.vert_list = [] # 二维列表,存储顶点及顶点间的关系(权重) # 初始权重为 0 ,表示节点与节点之间还没有建立起关系 self.matrix = [[0] * nums for _ in range(nums)] # 顶点个数 self.v_nums = 0 # 使用队列模拟队列或栈,用于广度、深度优先搜索算法 self.queue_stack = [] # 保存搜索到的路径 self.searchPath = [] # 暂省略……
One-dimensional list
vert_listSave all Vertex data.Two-dimensional list
Saves the relationship data between vertices.
Use a list to simulate a queue or stack for subsequent breadth and depth searches.
The list has 2 very valuable methods:
append()andpop().
is used to add data to the list, and each time it is added from the end of the list.
Default is to delete and pop up data from the end of the list.pop(parameter)You can provide an index value to delete and pop up data from the specified position.Using the append() and pop() methods can simulate the stack and enter and exit data from the same place.
Use the append() and pop(0) methods to simulate the queue, add data from the back, and get the data from the front
searchPath: Used to save the breadth of use or results from a depth-first path search.
""" 添加新顶点 """ def add_vertex(self, vert): if vert in self.vert_list: # 已经存在 return if self.v_nums >= len(self.matrix): # 超过相邻矩阵所能存储的节点上限 return # 顶点的编号内部生成 vert.v_id = self.v_nums self.vert_list.append(vert) # 数量增一 self.v_nums += 1
上述方法注意一点,节点的编号由图内部逻辑提供,便于节点编号顺序的统一。
添加边方法
此方法是邻接矩阵表示法的核心逻辑。
''' 添加节点与节点之间的边, 如果是无权重图,统一设定为 1 ''' def add_edge(self, from_v, to_v): # 如果节点不存在 if from_v not in self.vert_list: self.add_vertex(from_v) if to_v not in self.vert_list: self.add_vertex(to_v) # from_v 节点的编号为行号,to_v 节点的编号为列号 self.matrix[from_v.v_id][to_v.v_id] = 1 ''' 添加有权重的边 ''' def add_edge(self, from_v, to_v, weight): # 如果节点不存在 if from_v not in self.vert_list: self.add_vertex(from_v) if to_v not in self.vert_list: self.add_vertex(to_v) # from_v 节点的编号为行号,to_v 节点的编号为列号 self.matrix[from_v.v_id][to_v.v_id] = weight
添加边信息的方法有 2 个,一个用来添加无权重边,一个用来添加有权重的边。
查找某节点
使用线性查找法从节点集合中查找某一个节点。
''' 根据节点编号返回节点 ''' def find_vertex(self, v_id): if v_id >= 0 or v_id <= self.v_nums: # 节点编号必须存在 return [tmp_v for tmp_v in self.vert_list if tmp_v.v_id == v_id][0]
查询所有节点
''' 输出所有顶点信息 ''' def find_only_vertexes(self): for tmp_v in self.vert_list: print(tmp_v)
此方法仅为了查询方便。
查询节点之间的关系
''' 迭代节点与节点之间的关系(边) ''' def find_vertexes(self): for tmp_v in self.vert_list: edges = self.matrix[tmp_v.v_id] for col in range(len(edges)): w = edges[col] if w != 0: print(tmp_v, '和', self.vert_list[col], '的权重为:', w)
测试代码:
if __name__ == "__main__": # 初始化图对象 g = Graph(5) # 添加顶点 for _ in range(len(g.matrix)): v_name = input("顶点的名称( q 为退出):") if v_name == 'q': break v = Vertex(v_name) g.add_vertex(v) # 节点之间的关系 infos = [(0, 1, 3), (0, 3, 5), (1, 2, 4), (2, 3, 6), (2, 4, 1), (3, 4, 2), (4, 1, 7)] for i in infos: v = g.find_vertex(i[0]) v1 = g.find_vertex(i[1]) g.add_edge(v, v1, i[2]) # 输出顶点及边a print("-----------顶点与顶点关系--------------") g.find_vertexes() ''' 输出结果: 顶点的名称( q 为退出):A 顶点的名称( q 为退出):B 顶点的名称( q 为退出):C 顶点的名称( q 为退出):D 顶点的名称( q 为退出):E [编号为 0,名称为 A ] 的顶点 和 [编号为 1,名称为 B ] 的顶点 的权重为: 3 [编号为 0,名称为 A ] 的顶点 和 [编号为 3,名称为 D ] 的顶点 的权重为: 5 [编号为 1,名称为 B ] 的顶点 和 [编号为 2,名称为 C ] 的顶点 的权重为: 4 [编号为 2,名称为 C ] 的顶点 和 [编号为 3,名称为 D ] 的顶点 的权重为: 6 [编号为 2,名称为 C ] 的顶点 和 [编号为 4,名称为 E ] 的顶点 的权重为: 1 [编号为 3,名称为 D ] 的顶点 和 [编号为 4,名称为 E ] 的顶点 的权重为: 2 [编号为 4,名称为 E ] 的顶点 和 [编号为 1,名称为 B ] 的顶点 的权重为: 7 '''
在图中经常做的操作,就是查找从一个顶点到另一个顶点的路径。如怎么查找到 A0 到 E4 之间的路径长度:
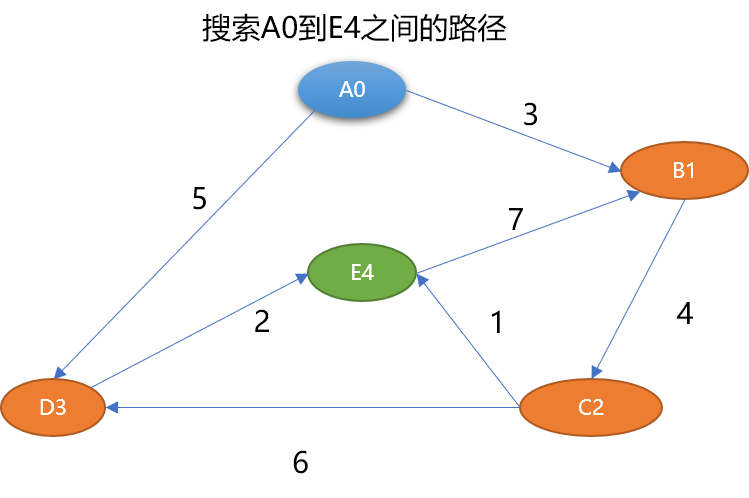
从人的直观思维角度查找一下,可以找到如下路径:
{A0,B1,C2,E4}路径长度为 8。
{A0,D3,E4}路径长度为 7。
{A0,B1,C2,D3,E4}路径长度为 15。
在路径查找时,人的思维具有知识性和直观性特点,因此不存在所谓的尝试或碰壁问题。而计算机是试探性思维,就会出现这条路不通,再找另一条路的现象。
所以路径算法中常常会以错误为代价,在查找过程中会走一些弯路。常用的路径搜索算法有 2 种:
广度优先搜索
深度优先搜索
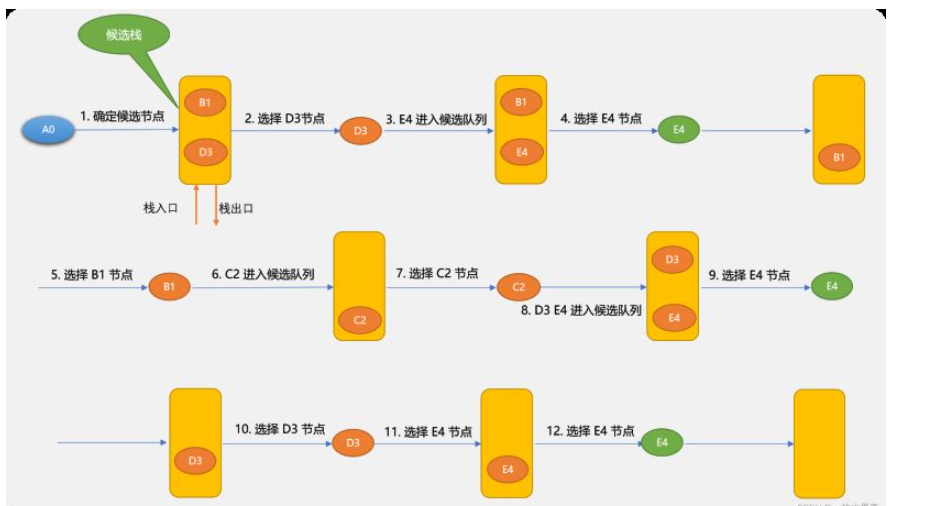
先看一下广度优先搜索的示意图:
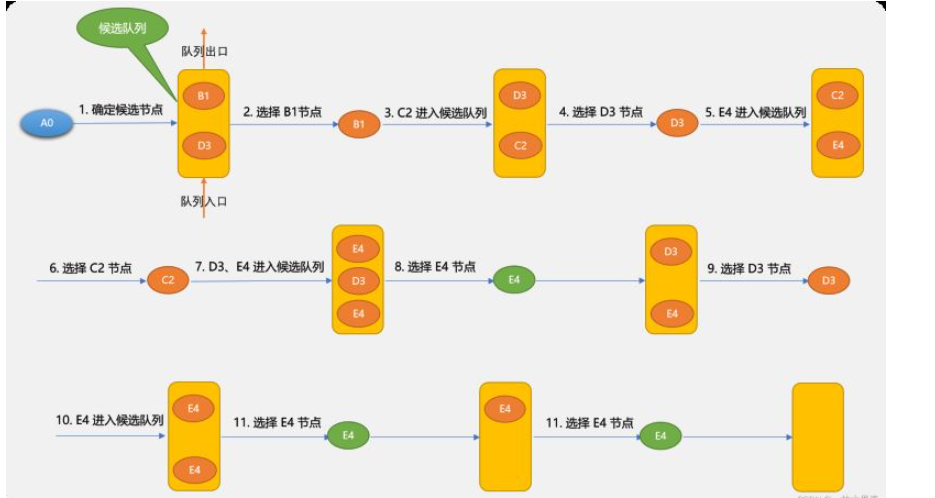
广度优先搜索的基本思路:
确定出发点,本案例是A0 顶点。
以出发点相邻的顶点为候选点,并存储至队列。
从队列中每拿出一个顶点后,再把与此顶点相邻的其它顶点做为候选点存储于队列。
不停重复上述过程,至到找到目标顶点或队列为空。
使用广度搜索到的路径与候选节点进入队列的先后顺序有关系。如第 1 步确定候选节点时B1和D3谁先进入队列,对于后面的查找也会有影响。
上图使用广度搜索可找到A0~E4路径是:
{A0,B1,D3,C2,E4}
其实{A0,B1,C2,E4}也是一条有效路径,有可能搜索不出来,这里因为搜索到B1后不会马上搜索C2,因为B3先于C2进入,广度优先搜索算法只能保证找到路径,而不能保存找到最佳路径。
编码实现广度优先搜索:
广度优先搜索需要借助队列临时存储选节点,本文使用列表模拟队列。
在图类中实现广度优先搜索算法的方法:
class Graph(): # 省略其它代码 ''' 广度优先搜索算法 ''' def bfs(self, from_v, to_v): # 查找与 fv 相邻的节点 self.find_neighbor(from_v) # 临时路径 lst_path = [from_v] # 重复条件:队列不为空 while len(self.queue_stack) != 0: # 从队列中一个节点(模拟队列) tmp_v = self.queue_stack.pop(0) # 添加到列表中 lst_path.append(tmp_v) # 是不是目标节点 if tmp_v.v_id == to_v.v_id: self.searchPath.append(lst_path) print('找到一条路径', [v_.v_id for v_ in lst_path]) lst_path.pop() else: self.find_neighbor(tmp_v) ''' 查找某一节点的相邻节点,并添加到队列(栈)中 ''' def find_neighbor(self, find_v): if find_v.visited: return find_v.visited = True # 找到保存 find_v 节点相邻节点的列表 lst = self.matrix[find_v.v_id] for idx in range(len(lst)): if lst[idx] != 0: # 权重不为 0 ,可判断相邻 self.queue_stack.append(self.vert_list[idx])
广度优先搜索过程中,需要随时获取与当前节点相邻的节点,find_neighbor()方法的作用就是用来把当前节点的相邻节点压入队列中。
测试广度优先搜索算法:
if __name__ == "__main__": # 初始化图对象 g = Graph(5) # 添加顶点 for _ in range(len(g.matrix)): v_name = input("顶点的名称( q 为退出):") if v_name == 'q': break v = Vertex(v_name) g.add_vertex(v) # 节点之间的关系 infos = [(0, 1, 3), (0, 3, 5), (1, 2, 4), (2, 3, 6), (2, 4, 1), (3, 4, 2), (4, 1, 7)] for i in infos: v = g.find_vertex(i[0]) v1 = g.find_vertex(i[1]) g.add_edge(v, v1, i[2]) print("----------- 广度优先路径搜索--------------") f_v = g.find_vertex(0) t_v = g.find_vertex(4) g.bfs(f_v,t_v) ''' 输出结果 顶点的名称( q 为退出):A 顶点的名称( q 为退出):B 顶点的名称( q 为退出):C 顶点的名称( q 为退出):D 顶点的名称( q 为退出):E ----------- 广度优先路径搜索-------------- 找到一条路径 [0, 1, 3, 2, 4] 找到一条路径 [0, 1, 3, 2, 3, 4] '''
使用递归实现广度优先搜索算法:
''' 递归方式实现广度搜索 ''' def bfs_dg(self, from_v, to_v): self.searchPath.append(from_v) if from_v.v_id != to_v.v_id: self.find_neighbor(from_v) if len(self.queue_stack) != 0: self.bfs_dg(self.queue_stack.pop(0), to_v)
先看一下深度优先算法的示意图。
深度优先搜索算法和广度优先搜索算法不同的地方在于:深度优先搜索算法将候选节点放在堆栈中。因栈是先进后出,所以,搜索到的节点顺序不一样。
使用循环实现深度优先搜索算法:
深度优先搜索算法需要用到栈,本文使用列表模拟。
''' 深度优先搜索算法 使用栈存储下一个需要查找的节点 ''' def dfs(self, from_v, to_v): # 查找与 from_v 相邻的节点 self.find_neighbor(from_v) # 临时路径 lst_path = [from_v] # 重复条件:栈不为空 while len(self.queue_stack) != 0: # 从栈中取一个节点(模拟栈) tmp_v = self.queue_stack.pop() # 添加到列表中 lst_path.append(tmp_v) # 是不是目标节点 if tmp_v.v_id == to_v.v_id: self.searchPath.append(lst_path) print('找到一条路径:', [v_.v_id for v_ in lst_path]) lst_path.pop() else: self.find_neighbor(tmp_v)
测试:
if __name__ == "__main__": # 初始化图对象 g = Graph(5) # 添加顶点 for _ in range(len(g.matrix)): v_name = input("顶点的名称( q 为退出):") if v_name == 'q': break v = Vertex(v_name) g.add_vertex(v) # 节点之间的关系 infos = [(0, 1, 3), (0, 3, 5), (1, 2, 4), (2, 3, 6), (2, 4, 1), (3, 4, 2), (4, 1, 7)] for i in infos: v = g.find_vertex(i[0]) v1 = g.find_vertex(i[1]) g.add_edge(v, v1, i[2]) # 输出顶点及边a print("-----------顶点与顶点关系--------------") g.find_vertexes() print("----------- 深度优先路径搜索--------------") f_v = g.find_vertex(0) t_v = g.find_vertex(4) g.dfs(f_v, t_v) ''' 输出结果 顶点的名称( q 为退出):A 顶点的名称( q 为退出):B 顶点的名称( q 为退出):C 顶点的名称( q 为退出):D 顶点的名称( q 为退出):E -----------顶点与顶点关系-------------- [编号为 0,名称为 A ] 的顶点 和 [编号为 1,名称为 B ] 的顶点 的权重为: 3 [编号为 0,名称为 A ] 的顶点 和 [编号为 3,名称为 D ] 的顶点 的权重为: 5 [编号为 1,名称为 B ] 的顶点 和 [编号为 2,名称为 C ] 的顶点 的权重为: 4 [编号为 2,名称为 C ] 的顶点 和 [编号为 3,名称为 D ] 的顶点 的权重为: 6 [编号为 2,名称为 C ] 的顶点 和 [编号为 4,名称为 E ] 的顶点 的权重为: 1 [编号为 3,名称为 D ] 的顶点 和 [编号为 4,名称为 E ] 的顶点 的权重为: 2 [编号为 4,名称为 E ] 的顶点 和 [编号为 1,名称为 B ] 的顶点 的权重为: 7 ----------- 深度优先路径搜索-------------- 找到一条路径: [0, 3, 4] 找到一条路径: [0, 3, 1, 2, 4] '''
使用递归实现深度优先搜索算法:
''' 递归实现深度搜索算法 ''' def def_dg(self, from_v, to_v): self.searchPath.append(from_v) if from_v.v_id != to_v.v_id: # 查找与 from_v 节点相连的子节点 lst = self.find_neighbor_(from_v) if lst is not None: for tmp_v in lst[::-1]: self.def_dg(tmp_v, to_v) """ 查找某一节点的相邻节点,以列表方式返回 """ def find_neighbor_(self, find_v): if find_v.visited: return find_v.visited = True # 查找与 find_v 节点相邻的节点 lst = self.matrix[find_v.v_id] return [self.vert_list[idx] for idx in range(len(lst)) if lst[idx] != 0]
递归实现时,不需要使用全局栈,只需要获到当前节点的相邻节点便可。
The above is the detailed content of How to implement graph breadth and depth first path search algorithm in Python. For more information, please follow other related articles on the PHP Chinese website!


![[Web front-end] Node.js quick start](https://img.php.cn/upload/course/000/000/067/662b5d34ba7c0227.png)


