


Let’s start with the server side. The server first initializes the Socket, then binds to the port, listens to the port, calls accept to block, and waits for the client to connect. At this time, if a client initializes a Socket and then connects to the server (connect), if the connection is successful, the connection between the client and the server is established. The client sends a data request, the server receives the request and processes the request, then sends the response data to the client, the client reads the data, and finally closes the connection. An interaction ends. Use the following Python code to implement it:
import socket
# socket_family 可以是 AF_UNIX 或 AF_INET。socket_type 可以是 SOCK_STREAM 或 SOCK_DGRAM。protocol 一般不填,默认值为 0
socket.socket(socket_family, socket_type, protocal=0)
# 获取tcp/ip套接字
tcpSock = socket.socket(socket.AF_INET, socket.SOCK_STREAM)
# 获取udp/ip套接字
udpSock = socket.socket(socket.AF_INET, socket.SOCK_DGRAM)
Check the socket status1. Server
import socket
# 1、买手机
phone = socket.socket(socket.AF_INET, socket.SOCK_STREAM) # tcp称为流式协议,udp称为数据报协议SOCK_DGRAM
# print(phone)
# 2、插入/绑定手机卡
# phone.setsockopt(socket.SOL_SOCKET,socket.SO_REUSEADDR,1)
phone.bind(('127.0.0.1', 8080))
# 3、开机
phone.listen(5) # 半连接池,限制的是请求数
# 4、等待电话连接
print('start....')
while True: # 连接循环
conn, client_addr = phone.accept() # (三次握手建立的双向连接,(客户端的ip,端口))
# print(conn)
print('已经有一个连接建立成功', client_addr)
# 5、通信:收\发消息
while True: # 通信循环
try:
print('服务端正在收数据...')
data = conn.recv(1024) # 最大接收的字节数,没有数据会在原地一直等待收,即发送者发送的数据量必须>0bytes
# print('===>')
if len(data) == 0: break # 在客户端单方面断开连接,服务端才会出现收空数据的情况
print('来自客户端的数据', data)
conn.send(data.upper())
except ConnectionResetError:
break
# 6、挂掉电话连接
 conn.close()
# 7、关机
phone.close()
# start....
# 已经有一个连接建立成功 ('127.0.0.1', 4065)
# 服务端正在收数据...
# 来自客户端的数据 b'\xad'
# 服务端正在收数据...
import socket
# 1、买手机
phone = socket.socket(socket.AF_INET, socket.SOCK_STREAM)
# print(phone)
# 2、拨电话
phone.connect(('127.0.0.1', 8080)) # 指定服务端ip和端口
# 3、通信:发\收消息
while True: # 通信循环
msg = input('>>: ').strip() # msg=''
if len(msg) == 0: continue
phone.send(msg.encode('utf-8'))
# print('has send----->')
data = phone.recv(1024)
# print('has recv----->')
print(data)
# 4、关闭
phone.close()
# >>: 啊
# b'a'
# >>: 啊啊
# b'\xb0\xa1\xb0\xa1'
# >>:
1. Method 1: Add a socket configuration and reuse ip and port
#

phone=socket(AF_INET,SOCK_STREAM)
phone.setsockopt(SOL_SOCKET,SO_REUSEADDR,1) #就是它,在bind前加
phone.bind(('127.0.0.1',8080))
发现系统存在大量TIME_WAIT状态的连接,通过调整linux内核参数解决,
vi /etc/sysctl.conf
编辑文件,加入以下内容:
net.ipv4.tcp_syncookies = 1
net.ipv4.tcp_tw_reuse = 1
net.ipv4.tcp_tw_recycle = 1
net.ipv4.tcp_fin_timeout = 30
然后执行 /sbin/sysctl -p 让参数生效。
net.ipv4.tcp_syncookies = 1 表示开启SYN Cookies。当出现SYN等待队列溢出时,启用cookies来处理,可防范少量SYN攻击,默认为0,表示关闭;
net.ipv4.tcp_tw_reuse = 1 表示开启重用。允许将TIME-WAIT sockets重新用于新的TCP连接,默认为0,表示关闭;
net.ipv4.tcp_tw_recycle = 1 表示开启TCP连接中TIME-WAIT sockets的快速回收,默认为0,表示关闭。
net.ipv4.tcp_fin_timeout 修改系統默认的 TIMEOUT 时间
Server:
from socket import *
import subprocess
server = socket(AF_INET, SOCK_STREAM)
server.bind(('127.0.0.1', 8000))
server.listen(5)
print('start...')
while True:
conn, client_addr = server.accept()
while True:
print('from client:', client_addr)
cmd = conn.recv(1024)
if len(cmd) == 0: break
print('cmd:', cmd)
obj = subprocess.Popen(cmd.decode('utf8'), # 输入的cmd命令
shell=True, # 通过shell运行
stderr=subprocess.PIPE, # 把错误输出放入管道,以便打印
stdout=subprocess.PIPE) # 把正确输出放入管道,以便打印

stdout = obj.stdout.read() # 打印正确输出
stderr = obj.stderr.read() # 打印错误输出

conn.send(stdout)
conn.send(stderr)
conn.close()
server.close()
Client
import socket
client = socket.socket(socket.AF_INET, socket.SOCK_STREAM)
client.connect(('127.0.0.1', 8000))
while True:
data = input('please enter your data')
client.send(data.encode('utf8'))
data = client.recv(1024)
print('from server:', data)
client.close()
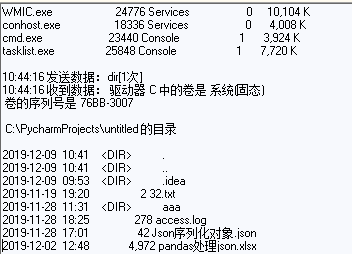
Enter the
dir command. Since the server sends less than 1024 bytes, the client can accept. Enter the
command. Since the server sends more bytes than 1024 bytes, the client only accepts part of the data, and when you enter the dir command again , the client will receive the result of the dir command, but it will print the remaining unsent data from the last time. This is a sticky problem.
 5. Sticky packets
Server
# _*_coding:utf-8_*_
from socket import *
ip_port = ('127.0.0.1', 8080)
TCP_socket_server = socket(AF_INET, SOCK_STREAM)
TCP_socket_server.bind(ip_port)
TCP_socket_server.listen(5)
conn, addr = TCP_socket_server.accept()

data1 = conn.recv(10)
data2 = conn.recv(10)
print('----->', data1.decode('utf-8'))
print('----->', data2.decode('utf-8'))
conn.close()
Client
# _*_coding:utf-8_*_
import socket
BUFSIZE = 1024
ip_port = ('127.0.0.1', 8080)
s = socket.socket(socket.AF_INET, socket.SOCK_STREAM)
res = s.connect_ex(ip_port)
s.send('hello'.encode('utf-8'))
s.send('world'.encode('utf-8'))

# 服务端一起收到b'helloworld'
2. The receiver does not receive the packets in the buffer in time, causing multiple packets to be received
Server
# _*_coding:utf-8_*_
from socket import *
ip_port = ('127.0.0.1', 8080)
TCP_socket_server = socket(AF_INET, SOCK_STREAM)
TCP_socket_server.bind(ip_port)
TCP_socket_server.listen(5)
conn, addr = TCP_socket_server.accept()
data1 = conn.recv(2) # 一次没有收完整
data2 = conn.recv(10) # 下次收的时候,会先取旧的数据,然后取新的
print('----->', data1.decode('utf-8'))
print('----->', data2.decode('utf-8'))
conn.close()
Client
# _*_coding:utf-8_*_
import socket
BUFSIZE = 1024
ip_port = ('127.0.0.1', 8080)
s = socket.socket(socket.AF_INET, socket.SOCK_STREAM)
res = s.connect_ex(ip_port)
s.send('hello feng'.encode('utf-8'))
6. Solving the problem of sticky packets
Why is it low: The program runs much faster than the network transmission speed, so before sending a segment of bytes, use send to send the length of the byte stream. This method will amplify the performance caused by network delay. loss.
Server:
import socket, subprocess
server = socket.socket(socket.AF_INET, socket.SOCK_STREAM)
server.bind(('127.0.0.1', 8000))
server.listen(5)
while True:
conn, addr = server.accept()
print('start...')
while True:
cmd = conn.recv(1024)
print('cmd:', cmd)
obj = subprocess.Popen(cmd.decode('utf8'),
shell=True,
stderr=subprocess.PIPE,
stdout=subprocess.PIPE)
stdout = obj.stdout.read()
if stdout:
ret = stdout
else:
stderr = obj.stderr.read()
ret = stderr
ret_len = len(ret)
 conn.send(str(ret_len).encode('utf8'))
data = conn.recv(1024).decode('utf8')
if data == 'recv_ready':
conn.sendall(ret)
conn.close()
server.close()
Client:
import socket client = socket.socket(socket.AF_INET, socket.SOCK_STREAM) client.connect(('127.0.0.1', 8000)) while True: msg = input('please enter your cmd you want>>>').strip() if len(msg) == 0: continue client.send(msg.encode('utf8')) length = int(client.recv(1024)) client.send('recv_ready'.encode('utf8')) send_size = 0 recv_size = 0 data = b'' while recv_size < length: data = client.recv(1024) recv_size += len(data) print(data.decode('utf8'))
struct模块解析
import struct import json # 'i'是格式 try: obj = struct.pack('i', 1222222222223) except Exception as e: print(e) obj = struct.pack('i', 1222) print(obj, len(obj)) # 'i' format requires -2147483648 <= number <= 2147483647 # b'\xc6\x04\x00\x00' 4 res = struct.unpack('i', obj) print(res[0]) # 1222
解决粘包问题的核心就是:为字节流加上自定义固定长度报头,报头中包含字节流长度,然后一次send到对端,对端在接收时,先从缓存中取出定长的报头,然后再取真实数据。
1、 使用struct模块创建报头:
import json
import struct
header_dic = {
'filename': 'a.txt',
'total_size':111111111111111111111111111111111222222222222222222222222222222222222222222222222222222222222222222222222222222222222222222222222222222222222222222223131232,
'hash': 'asdf123123x123213x'
}
header_json = json.dumps(header_dic)
header_bytes = header_json.encode('utf-8')
print(len(header_bytes))# 223
# 'i'是格式
obj = struct.pack('i', len(header_bytes))
print(obj, len(obj))
# b'\xdf\x00\x00\x00' 4

res = struct.unpack('i', obj)
print(res[0])
# 2232、服务端:
from socket import *
import subprocess
import struct
import json
server = socket(AF_INET, SOCK_STREAM)
server.bind(('127.0.0.1', 8000))
server.listen(5)
print('start...')
while True:
conn, client_addr = server.accept()
print(conn, client_addr)
while True:
cmd = conn.recv(1024)
obj = subprocess.Popen(cmd.decode('utf8'),
shell=True,
stderr=subprocess.PIPE,
stdout=subprocess.PIPE)
stderr = obj.stderr.read()
stdout = obj.stdout.read()
# 制作报头
header_dict = {
'filename': 'a.txt',
'total_size': len(stdout) + len(stderr),
'hash': 'xasf123213123'
}
header_json = json.dumps(header_dict)
header_bytes = header_json.encode('utf8')
# 1. 先把报头的长度len(header_bytes)打包成4个bytes,然后发送
conn.send(struct.pack('i', len(header_bytes)))
# 2. 发送报头
 conn.send(header_bytes)
# 3. 发送真实的数据
 conn.send(stdout)
conn.send(stderr)
conn.close()
server.close()3、 客户端:
from socket import * import json import struct client = socket(AF_INET, SOCK_STREAM) client.connect(('127.0.0.1', 8000)) while True: cmd = input('please enter your cmd you want>>>') if len(cmd) == 0: continue client.send(cmd.encode('utf8')) # 1. 先收4个字节,这4个字节中包含报头的长度 header_len = struct.unpack('i', client.recv(4))[0] # 2. 再接收报头 header_bytes = client.recv(header_len) # 3. 从包头中解析出想要的东西 header_json = header_bytes.decode('utf8') header_dict = json.loads(header_json) total_size = header_dict['total_size'] # 4. 再收真实的数据 recv_size = 0 res = b'' while recv_size < total_size: data = client.recv(1024) res += data recv_size += len(data) print(res.decode('utf8')) client.close()
UDP是无链接的,先启动哪一端都不会报错,并且可以同时多个客户端去跟服务端通信
UDP协议是数据报协议,发空的时候也会自带报头,因此客户端输入空,服务端也能收到。
UPD协议一般不用于传输大数据。
UPD套接字无粘包问题,但是不能替代TCP套接字,因为UPD协议有一个缺陷:如果数据发送的途中,数据丢失,则数据就丢失了,而TCP协议则不会有这种缺陷,因此一般UPD套接字用户无关紧要的数据发送,例如qq聊天。
import socket
server = socket.socket(socket.AF_INET, socket.SOCK_DGRAM) # 数据报协议-》UDP
server.bind(('127.0.0.1', 8080))
while True:
data, client_addr = server.recvfrom(1024)
print('===>', data, client_addr)
server.sendto(data.upper(), client_addr)
server.close()
import socket
client = socket.socket(socket.AF_INET, socket.SOCK_DGRAM) # 数据报协议-》UDP
while True:
msg = input('>>: ').strip() # msg=''
client.sendto(msg.encode('utf-8'), ('127.0.0.1', 8080))
data, server_addr = client.recvfrom(1024)
print(data)
client.close()
基于tcp的套接字,关键就是两个循环,一个链接循环,一个通信循环
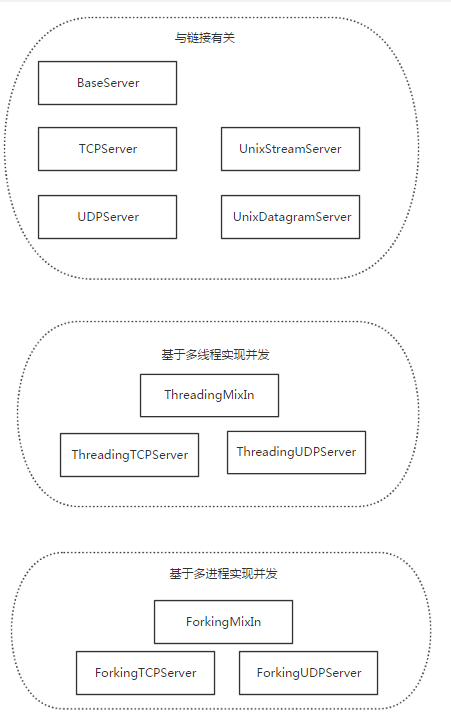
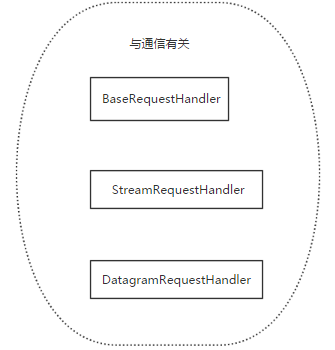
socketserver模块中分两大类:server类(解决链接问题)和request类(解决通信问题)。
基于tcp的socketserver我们自己定义的类中的。
self.server即套接字对象
self.request即一个链接
self.client_address即客户端地址
import socketserver
class MyHandler(socketserver.BaseRequestHandler):
def handle(self):
# 通信循环
while True:
# print(self.client_address)
# print(self.request) #self.request=conn
try:
data = self.request.recv(1024)
if len(data) == 0: break
self.request.send(data.upper())
except ConnectionResetError:
break
if __name__ == '__main__':
s = socketserver.ThreadingTCPServer(('127.0.0.1', 8080), MyHandler, bind_and_activate=True)
s.serve_forever() # 代表连接循环
# 循环建立连接,每建立一个连接就会启动一个线程(服务员)+调用Myhanlder类产生一个对象,调用该对象下的handle方法,专门与刚刚建立好的连接做通信循环
import socket
phone = socket.socket(socket.AF_INET, socket.SOCK_STREAM)
phone.connect(('127.0.0.1', 8080)) # 指定服务端ip和端口
while True:
# msg=input('>>: ').strip() #msg=''
msg = 'client33333' # msg=''
if len(msg) == 0: continue
phone.send(msg.encode('utf-8'))
data = phone.recv(1024)
print(data)
phone.close()
基于udp的socketserver我们自己定义的类中的
self.request是一个元组(第一个元素是客户端发来的数据,第二部分是服务端的udp套接字对象),如(b'adsf', )
self.client_address即客户端地址
import socketserver
class MyHandler(socketserver.BaseRequestHandler):
def handle(self):
# 通信循环
print(self.client_address)
print(self.request)
data = self.request[0]
print('客户消息', data)
self.request[1].sendto(data.upper(), self.client_address)
if __name__ == '__main__':
s = socketserver.ThreadingUDPServer(('127.0.0.1', 8080), MyHandler)
s.serve_forever()
import socket
client = socket.socket(socket.AF_INET, socket.SOCK_DGRAM) # 数据报协议-》udp
while True:
# msg=input('>>: ').strip() #msg=''
msg = 'client1111'
client.sendto(msg.encode('utf-8'), ('127.0.0.1', 8080))
data, server_addr = client.recvfrom(1024)
print(data)
client.close()
以下列出了 Python 网络编程的一些重要模块:
| 协议 | 功能用处 | 端口号 | Python 模块 |
|---|---|---|---|
| HTTP | 网页访问 | 80 | httplib, urllib, xmlrpclib |
| NNTP | 阅读和张贴新闻文章,俗称为"帖子" | 119 | nntplib |
| FTP | 文件传输 | 20 | ftplib, urllib |
| SMTP | 发送邮件 | 25 | smtplib |
| POP3 | 接收邮件 | 110 | poplib |
| IMAP4 | 获取邮件 | 143 | imaplib |
| Telnet | 命令行 | 23 | telnetlib |
| Gopher | 信息查找 | 70 | gopherlib, urllib |
The above is the detailed content of How to use Python's socket and socketserver. For more information, please follow other related articles on the PHP Chinese website!


![[Web front-end] Node.js quick start](https://img.php.cn/upload/course/000/000/067/662b5d34ba7c0227.png)


