


We know the three major concepts of Docker: image, container, and warehouse. The image is the basis for container operation. Our general development process is to obtain the basic image from Docker Hub. , perform certain customized development based on the basic image (such as putting the application into the image), generate a new image, start the container based on this new image, and then run the application.
There are generally two methods for making Docker images. One is based on the dockerfile configuration file and is performed using docker build. This is The most recommended authentic image creation method; the second is to manually generate a new image with the modified content by using a command like docker commit.
This method is not suitable for large-scale image generation. First, the construction content of the image cannot be traced back. Second, the operation efficiency is relatively low, but in a certain It also has its convenience in some temporary situations, especially during development and testing. If you need to install some new software temporarily, you can quickly generate a new image.
Here is an example of generating an image that comes with Golang to demonstrate how to use commit to generate an image.
First we need to pull a Centos base image. The installation of Golang will be based on this base image.
Search centos image:
[root@node1 ~]# docker search centos
INDEX       NAME                                                   DESCRIPTION                                     STARS     OFFICIAL   AUTOMATED
docker.io   docker.io/centos                                       DEPRECATED; The official build of CentOS.       7529      [OK]
docker.io   docker.io/kasmweb/centos-7-desktop                     CentOS 7 desktop for Kasm Workspaces            33
docker.io   docker.io/couchbase/centos7-systemd                    centos7-systemd images with additional deb...   7                    [OK]
Pull the official image with the highest number of STARS
[root@node1 ~]# docker pull centos
Using default tag: latest
Trying to pull repository docker.io/library/centos ...
latest: Pulling from docker.io/library/centos
a1d0c7532777: Pull complete
Digest: sha256:a27fd8080b517143cbbbab9dfb7c8571c40d67d534bbdee55bd6c473f432b177
Status: Downloaded newer image for docker.io/centos:latest
[root@node1 ~]# docker run -it centos /bin/bash
[root@311c53f54f2f /]#
[root@311c53f54f2f /]# go version
bash: go: command not found
here It proves that there is no golang in basic centos.
Using yum to install golang, I found the following error message
[root@311c53f54f2f /]# yum install go
Failed to set locale, defaulting to C.UTF-8
CentOS Linux 8 - AppStream                                                                                            71  B/s |  38  B     00:00
Error: Failed to download metadata for repo 'appstream': Cannot prepare internal mirrorlist: No URLs in mirrorlist
This is because of a problem with the yum source, which can be solved by executing the following command:
[root@311c53f54f2f yum.repos.d]# sed -i 's/mirrorlist/#mirrorlist/g' /etc/yum.repos.d/CentOS-*
[root@311c53f54f2f yum.repos.d]# sed -i 's|#baseurl=http://mirror.centos.org|baseurl=http://vault.centos.org|g' /etc/yum.repos.d/CentOS-*
[root@311c53f54f2f yum.repos.d]# yum clean all
Failed to set locale, defaulting to C.UTF-8
0 files removed
[root@311c53f54f2f yum.repos.d]# yum makecache
Failed to set locale, defaulting to C.UTF-8
CentOS Linux 8 - AppStream                                                                                           2.6 MB/s | 8.4 MB     00:03
CentOS Linux 8 - BaseOS                                                                                              2.0 MB/s | 4.6 MB     00:02
CentOS Linux 8 - Extras                                                                                              7.7 kB/s |  10 kB     00:01
Metadata cache created.
Golang is installed normally and successfully
[root@311c53f54f2f yum.repos.d]# yum install go
[root@311c53f54f2f yum.repos.d]# go version
go version go1.16.12 linux/amd64
First use docker ps to view the current container container id, here it is 311c53f54f2f.
[root@node1 ~]# docker ps
CONTAINER ID        IMAGE               COMMAND             CREATED             STATUS              PORTS               NAMES
311c53f54f2f        centos              "/bin/bash"         13 minutes ago      Up 13 minutes
Use the docker commit command to generate a new image
[root@node1 ~]# docker commit -a "lucas" -m "install golang" 311c53f54f2f centos-go:v1
sha256:019ab02d451defb75e2ee03948289ed008036ba7ec8a355cae28bdf7fbce07d2
Use docker image again to see the new image of centos-go we generated .
[root@node1 ~]# docker images
REPOSITORY          TAG                 IMAGE ID            CREATED             SIZE
centos-go           v1                  019ab02d451d        2 minutes ago       805 MB
docker.io/busybox   latest              bab98d58e29e        8 days ago          4.86 MB
docker.io/nginx     latest              904b8cb13b93        13 days ago         142 MB
docker.io/centos    latest              5d0da3dc9764        18 months ago       231 MB
[root@node1 ~]# docker run -it centos-go:v1 /bin/bash
[root@daff0519f2ca /]# go version
go version go1.16.12 linux/amd64
Dockerfile is a text file containing Docker image building instructions for Automate the build process of Docker images. Dockerfile describes the image building process through a series of instructions, including base image, dependency installation, file copy, environment variable configuration, startup command, etc. The syntax of Dockerfile is a language similar to shell scripting.
Dockerfile contains four parts: basic image information, maintainer information, image operation command and container startup command. In Dockerfile, comments starting with # can be used to explain the function of instructions or provide other comment information.
The following are some common Dockerfile commands:
FROM: Specify the base image, for example FROM ubuntu:latest, the FROM directive must be in addition to comments Unexpected first command, followed by maintainer information command.
MAINTAINER: Specify the maintainer's information, such as MAINTAINER lucas.
RUN: Run commands in the image, such as RUN apt-get update && apt-get install -y nginx.
CMD: Specify the command to run when the container starts, such as CMD ["nginx", "-g", "daemon off;"].
EXPOSE: Declare the port that the container will listen to, such as EXPOSE 80.
ENV: Set environment variables, such as ENV NODE_ENV production.
ADD: Copy the file to the image, for example ADD app.js /app.js.
COPY: Copy the file to the image, for example COPY app.js /app.js.
WORKDIR: Set the working directory, for example WORKDIR /app.
USER: Set the user to use when starting the container, such as USER nginx.
VOLUME: Declare the container data volume, such as VOLUME /data.
ENTRYPOINT: Specify the command to be run when the container starts, for example ENTRYPOINT ["nginx", "-g", "daemon off;"].
In addition to these common commands, Dockerfile has other commands available. You can check out the official Docker documentation for more information.
After completing the configuration of the dockerfile, use docker build to build the image. The docker build command can customize the build process by specifying different parameters. For example, you can use the --no-cache option to force Docker not to use the cache when building the image, or use the --build-arg option to pass the environment variables required during the build. . You can view all available options through the docker build --help command.
Here we demonstrate how to use dockerfile to build a springboot web application image and use docker to start the container.
我们准备一个基于springboot开发的应用服务,这个服务开放8080端口,访问是返回一个用户的姓名信息。
为了方便,可以使用spring initializr 在线生成demo代码,在demo代码的基础上开发一个controller返回一个User对象的name信息,由于这块代码比较简单,这里就不详述过程了。
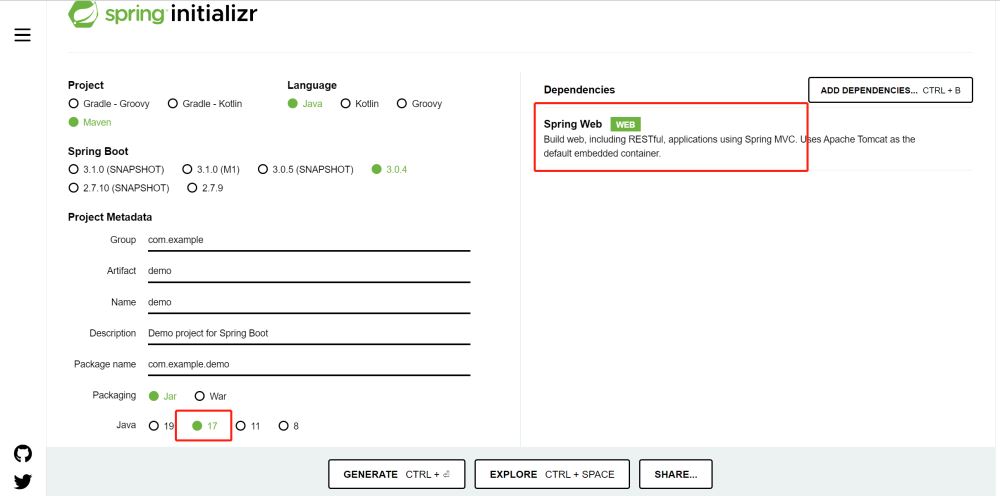
代码完成以后使用mvn clean package进行打包,这里打包成功以后生成了demo-0.0.1-SNAPSHOT.jar,我们使用java -jar demo-0.0.1-SNAPSHOT.jar就可以运行这个应用程序。
在项目根目录下创建一个名为Dockerfile的文件,并在其中添加以下内容:
FROM openjdk:18-jdk-alpine
MAINTAINER lucas
COPY target/demo-0.0.1-SNAPSHOT.jar /usr/app/
WORKDIR /usr/app
EXPOSE 8080
ENTRYPOINT ["java", "-jar", "demo-0.0.1-SNAPSHOT.jar"]
在上面的Dockerfile中,FROM指令指定了基础镜像为openjdk:18-jdk-alpine,COPY指令将构建好的可执行jar包复制到容器中,WORKDIR指令设置工作目录为/usr/app,EXPOSE指令指定了容器运行的端口为8080,ENTRYPOINT指令指定了容器启动时要执行的命令为java -jar demo-0.0.1-SNAPSHOT.jar。
在终端中进入项目根目录,然后执行以下命令构建镜像:
docker build -t demo:latest .
其中,-t参数指定了镜像的名称和版本号,.参数指定了Dockerfile所在的目录。
[root@node1 docker]# docker build -t demo:latest .
Sending build context to Docker daemon 51.05 MB
Step 1/6 : FROM openjdk:18-jdk-alpine
 ---> c89120dcca4c
Step 2/6 : MAINTAINER lucas
 ---> Running in 3d0ae6d2a813
 ---> 085b9066ca7b
Removing intermediate container 3d0ae6d2a813
Step 3/6 : COPY target/demo-0.0.1-SNAPSHOT.jar /usr/app/
 ---> c5c77f80f179
Removing intermediate container 00228e4b0aed
Step 4/6 : WORKDIR /usr/app
 ---> bdb555e3fb18
Removing intermediate container 35682266f140
Step 5/6 : EXPOSE 8080
 ---> Running in 499d9888fa01
 ---> 0fca023e8f23
Removing intermediate container 499d9888fa01
Step 6/6 : ENTRYPOINT java -jar demo-0.0.1-SNAPSHOT.jar
 ---> Running in 661fdaafa31d
 ---> 61e80950d665
Removing intermediate container 661fdaafa31d
Successfully built 61e80950d665
可以看到构建成功,使用docker images 可以查看到构建成功的镜像。

以上步骤已经使用docker build生成了镜像,接下来就可以使用这个镜像启动容器,启动后会自动启动应用程序。
在终端中执行以下命令启动容器:
docker run -d -p 8080:8080 demo:latest
其中,-d参数指定了容器在后台运行,-p参数指定了容器的端口映射,demo:latest参数指定了要运行的镜像名称和版本号。
访问对应的web服务进行访问验证,结果如下:

The above is the detailed content of How to build springboot web application image and deploy it using containers. For more information, please follow other related articles on the PHP Chinese website!
 SpringBoot project building steps
 What is the difference between j2ee and springboot
 How to use transactionscope
 What are the virtual currency trading platforms?
 shib coin latest news
 html file opens blank
 How to implement docker container technology in java
 What are the applications of the Internet of Things?


![[Web front-end] Node.js quick start](https://img.php.cn/upload/course/000/000/067/662b5d34ba7c0227.png)


