

nginx限流是如何工作的
nginx限流使用漏桶算法(leaky bucket algorithm),该算法广泛应用于通信和基于包交换计算机网络中,用来处理当带宽被限制时的突发情况。和一个从上面进水,从下面漏水的桶的原理很相似;如果进水的速率大于漏水的速率,这个桶就会发生溢出。
在请求处理过程中,水代表从客户端来的请求,而桶代表了一个队列,请求在该队列中依据先进先出(fifo)算法等待被处理。漏的水代表请求离开缓冲区并被服务器处理,溢出代表了请求被丢弃并且永不被服务。

一、限制访问频率(正常流量)
nginx中我们使用ngx_http_limit_req_module模块来限制请求的访问频率,基于漏桶算法原理实现。接下来我们使用 nginx limit_req_zone 和 limit_req 两个指令,限制单个ip的请求处理速率。
语法:limit_req_zone key zone rate
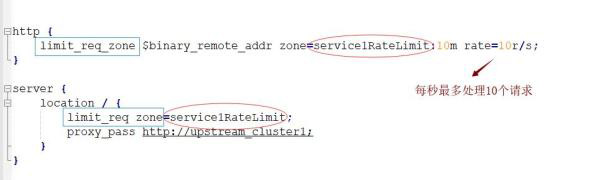
key :定义限流对象,binary_remote_addr 是一种key,表示基于 remote_addr(客户端ip) 来做限流,binary_ 的目的是压缩内存占用量。
zone:定义共享内存区来存储访问信息, myratelimit:10m 表示一个大小为10m,名字为myratelimit的内存区域。每1m可存储16000个IP地址的访问信息,因此10m可存储16万个IP地址的访问信息。
The "rate" parameter is used to set the maximum access rate. "rate=10r/s" means that no more than 10 requests will be processed per second.。nginx 实际上以毫秒为粒度来跟踪请求信息,因此 10r/s 实际上是限制:每100毫秒处理一个请求。这意味着,自上一个请求处理完后,若后续100毫秒内又有请求到达,将拒绝处理该请求。
二、限制访问频率(突发流量)
按上面的配置在流量突然增大时,超出的请求将被拒绝,无法处理突发流量,那么在处理突发流量的时候,该怎么处理呢?nginx提供了 burst 参数来解决突发流量的问题,并结合 nodelay 参数一起使用。burst 译为突发、爆发,表示在超过设定的处理速率后能额外处理的请求数。
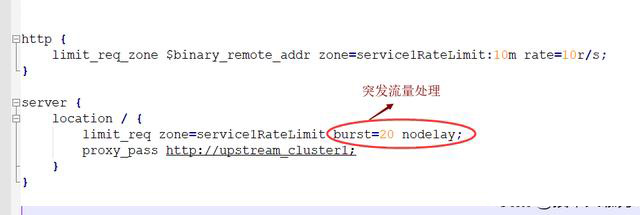
burst=20 nodelay表示这20个请求立马处理,不能延迟,相当于特事特办。不过,即使这20个突发请求立马处理结束,后续来了请求也不会立马处理。burst=20 相当于缓存队列中占了20个坑,即使请求被处理了,这20个位置这只能按 100ms一个来释放。这就达到了速率稳定,但突然流量也能正常处理的效果。
三、限制并发连接数
nginx 的ngx_http_limit_conn_module模块提供了对资源连接数进行限制的功能,使用 limit_conn_zone 和 limit_conn 两个指令就可以了。
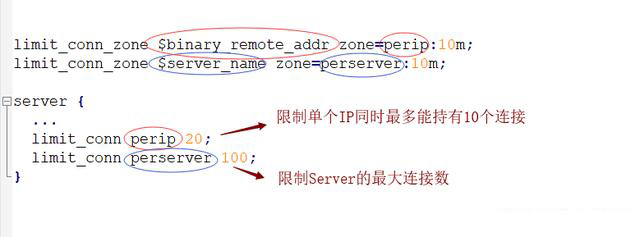
limit_conn perip 20:对应的key是 $binary_remote_addr,表示限制单个ip同时最多能持有20个连接。 limit_conn perserver 100:对应的key是 $server_name,表示虚拟主机(server) 同时能处理并发连接的总数。注意,只有当 request header 被后端server处理后,这个连接才进行计数。
以上就是Nginx限流如何实现的详细内容,更多请关注php中文网其它相关文章!

每个人都需要一台速度更快、更稳定的 PC。随着时间的推移,垃圾文件、旧注册表数据和不必要的后台进程会占用资源并降低性能。幸运的是,许多工具可以让 Windows 保持平稳运行。

Copyright 2014-2025 //m.sbmmt.com/ All Rights Reserved | php.cn | 湘ICP备2023035733号


 402
402


