 Backend Development
 Python Tutorial
 How to use python+Flask to realize real-time update and display of logs on web pages
How to use python+Flask to realize real-time update and display of logs on web pages
1. Output logs to files
Use module: logging
You can generate custom level logs and output logs to the specified path
Log level: debug (debug log)
1. Encapsulation log Output method ()
import logging as lg
import os

class logging_():
    def __init__(path,delete=True)
        self.path = path #日志文件存放位置
        name = 'log.log' #日志文件名称
        self.log_ = os.path.join(self.path,name) #进入文件目录
        if delete == True:
            open(f"{path}/{name}","w").close #为True时清空文本
        # 创建一个日志处理器
        self.logger = lg.getLogger('logger')
        # 设置日志等级,低于设置等级的日志被丢弃
        self.logger.setLevel(lg.DEBUG)
        # 设置输出日志格式
        self.fmt = lg.Formatter("[%(asctime)s] - %(levelname)s: %(message)s","%Y-%m-%d %H:%M:%S")
        # 创建一个文件处理器
        self.fh = lg.FileHandler(self.log_,encoding='utf-8')
        # 设置文件输出格式
        self.fh.setFormatter(self.fmt)
        # 将文件处理器添加到日志处理器中
        self.logger.addHandler(self.fh)
        # 创建一个控制台处理器
        self.sh=lg.StreamHandler()
        # 设置控制台输出格式
        self.sh.setFormatter(self.fmt)
        # 将控制台处理器添加到日志处理器中
        self.logger.addHandler(self.sh)

        # 关闭文件
        self.fh.close()

# 使用
if __name__ == '__main__':
    _path = os.paht.dirname(__file__) # 获取当前文件的路径
    lg = logging_(_path).logger # 实例化封装类
    lg.info('1111')
    lg.debug('2222')
    lg.error('33333')
    lg.warning('44444')
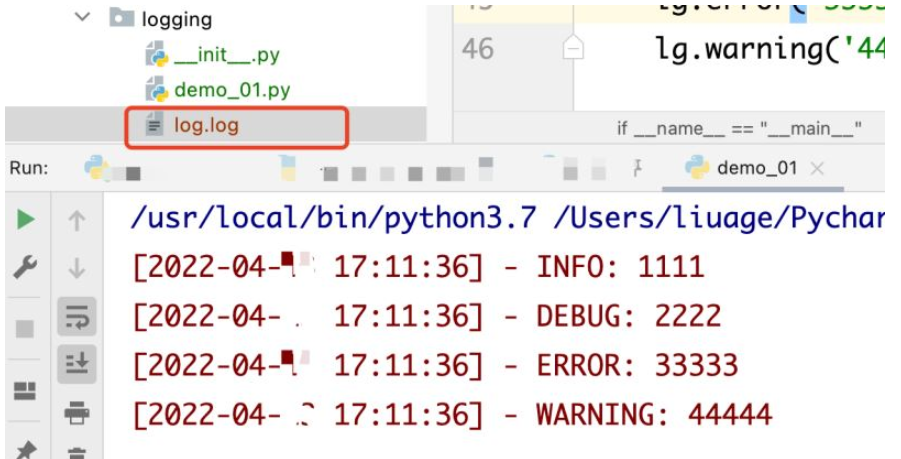
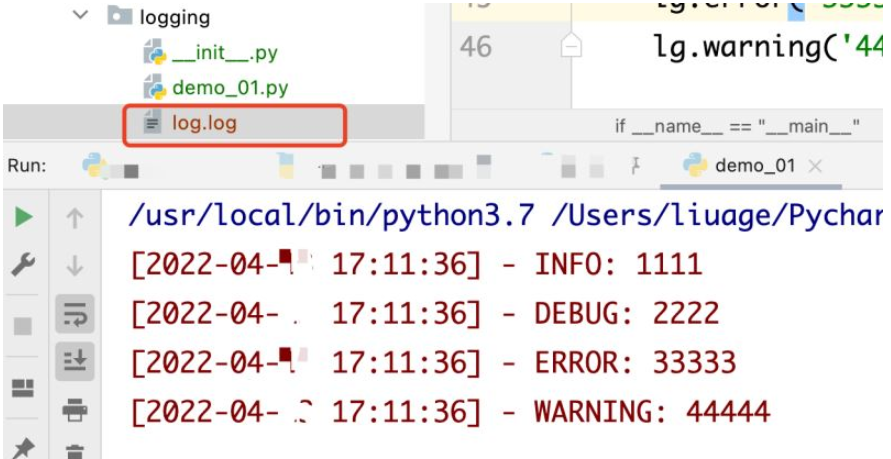
Output content after running, there is an additional log.log file in the current file directory:

Log content:

2. Generate logs and read logs
1. Create a new py file (generation_log) with a customized file name.
2. Directly upload Code
# 导入上面封装好的日志输出
from logging.demo_01 import logging_
import os,time
_path = os.path.dirname(__file__) # 获取当前文件路径
lg = logging_(_path) # 实例化类

# 创建方法生成日志
def generation_log():
    for i in range(20):
        lg.info(i)
        time.sleep(1)

# 读取日志并返回
def red_logs():
    log_path = f'{_path}/log.log' # 获取日志文件路径
    with open(log_path,'rb') as f:
        log_size = path.getsize(log_path) # 获取日志大小
        offset = -100
        # 如果文件大小为0时返回空
        if log_size == 0:
            return ''
        while True:
            # 判断offset是否大于文件字节数,是则读取所有行,并返回
            if (abs(offset) >= log_size):
                f.seek(-log_size, 2)
                data = f.readlines()
                return data
            # 游标移动倒数的字节数位置
            data = f.readlines()
            # 判断读取到的行数,如果大于1则返回最后一行,否则扩大offset
            if (len(data) > 1):
                return data
            else:
                offset *= 2
3. Flask creates a web service
I won’t explain what flask does right now. If you are interested, you can go to Baidu or wait for my update. Here, just follow the steps and add the code. Quickly implement a simple web page
1. Create an app.py file in the directory and enter the following code
#导入flask模块
from flask import Flask,request,render_template
# 导入日志生成和日志返回方法
from study.logging.generation_log import generation_log,red_logs

app = Flask(__name__)

line_number = [0] #存放当前日志行数
# 定义接口把处理日志并返回到前端
@app.route('/get_log',methods=['GET','POST'])
def get_log():
    log_data = red_logs() # 获取日志
    # 判断如果此次获取日志行数减去上一次获取日志行数大于0,代表获取到新的日志
    if len(log_data) - line_number[0] > 0:
        log_type = 2 # 当前获取到日志
        log_difference = len(log_data) - line_number[0] # 计算获取到少行新日志
        log_list = [] # 存放获取到的新日志
        # 遍历获取到的新日志存放到log_list中
        for i in range(log_difference):
            log_i = log_data[-(i+1)].decode('utf-8') # 遍历每一条日志并解码
            log_list.insert(0,log_i) # 将获取的日志存放log_list中
    else:
        log_type = 3
        log_list = ''
    # 已字典形式返回前端
    _log = {
        'log_type' : log_type,
        'log_list' : log_list
    }
    line_number.pop() # 删除上一次获取行数
    line_number.append(len(log_data)) # 添加此次获取行数
    return _log

# 通过前端请求执行生成日志方法
@app.route('/generation_log',methods=['GET','POST'])
def generation_log_():
    if request.method == 'POST':
        generation_log()
    return ''

@app.route('/',methods=['GET','POST'])
def index():
    if request.method == 'GET':
        return render_template('index.html')
    if request.method == 'POST':
        return render_template('index.html')

if __name__ == "__main__":
    app.run(debug=True) #启动web服务
2. Create a templates directory in the directory
3. Create a new index.html file in the templates directory and enter the following front-end code
<!DOCTYPE html>
<html lang="en">
<head>
<meta charset="UTF-8">
<title>Title</title>
<style>
body{
margin: auto;
background-color: #f5f5f5;
}
.button{width: 200px;height: 50px;color:#FFFFFF;background-color: #1da1f2}
.log{
width: 98%;
height: 500px;
background-color: #FFFFFF;
margin: 0 auto;
margin-top: 10px;
padding-top: 30px;
padding-bottom: 40px;
}
.log_text{
height: 500px;
margin-left: 80px;
font-size: 18px;
color: #111111;
overflow-x: hidden;
overflow-y: auto;
}
</style>
</head>
<body>
<button id="button" class="button">开始</button>
<div class="log">
<div class="log_text" id='log_list'>
<div id="log_text"></div>
</div>
</div>
</body>
<script src="http://libs.baidu.com/jquery/2.0.0/jquery.min.js"></script>
<script>
var time
// 创建一个元素节点
function insertAfter( newElement, targetElement ){ // newElement是要追加的元素targetElement 是指定元素的位置
var parent = targetElement.parentNode; // 找到指定元素的父节点
parent.appendChild( newElement, targetElement );
};
function log(){
clearTimeout(time) // 清空定时器
var log_null = 0 //存放空日志次数
var div = document.getElementById('log_list') //找到存放日志的块
div.innerHTML = "<div id='log_text'></div>" // 每次跑清空div内内容
$.post('/generation_log',{},function (){
}) //请求生成日志接口
// 生成定时器
time = setInterval(function (){
$.get('/get_log',{},function (data){ //请求获取日志接口获取日志
if (data.log_type == 3){ //如果获取的是空日志log_null次数加1
log_null ++
if (log_null >= 5){
clearTimeout(time) //如果连续10次获取的都是空日志清除定时任务
}
return
}
if (data.log_type == 2){ //如果获取到新日志
for (i=0;i<data.log_list.length;i++){ //遍历日志
var p = document.createElement("p") //生成一个p标签
p.innerHTML = data.log_list[i] //日志存放到P标签内
var header = document.getElementById('log_text')
insertAfter(p,header) //将p标签添加到log_text div中
div.scrollTop = div.scrollHeight //滚动条实时显示到底部
}
log_null = 0 //日志为空次数清0
}
})
},1000) //每1秒钟执行一次
}
document.getElementById('button').addEventListener("click",log) //点击开始按钮开始执行
</script>
</html>4. Start the service
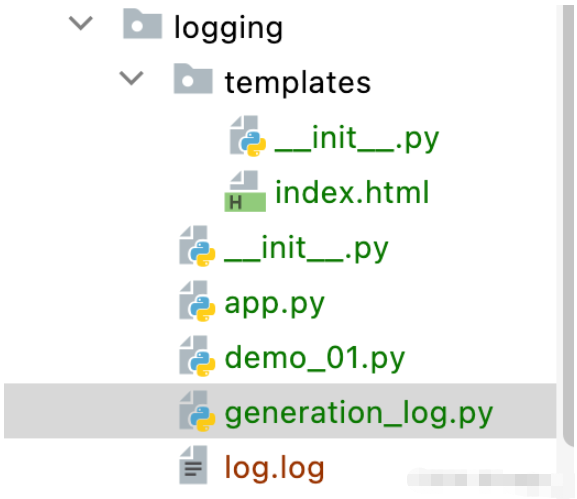
1. Check the project directory to see if the code is complete

2. Start the app.py file

3. Access the local connection: http://127.0.0.1:5000/

##4 , click start

The above is the detailed content of How to use python+Flask to realize real-time update and display of logs on web pages. For more information, please follow other related articles on the PHP Chinese website!

Hot AI Tools

Undress AI Tool
Undress images for free

Undresser.AI Undress
AI-powered app for creating realistic nude photos

AI Clothes Remover
Online AI tool for removing clothes from photos.

Clothoff.io
AI clothes remover

Video Face Swap
Swap faces in any video effortlessly with our completely free AI face swap tool!

Hot Article

Hot Tools

Notepad++7.3.1
Easy-to-use and free code editor

SublimeText3 Chinese version
Chinese version, very easy to use

Zend Studio 13.0.1
Powerful PHP integrated development environment

Dreamweaver CS6
Visual web development tools

SublimeText3 Mac version
God-level code editing software (SublimeText3)
 PHP calls AI intelligent voice assistant PHP voice interaction system construction
Jul 25, 2025 pm 08:45 PM
User voice input is captured and sent to the PHP backend through the MediaRecorder API of the front-end JavaScript; 2. PHP saves the audio as a temporary file and calls STTAPI (such as Google or Baidu voice recognition) to convert it into text; 3. PHP sends the text to an AI service (such as OpenAIGPT) to obtain intelligent reply; 4. PHP then calls TTSAPI (such as Baidu or Google voice synthesis) to convert the reply to a voice file; 5. PHP streams the voice file back to the front-end to play, completing interaction. The entire process is dominated by PHP to ensure seamless connection between all links.
 How to use PHP combined with AI to achieve text error correction PHP syntax detection and optimization
Jul 25, 2025 pm 08:57 PM
To realize text error correction and syntax optimization with AI, you need to follow the following steps: 1. Select a suitable AI model or API, such as Baidu, Tencent API or open source NLP library; 2. Call the API through PHP's curl or Guzzle and process the return results; 3. Display error correction information in the application and allow users to choose whether to adopt it; 4. Use php-l and PHP_CodeSniffer for syntax detection and code optimization; 5. Continuously collect feedback and update the model or rules to improve the effect. When choosing AIAPI, focus on evaluating accuracy, response speed, price and support for PHP. Code optimization should follow PSR specifications, use cache reasonably, avoid circular queries, review code regularly, and use X
 python seaborn jointplot example
Jul 26, 2025 am 08:11 AM
Use Seaborn's jointplot to quickly visualize the relationship and distribution between two variables; 2. The basic scatter plot is implemented by sns.jointplot(data=tips,x="total_bill",y="tip",kind="scatter"), the center is a scatter plot, and the histogram is displayed on the upper and lower and right sides; 3. Add regression lines and density information to a kind="reg", and combine marginal_kws to set the edge plot style; 4. When the data volume is large, it is recommended to use "hex"
 PHP integrated AI emotional computing technology PHP user feedback intelligent analysis
Jul 25, 2025 pm 06:54 PM
To integrate AI sentiment computing technology into PHP applications, the core is to use cloud services AIAPI (such as Google, AWS, and Azure) for sentiment analysis, send text through HTTP requests and parse returned JSON results, and store emotional data into the database, thereby realizing automated processing and data insights of user feedback. The specific steps include: 1. Select a suitable AI sentiment analysis API, considering accuracy, cost, language support and integration complexity; 2. Use Guzzle or curl to send requests, store sentiment scores, labels, and intensity information; 3. Build a visual dashboard to support priority sorting, trend analysis, product iteration direction and user segmentation; 4. Respond to technical challenges, such as API call restrictions and numbers
 python list to string conversion example
Jul 26, 2025 am 08:00 AM
String lists can be merged with join() method, such as ''.join(words) to get "HelloworldfromPython"; 2. Number lists must be converted to strings with map(str, numbers) or [str(x)forxinnumbers] before joining; 3. Any type list can be directly converted to strings with brackets and quotes, suitable for debugging; 4. Custom formats can be implemented by generator expressions combined with join(), such as '|'.join(f"[{item}]"foriteminitems) output"[a]|[
 python connect to sql server pyodbc example
Jul 30, 2025 am 02:53 AM
Install pyodbc: Use the pipinstallpyodbc command to install the library; 2. Connect SQLServer: Use the connection string containing DRIVER, SERVER, DATABASE, UID/PWD or Trusted_Connection through the pyodbc.connect() method, and support SQL authentication or Windows authentication respectively; 3. Check the installed driver: Run pyodbc.drivers() and filter the driver name containing 'SQLServer' to ensure that the correct driver name is used such as 'ODBCDriver17 for SQLServer'; 4. Key parameters of the connection string
 python pandas melt example
Jul 27, 2025 am 02:48 AM
pandas.melt() is used to convert wide format data into long format. The answer is to define new column names by specifying id_vars retain the identification column, value_vars select the column to be melted, var_name and value_name, 1.id_vars='Name' means that the Name column remains unchanged, 2.value_vars=['Math','English','Science'] specifies the column to be melted, 3.var_name='Subject' sets the new column name of the original column name, 4.value_name='Score' sets the new column name of the original value, and finally generates three columns including Name, Subject and Score.
 Optimizing Python for Memory-Bound Operations
Jul 28, 2025 am 03:22 AM
Pythoncanbeoptimizedformemory-boundoperationsbyreducingoverheadthroughgenerators,efficientdatastructures,andmanagingobjectlifetimes.First,usegeneratorsinsteadofliststoprocesslargedatasetsoneitematatime,avoidingloadingeverythingintomemory.Second,choos


