Why use component-based development?
Currently popular front-end frameworks such as Vue React will complete business requirements by writing components, which is component-based development. Including small program development, the idea of component development will also be used.
Analyze componentized ideas to develop applications:
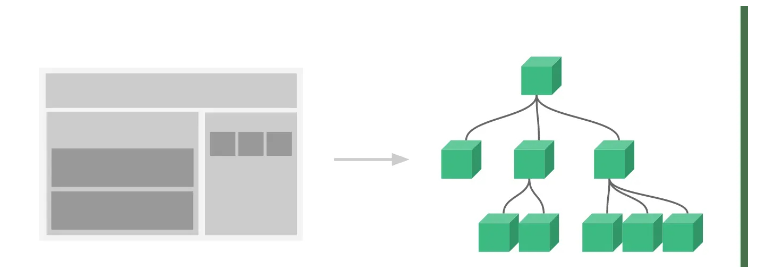
Split a complete page into many small components
Each Each component is used to complete a functional module of the page
Each component can also be subdivided (parent and child components)
General components can be duplicated Use different pages
A Vue page should be organized like a nested component tree:

vue3 Entry file:
import { createApp } from 'vue';
import App from './App.vue';

createApp(App).mount('#app');createApp() The function passes in an App, App is a component and is the root component of the project.
The following will analyze the common methods of component development in Vue3.
##$props Used to pass data to sub-components
<p> $props: {{$props}} </p><script setup> You need to use definePropsApi to get props
const props = defineProps({
  num: Number,
})<button @click="$emit('add')"> add </button>
defineEmitsApi statement emits##<div class="code" style="position:relative; padding:0px; margin:0px;"><pre class="brush:js;"><button @click="add">{{ num }}</button>
const emits = defineEmits([&#39;add&#39;])
function add() {
emits(&#39;add&#39;)
}</pre><div class="contentsignin">Copy after login</div></div>$parent
directly in the template will return an empty object. In order to specify the properties to be exposed in the <script setup> component, use the
compiler macro: <div class="code" style="position:relative; padding:0px; margin:0px;"><pre class="brush:js;">const parData = ref("父组件数据");
defineExpose({
parData,
})</pre><div class="contentsignin">Copy after login</div></div> Subcomponent: <div class="code" style="position:relative; padding:0px; margin:0px;"><pre class="brush:php;toolbar:false"><p>父组件 parData: {{$parent.parData}}</p></pre><div class="contentsignin">Copy after login</div></div>$attrs
Sub component:
<Foo a="a" b="b" :num="num" @add="add" />
is
{ "a": "a", "b": "b" }. When a component does not declare any props, this will contain the bindings of all parent scopes and can be passed through
Parent component:
<Bar :age=18 sex="boy" />
<p v-bind="$attrs">将$attrs对象绑定到当前标签</p>
View the DOM in the browser, age and sex are bound to the
tag as attributes. ##<script setup>
import { useAttrs } from 'vue';

const attrs = useAttrs();
console.log(attrs.sex); // boyproviede & inject provide
option to provide data, Child components have anParent component:
provide("user", "kong");
provide("pass", 123456);const user = inject("user");
const pass = inject("pass");SlotComp Component
<template>
  <div :>
    <slot name="head"></slot>
  </div>
  <div :>
    <slot name="foot"></slot>
  </div>
</template> <SlotComp>
<template v-slot:head>
<p>head插槽</p>
</template>
<template v-slot:foot>
<p>foot插槽</p>
</template>
</SlotComp>name
attribute The contents of theslot slot will be replaced. The replaced content needs to use the v-slot directive in the parent component to provide the slot with the content you want to display. Rendering scope
            <template v-slot:foot>
              <p>foot插槽</p>
              {{msg}}
              {{items}}
</template>In the above example, {{items}} will not display data. All content in the parent template is compiled in the parent scope; all content in the child template is compiled in the child scope.
Slot content:Let the slot content access the data only available in the subcomponent:
<slot name="head" :item="items"></slot>Copy after login
            <template v-slot:head = "slotProps">
              <p v-for="i in slotProps.item">{{i}}</p>
</template>slot prop
. Now, in the parent scope, we can usev-slot with a value to define the name of the slot prop we provide, in this case slotProps. v-modelForm component
<input v-model="text" />
将 v-model 应用在自定义组件上面:
父组件中使用自定义组件:
const msg = ref('hello world!');

<ModelComp v-model="msg"></ModelComp>
相当于:
          <ModelComp
            :modelValue="msg"
             @update:modelValue="msg = $event"
          >
</ModelComp>自定义组件ModelComp.vue中:
const props = defineProps({
  modelValue: String
})
const emits = defineEmits([
  "update:modelValue"
])

const text = ref("请输入..");

// text改变时执行
watch(text,()=>{
  emits("update:modelValue",text.value);
})未设置参数时如上,默认绑定的参数是 modelValue update:modelValue
设置v-model参数:
<ModelComp v-model:show="show"></ModelComp>
相当于:
          <ModelComp
            :show="showFlag"
             @update:show="showFlag = $event"
          >
</ModelComp>自定义组件ModelComp.vue中:
const props = defineProps({
  show: Boolean
})
const emits = defineEmits([
  "update:show",
])class绑定:根据需求动态绑定class样式时可以使用一下几种方法
写法1:对象语法
<button @click="changeColor" :class="{ active: isActive }">
    点击切换我的文体颜色样式
</button>

const isActive = ref(false);
const changeColor = () => {
  isActive.value = !isActive.value;
}写法2:对象语法
<button @click="changeColor2" :class="classObj">
点击切换颜色,根据计算属性
</button>
const isActive2 = reactive({
active: false,
})
const classObj = computed(() => {
return {
active: isActive2.active,
'font-30': true,
}
})
const changeColor2 = () => {
isActive2.active = !isActive2.active
}写法3:数组语法
<div :class="[activeClass, errorClass]"></div>
三目运算符写法
<div :class="[isActive ? activeClass : '', errorClass]"></div>
数组语法中结合对象语法使用
<div :class="[{ active: isActive }, errorClass]"></div>动态绑定行内style样式
三种方式:html代码
<p :>style绑定</p>
<p :>style对象绑定(直接绑定到一个对象,代码更清新)</p>
<p :>style数组绑定</p>
js 代码
const colorRed = ref('#f00')
const styleObj = reactive({
  fontSize: '30px',
})
const styleObjRed = reactive({
  color: '#f00',
})The above is the detailed content of What are the common API knowledge points for vue3 component development?. For more information, please follow other related articles on the PHP Chinese website!


