


A python bytecode mainly consists of two parts, one is the operation code, and the other is the parameters of the operation code. In cpython, only some bytecodes have parameters. If The corresponding bytecode has no parameters, so the value of oparg is equal to 0. In cpython, the instruction with opcode

opcode and oparg each occupy one byte, and the cpython virtual machine uses little endian mode to save bytecode.
We use the following code snippet to first understand the design of bytecode:
import dis def add(a, b): return a + b if __name__ == '__main__': print(add.__code__.co_code) print("bytecode: ", list(bytearray(add.__code__.co_code))) dis.dis(add)
The output of the above code in python3.9 is as follows:
b'|\x00|\x01\x17\x00S\x00' bytecode: [124, 0, 124, 1, 23, 0, 83, 0] 5 0 LOAD_FAST 0 (a) 2 LOAD_FAST 1 (b) 4 BINARY_ADD 6 RETURN_VALUE
First need What I understand is that add.__code__.co_code is the bytecode of the function add, which is a byte sequence.list(bytearray(add.__code__.co_code))is to combine this sequence byte by byte. Separate it and convert it into decimal form. According to each instruction we talked about earlier - the bytecode occupies 2 bytes, so the above bytecode has four instructions: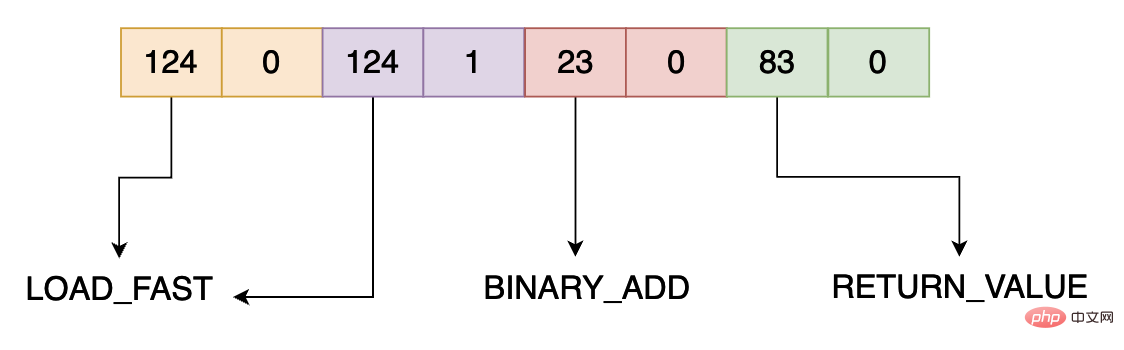
opcode and corresponding operation The instructions have a detailed correspondence table at the end of the article. In the above code, three bytecode instructions are mainly used, namely 124, 23 and 83. Their corresponding operation instructions are LOAD_FAST, BINARY_ADD and RETURN_VALUE respectively. Their meanings are as follows:
LOAD_FAST: Push varnames[var_num] onto the top of the stack. BINARY_ADD: Pop two objects from the stack and push the result of their addition onto the top of the stack. RETURN_VALUE: Pop the element at the top of the stack and use it as the return value of the function.
The first thing we need to know is BINARY_ADD and RETURN_VALUE. These two operation instructions have no parameters, so the parameters after these two opcodes are all 0.
But LOAD_FAST has parameters. We already know above that LOAD_FAST pushes co-varnames[var_num] onto the stack, and var_num is the parameter of the instruction LOAD_FAST. There are two LOAD_FAST instructions in the above code, which push a and b onto the stack. Their subscripts in varnames are 0 and 1 respectively, so their operands are 0 and 1.
The python bytecode operand and opcode we talked about above each occupy one byte, but if the number of varnames or constant table data is greater than If the representation range is 1 byte, how to deal with it?
In order to solve this problem, cpython designs extended parameters for bytecode. For example, if we want to load the object with the subscript 66113 in the constant table, then the corresponding bytecode is as follows:
[144, 1, 144, 2, 100, 65]
144 represents EXTENDED_ARG, which is essentially not a bytecode that needs to be executed by the Python virtual machine. This field is designed mainly for calculation of extended parameters. The corresponding operation instruction of
100 is LOAD_CONST, and its operation code is 65. However, the above instruction will not load the object with the subscript 65 in the constant table, but will load the object with the subscript 66113. The reason is Because of EXTENDED_ARG.
Now let’s simulate the above analysis process:
First read a bytecode instruction, the opcode is equal to 144, indicating that it is an extended parameter, then the parameter arg at this time is equal to (1 x (1 << 8)) = 256. Read the second bytecode instruction, the opcode is equal to 144, indicating that it is an extended parameter, because the previous arg already exists and is not equal to 0, then the calculation method of arg has changed at this time, arg = arg << 8 2 << 8 , that is to say, the original arg is multiplied by 256 plus the new operand multiplied by 256. At this time, arg = 66048. Read the third bytecode instruction, the opcode is equal to 100, this is the LOAD_CONST instruction, then the opcode at this time is equal to arg = 65, because the opcode is not EXTENDED_ARG, so the operand does not need to be multiplied by 256.
The above calculation process is represented by the program code as follows. In the following code, code is the real byte sequence HAVE_ARGUMENT = 90.
def _unpack_opargs(code): extended_arg = 0 for i in range(0, len(code), 2): op = code[i] if op >= HAVE_ARGUMENT: arg = code[i+1] | extended_arg extended_arg = (arg << 8) if op == EXTENDED_ARG else 0 else: arg = None yield (i, op, arg)
We can use code to verify our previous analysis:
import dis def num_to_byte(n): return n.to_bytes(1, "little") def nums_to_bytes(data): ans = b"".join([num_to_byte(n) for n in data]) return ans if __name__ == '__main__': # extended_arg extended_num opcode oparg for python_version > 3.5 bytecode = nums_to_bytes([144, 1, 144, 2, 100, 65]) print(bytecode) dis.dis(bytecode)
The output result of the above code is as follows:
b'\x90\x01\x90\x02dA' 0 EXTENDED_ARG 1 2 EXTENDED_ARG 258 4 LOAD_CONST 66113 (66113)
You can see according to the output result of the above program Our analysis turned out to be correct.
Source code bytecode mapping table
This section mainly analyzes the co_lnotab field in a code object object, and learns the design of this field by analyzing a specific field.
import dis def add(a, b): a += 1 b += 2 return a + b if __name__ == '__main__': dis.dis(add.__code__) print(f"{list(bytearray(add.__code__.co_lnotab)) = }") print(f"{add.__code__.co_firstlineno = }")
First of all, the first column of the output of dis is the line number of the source code corresponding to the bytecode, and the second column is the displacement of the bytecode in the byte sequence.
The output result of the above code is as follows:
源代码的行号 字节码的位移 6 0 LOAD_FAST 0 (a) 2 LOAD_CONST 1 (1) 4 INPLACE_ADD 6 STORE_FAST 0 (a) 7 8 LOAD_FAST 1 (b) 10 LOAD_CONST 2 (2) 12 INPLACE_ADD 14 STORE_FAST 1 (b) 8 16 LOAD_FAST 0 (a) 18 LOAD_FAST 1 (b) 20 BINARY_ADD 22 RETURN_VALUE list(bytearray(add.__code__.co_lnotab)) = [0, 1, 8, 1, 8, 1] add.__code__.co_firstlineno = 5
It can be seen from the output result of the above code that the bytecode is divided into three segments, and each segment represents the bytecode of one line of code. Now let's analyze the co_lnotab field. This field is actually divided into two bytes. For example, the above [0, 1, 8, 1, 8, 1] can be divided into three segments [0, 1], [8, 1], [8, 1]. The meanings are:
第一个数字表示距离上一行代码的字节码数目。 第二个数字表示距离上一行有效代码的行数。
现在我们来模拟上面代码的字节码的位移和源代码行数之间的关系:
[0, 1],说明这行代码离上一行代码的字节位移是 0 ,因此我们可以看到使用 dis 输出的字节码 LOAD_FAST ,前面的数字是 0,距离上一行代码的行数等于 1 ,代码的第一行的行号等于 5,因此 LOAD_FAST 对应的行号等于 5 + 1 = 6 。 [8, 1],说明这行代码距离上一行代码的字节位移为 8 个字节,因此第二块的 LOAD_FAST 前面是 8 ,距离上一行代码的行数等于 1,因此这个字节码对应的源代码的行号等于 6 + 1 = 7。 [8, 1],同理可以知道这块字节码对应源代码的行号是 8 。
现在有一个问题是当两行代码之间相距的行数超过 一个字节的表示范围怎么办?在 python3.5 以后如果行数差距大于 127,那么就使用 (0, 行数) 对下一个组合进行表示,(0, \(x_1\)), (0,$ x_2$) ... ,直到 \(x_1 + ... + x_n\) = 行数。
在后面的程序当中我们会使用 compile 这个 python 内嵌函数。当你使用Python编写代码时,可以使用compile()函数将Python代码编译成字节代码对象。这个字节码对象可以被传递给Python的解释器或虚拟机,以执行代码。
compile()函数接受三个参数:
source: 要编译的Python代码,可以是字符串,字节码或AST对象。filename: 代码来源的文件名(如果有),通常为字符串。mode: 编译代码的模式。可以是 'exec'、'eval' 或 'single' 中的一个。'exec' 模式用于编译多行代码,'eval' 用于编译单个表达式,'single' 用于编译单行代码。
import dis code = """ x=1 y=2 """ \ + "\n" * 500 + \ """ z=x+y """ code = compile(code, '', 'exec') print(list(bytearray(code.co_lnotab))) print(code.co_firstlineno) dis.dis(code)
上面的代码输出结果如下所示:
[0, 1, 4, 1, 4, 127, 0, 127, 0, 127, 0, 121] 1 2 0 LOAD_CONST 0 (1) 2 STORE_NAME 0 (x) 3 4 LOAD_CONST 1 (2) 6 STORE_NAME 1 (y) 505 8 LOAD_NAME 0 (x) 10 LOAD_NAME 1 (y) 12 BINARY_ADD 14 STORE_NAME 2 (z) 16 LOAD_CONST 2 (None) 18 RETURN_VALUE
根据我们前面的分析因为第三行和第二行之间的差距大于 127 ,因此后面的多个组合都是用于表示行数的。
505 = 3(前面已经有三行了) + (127 + 127 + 127 + 121)(这个是第二行和第三行之间的差距,这个值为 502,中间有 500 个换行但是因为字符串相加的原因还增加了两个换行,因此一共是 502 个换行)。
具体的算法用代码表示如下所示,下面的参数就是我们传递给 dis 模块的 code,也就是一个 code object 对象。
def findlinestarts(code): """Find the offsets in a byte code which are start of lines in the source. Generate pairs (offset, lineno) as described in Python/compile.c. """ byte_increments = code.co_lnotab[0::2] line_increments = code.co_lnotab[1::2] bytecode_len = len(code.co_code) lastlineno = None lineno = code.co_firstlineno addr = 0 for byte_incr, line_incr in zip(byte_increments, line_increments): if byte_incr: if lineno != lastlineno: yield (addr, lineno) lastlineno = lineno addr += byte_incr if addr >= bytecode_len: # The rest of the lnotab byte offsets are past the end of # the bytecode, so the lines were optimized away. return if line_incr >= 0x80: # line_increments is an array of 8-bit signed integers line_incr -= 0x100 lineno += line_incr if lineno != lastlineno: yield (addr, lineno)
| 操作 | 操作码 |
|---|---|
| POP_TOP | 1 |
| ROT_TWO | 2 |
| ROT_THREE | 3 |
| DUP_TOP | 4 |
| DUP_TOP_TWO | 5 |
| ROT_FOUR | 6 |
| NOP | 9 |
| UNARY_POSITIVE | 10 |
| UNARY_NEGATIVE | 11 |
| UNARY_NOT | 12 |
| UNARY_INVERT | 15 |
| BINARY_MATRIX_MULTIPLY | 16 |
| INPLACE_MATRIX_MULTIPLY | 17 |
| BINARY_POWER | 19 |
| BINARY_MULTIPLY | 20 |
| BINARY_MODULO | 22 |
| BINARY_ADD | 23 |
| BINARY_SUBTRACT | 24 |
| BINARY_SUBSCR | 25 |
| BINARY_FLOOR_DIVIDE | 26 |
| BINARY_TRUE_DIVIDE | 27 |
| INPLACE_FLOOR_DIVIDE | 28 |
| INPLACE_TRUE_DIVIDE | 29 |
| RERAISE | 48 |
| WITH_EXCEPT_START | 49 |
| GET_AITER | 50 |
| GET_ANEXT | 51 |
| BEFORE_ASYNC_WITH | 52 |
| END_ASYNC_FOR | 54 |
| INPLACE_ADD | 55 |
| INPLACE_SUBTRACT | 56 |
| INPLACE_MULTIPLY | 57 |
| INPLACE_MODULO | 59 |
| STORE_SUBSCR | 60 |
| DELETE_SUBSCR | 61 |
| BINARY_LSHIFT | 62 |
| BINARY_RSHIFT | 63 |
| BINARY_AND | 64 |
| BINARY_XOR | 65 |
| BINARY_OR | 66 |
| INPLACE_POWER | 67 |
| GET_ITER | 68 |
| GET_YIELD_FROM_ITER | 69 |
| PRINT_EXPR | 70 |
| LOAD_BUILD_CLASS | 71 |
| YIELD_FROM | 72 |
| GET_AWAITABLE | 73 |
| LOAD_ASSERTION_ERROR | 74 |
| INPLACE_LSHIFT | 75 |
| INPLACE_RSHIFT | 76 |
| INPLACE_AND | 77 |
| INPLACE_XOR | 78 |
| INPLACE_OR | 79 |
| LIST_TO_TUPLE | 82 |
| RETURN_VALUE | 83 |
| IMPORT_STAR | 84 |
| SETUP_ANNOTATIONS | 85 |
| YIELD_VALUE | 86 |
| POP_BLOCK | 87 |
| POP_EXCEPT | 89 |
| STORE_NAME | 90 |
| DELETE_NAME | 91 |
| UNPACK_SEQUENCE | 92 |
| FOR_ITER | 93 |
| UNPACK_EX | 94 |
| STORE_ATTR | 95 |
| DELETE_ATTR | 96 |
| STORE_GLOBAL | 97 |
| DELETE_GLOBAL | 98 |
| LOAD_CONST | 100 |
| LOAD_NAME | 101 |
| BUILD_TUPLE | 102 |
| BUILD_LIST | 103 |
| BUILD_SET | 104 |
| BUILD_MAP | 105 |
| LOAD_ATTR | 106 |
| COMPARE_OP | 107 |
| IMPORT_NAME | 108 |
| IMPORT_FROM | 109 |
| JUMP_FORWARD | 110 |
| JUMP_IF_FALSE_OR_POP | 111 |
| JUMP_IF_TRUE_OR_POP | 112 |
| JUMP_ABSOLUTE | 113 |
| POP_JUMP_IF_FALSE | 114 |
| POP_JUMP_IF_TRUE | 115 |
| LOAD_GLOBAL | 116 |
| IS_OP | 117 |
| CONTAINS_OP | 118 |
| JUMP_IF_NOT_EXC_MATCH | 121 |
| SETUP_FINALLY | 122 |
| LOAD_FAST | 124 |
| STORE_FAST | 125 |
| DELETE_FAST | 126 |
| RAISE_VARARGS | 130 |
| CALL_FUNCTION | 131 |
| MAKE_FUNCTION | 132 |
| BUILD_SLICE | 133 |
| LOAD_CLOSURE | 135 |
| LOAD_DEREF | 136 |
| STORE_DEREF | 137 |
| DELETE_DEREF | 138 |
| CALL_FUNCTION_KW | 141 |
| CALL_FUNCTION_EX | 142 |
| SETUP_WITH | 143 |
| LIST_APPEND | 145 |
| SET_ADD | 146 |
| MAP_ADD | 147 |
| LOAD_CLASSDEREF | 148 |
| EXTENDED_ARG | 144 |
| SETUP_ASYNC_WITH | 154 |
| FORMAT_VALUE | 155 |
| BUILD_CONST_KEY_MAP | 156 |
| BUILD_STRING | 157 |
| LOAD_METHOD | 160 |
| CALL_METHOD | 161 |
| LIST_EXTEND | 162 |
| SET_UPDATE | 163 |
| DICT_MERGE | 164 |
| DICT_UPDATE | 165 |
The above is the detailed content of How to use python virtual machine. For more information, please follow other related articles on the PHP Chinese website!


![[Web front-end] Node.js quick start](https://img.php.cn/upload/course/000/000/067/662b5d34ba7c0227.png)


