


1. Introduction to Distributed Storage System
With the continuous development of information technology, it not only brings convenience to us, but also increases the amount of data and the connections between information. Problems such as increasingly complex associations, increasing concurrency of data access, higher and higher I/O requirements, and increasingly complex data types have become urgent problems that need to be solved as information technology continues to develop at a rapid pace. The emergence of distributed storage systems has solved most of the above problems to a large extent.
Distributed storage system stores data dispersedly on multiple independent devices. Traditional network storage systems use centralized storage servers to store all data. The storage server becomes the bottleneck of system performance and the focus of reliability and security, and cannot meet the needs of large-scale storage applications. The distributed storage system adopts a scalable system structure, uses multiple storage servers to share the storage load, and uses location servers to locate storage information. It not only improves the reliability, availability and access efficiency of the system, but is also easy to expand.
Distributed storage systems can be divided into general distributed storage and dedicated distributed storage in terms of interface types. General distributed storage means that there is no file system interface and needs to be accessed through the API interface; dedicated distributed storage is also called distributed file system. They generally have a file system interface and can be mounted directly. General distributed storage includes mogilefs, fastdfs, etc., and dedicated distributed storage systems include moosefs, etc.
2. mogilefs
mogilefs is an open source distributed file storage system. mogilefs is suitable for work scenarios where massive amounts of small files are stored. It is developed by danga interactive company under livejournal Development, the team has developed many well-known open source projects including memcached, mogilefs, perlbal, etc.
1. Mogliefs architecture diagram:
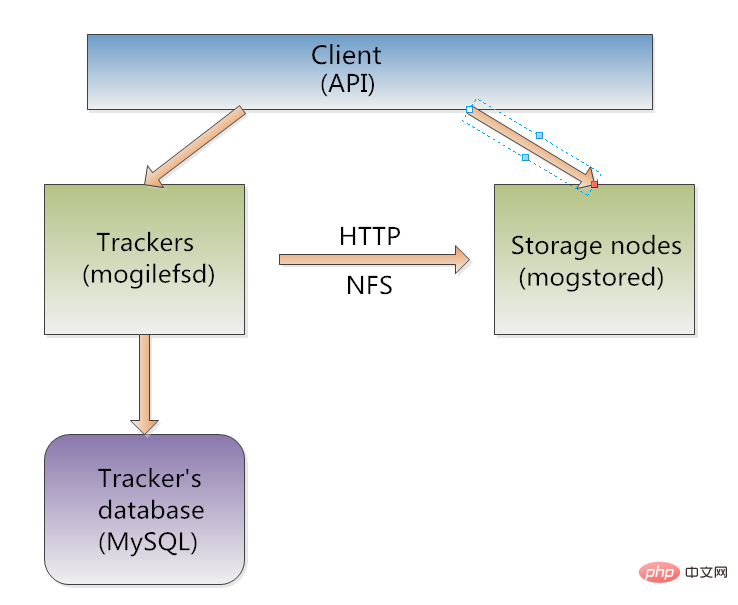
##2. Components that make up mogliefs:
1.trackers(mogilefsd): The core component of mogliefs, its main functions are (replication) node file replication, (deletion) file deletion, (query) metadata query, (monitor) health monitoring, (reaper) storage failure reset etc. It is often called a metadata server, but it does not store metadata. Instead, it stores metadata in a database such as mysql. To ensure the reliability of the architecture, there are generally multiple trackers. Trackers can be regarded as side-by-side agents that are only responsible for processing metadata information. 2. Database: The database is used to store the metadata of mogliefs, and trackers manage the data. Therefore it is usually recommended to do ha. 3.mogstored (storage node): where the actual files are stored. It is common to keep at least two copies of the actual document.3. Example demonstration topology diagram
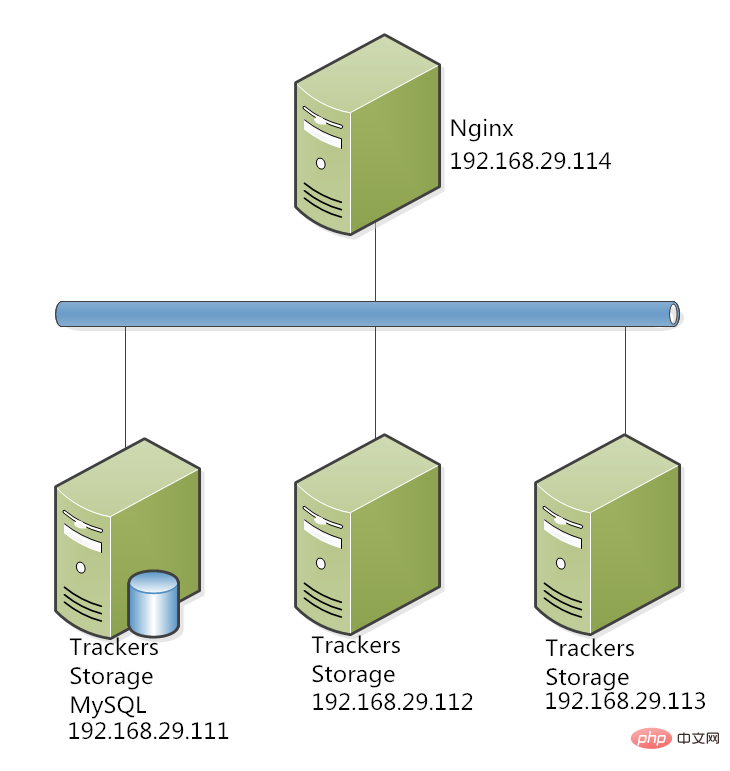
Install trackers and mogstored on three nodes at the same time, select one of the nodes to install mysql. In a production environment, it is best to deploy MySQL separately and perform master-slave replication. trackers and mogstored can also be deployed separately on different nodes, which need to be determined according to the actual production environment. The main purpose here is to demonstrate mogilefs and not to demonstrate mysql master-slave replication. If you want mogilefs to be mounted, you can use fuse to achieve it.It should be noted that:The file URL stored by mogilefs is very special (the process of mogilefs file name production will be explained later). For example, when storing a picture, the file URL may be similar to 6060/ A format like 0000/0000/0000/00000021.jpg is not user-friendly. Users may need an intuitive URL like image.hello.com/21.jpg. So nginx is usually used to replace mogilefs.
4. System environment and installation
mogilefs is a relatively old but mature distributed storage, considering There may be compatibility issues on centos7. Here is a demonstration on centos6. Operating system: centos release 6.6 mogilefs: 2.46 nginx: 1.10 mysql: 5.1 ip allocation: n1:192.168.29.111, n2:192.168.29.112, n3:192.168.29.113, n4:192.168.29.114 The structure is shown in the figure above. 1. Install mysql, mogilefsd, and mogstored on the n1 node, and configure n1 as trackers and storage node Mysql is installed directly with yum.~]# yum install -y mysql mysql-server
perl-danga-socket-1.61-1.el6.rf.noarch.rpm perl-io-stringy-2.110-1.2.el6.rfx.noarch.rpmperl-net-netmask-1.9015-8.el6.noarch.rpm perlbal-1.78-1.el6.noarch.rpmperl-perlbal-1.78-1.el6.noarch.rpm perlbal-doc-1.78-1.el6.noarch.rpmperl-io-aio-3.71-2.el6.x86_64.rpm
yum install -y mogilefs-server-mogstored-2.46-2.el6.noarch.rpm mogilefs-server-mogilefsd-2.46-2.el6.noarch.rpm mogilefs-server-2.46-2.el6.noarch.rpm
~]# vim /etc/mogilefs/mogilefsd.conf #mogilfs trackers的主配置文件
# enable daemon mode to work in background and use syslog daemonize = 1 #是否以守护进程的方式运行。 # where to store the pid of the daemon (must be the same in the init script) pidfile = /var/run/mogilefsd/mogilefsd.pid #pid文件路径 # database connection information db_dsn = dbi:mysql:mogilefs:host=192.168.29.111 #数据库的地址 db_user = moguser #配置数据库的用户名及密码 db_pass = 123456 # ip:port to listen on for mogilefs client requests listen = 0.0.0.0:7001 #监听的地址与端口 # optional, if you don't define the port above. conf_port = 7001 #默认端口 # number of query workers to start by default. query_jobs = 10 #查询进程数量 # number of delete workers to start by default. delete_jobs = 1 # number of replicate workers to start by default. replicate_jobs = 5 # number of reaper workers to start by default. # (you don't usually need to increase this) reaper_jobs = 1 # number of fsck workers to start by default. # (these can cause a lot of load when fsck'ing) #fsck_jobs = 1 # minimum amount of space to reserve in megabytes # default: 100 # consider setting this to be larger than the largest file you # would normally be uploading. #min_free_space = 200 # number of seconds to wait for a storage node to respond. # default: 2 # keep this low, so busy storage nodes are quickly ignored. #node_timeout = 2 # number of seconds to wait to connect to a storage node. # default: 2 # keep this low so overloaded nodes get skipped. #conn_timeout = 2 # allow replication to use the secondary node get port, # if you have apache or similar configured for get's #repl_use_get_port = 1
mysql> grant all on mogilefs.* to 'moguser'@'192.168.29.%' identified by '123456'; #创建用户moguser,拥有管理mogilefs库的所有权限,并允许192.168.29.*的用户远程连接。 mysql> flush privileges; mysql> quit
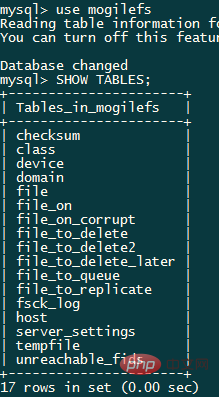
~]# mogdbsetup --dbhost=127.0.0.1 --dbuser=moguser --dbpass=123456
~]# service mogilefsd start starting mogilefsd [ ok ] ~]# ss -lnt
注:可以在n2、n3节点都安装trackers服务,从而消除单点故障风险也能平均i/o压力。
3.在n1上配置storage node
storage node配置文件路径为/etc/mogilefs/mogstored.conf:
~]# vim /etc/mogilefs/mogstored.conf maxconns = 10000 #最大并发连接数 httplisten = 0.0.0.0:7500 #mogilefs数据的传输是通过http协议实现的,这里是监听的地址和端口 mgmtlisten = 0.0.0.0:7501 #健康监测的监听地址和端口 docroot = /mogliefs/mogdata #数据的存储路径,目录的属组和属主必须是mogilefs
创建数据存储目录并修改属组和属主为mogilefs:
~]# mkdir -pv /mogliefs/mogdata ~]# chown -r mogilefs.mogilefs /mogliefs/
启动mogstored,查看进程是否正常启动端口是否监听:
~]# service mogstored start ~]# ss -lnt #监听端口为7500、7501
4.按照n1的步骤在节点n2、n3上安装mogilefs,并将n1上的配置文件复制到n2、n3。
~]# scp /etc/mogilefs/*.conf root@192.168.29.112:/etc/mogilefs/ ~]# scp /etc/mogilefs/*.conf root@192.168.29.113:/etc/mogilefs/
启动mogstored服务并确认监听:
~]# service mogstored start ~]# ss -lnt #监听端口为7500、7501
5.用在n1上用mogadm命令将所有节点整合成集群。
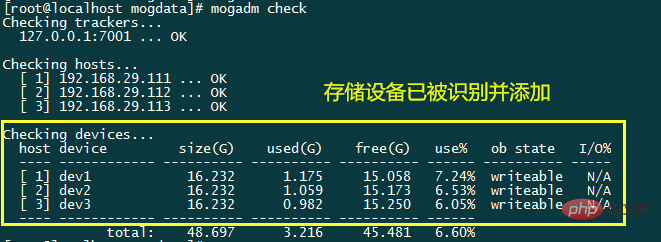
添加存储节点,并检查:
1 ~]# mogadm host add 192.168.29.111 --ip=192.168.29.111 --port=7500 --status=alive 2 ~]# mogadm host add 192.168.29.112 --ip=192.168.29.112 --port=7500 --status=alive 3 ~]# mogadm host add 192.168.29.113 --ip=192.168.29.113 --port=7500 --status=alive
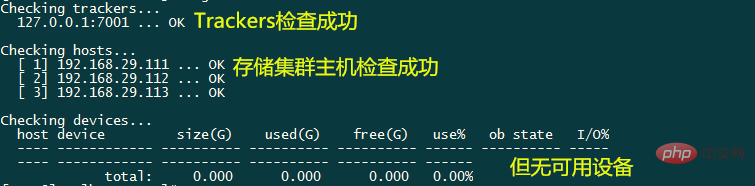
~]# mogadm check
若想让mogilefs集群中的存储被识别成不同设备,需要在创建的/mogliefs/mogdata目录下再创建名为dev*的目录,使每个节点被当做存储设备使用。mogilefs是将冗余存储在不同设备中的,每一个节点都应该被识别为不同的设备。
在n1、n2、n3上的/mogliefs/mogdata/目录下分别创建dev1,dev2,dev3目录,并在trackers上添加设备:
1 ~]# mogadm device add 192.168.29.111 1 2 ~]# mogadm device add 192.168.29.112 2 3 ~]# mogadm device add 192.168.29.113 3
6.创建domain和class
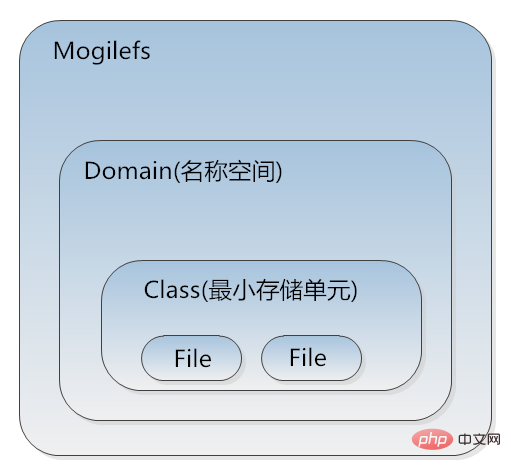
在mogilefs中,在多个节点上为了方便文件副本管理,通常在设备中不会以文件为单位进行管理,而是以class(类)做管理,复制删除等操作都是以class为最小单位进行的。每个class中可以放很多文件,class的容积也不是固定的。
在mogilefs的存储空间中,所有数据文件都在同一平面,所以不能有同名的情况发生,这样会影响mogilefs的灵活性,所以引入了domain(名称空间)的概念。domain包含class,在不同的domain中可以有相同的文件名。
~]# mogadm domain add imgs #创建名为imgs的domain ~]# mogadm domain add text #创建名为text的domain ~]# mogadm domain list #查看domain list

可以自定义class的属性,格式为:mogadm class add
~]# mogadm class add imgs png --mindevcount=3 --hashtype=md5 #在domain imgs中定义名为png的class,在不同设备中复制3份,并用md5做校验 ~]# mogadm class add imgs jpg --mindevcount=3 --hashtype=md5 #在domain imgs中定义名为jpg的class,在不同设备中复制3份,并用md5做校验 ~]# mogadm domain list

7.使用mogilefs做上传下载测试
mogilefs可以用自建的api接口进行交互,其中有很多用于管理存储数据的命令。例如上传数据命令为mogupload,查看数据命令为mogfileinfo等。
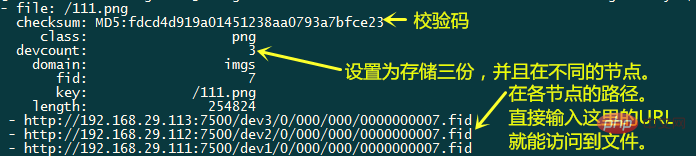
例:测试将文件/test/123.png上传至mogilefs集群(文件事先在本地准备好):
~]# mogupload --trackers=192.168.29.111 --domain=imgs --class=png --key='/111.png' --file='/test/123.png' #通过ip为192.168.29.111的trackers将123.png文件上传,并保存至domain为imgs,class为png的空间中,并重命名为111.png ~]# mogfileinfo --trackers=192.168.29.111 --domain=imgs --class=png --key='/111.png' #查看domain为imgs,class为png中key为111.png的文件的存储情况。
至此,mogilefs分布式储存集群就搭建完成了,但若想要使客户端能与之通信,就需要在接口上进行编程,这样就很麻烦了,好在我们能用nginx做反代进行通信。下面来演示nginx反代mogilefs的步骤。
5.nginx反代mogilefs
1.打开n2,n3的mogilefsd服务,将3个节点全部设置为trackers(保证配置文件与n1相同):
~]# service mogilefsd start
2.在n4节点编译安装nginx
安装依赖包:
~]# yum install gcc gcc-c++ perl pcre-devel openssl openssl-devel
下载nginx编译安装包nginx-1.10.3.tar.gz与nginx_mogilefs模块nginx_mogilefs_module-1.0.4.tar.gz并展开:
~]# ls nginx-1.10.3 nginx_mogilefs_module-1.0.4 nginx-1.10.3.tar.gz nginx_mogilefs_module-1.0.4.tar.gz
~]# cd nginx-1.10.3 ./configure \ > --prefix=/usr \ > --sbin-path=/usr/sbin/nginx \ > --conf-path=/etc/nginx/nginx.conf \ > --error-log-path=/var/log/nginx/error.log \ > --http-log-path=/var/log/nginx/access.log \ > --pid-path=/var/run/nginx/nginx.pid \ > --lock-path=/var/lock/nginx.lock \ > --user=nginx \ > --group=nginx \ > --with-http_ssl_module \ > --with-http_flv_module \ > --with-http_stub_status_module \ > --with-http_gzip_static_module \ > --http-client-body-temp-path=/var/tmp/nginx/client/ \ > --http-proxy-temp-path=/var/tmp/nginx/proxy/ \ > --http-fastcgi-temp-path=/var/tmp/nginx/fcgi/ \ > --http-uwsgi-temp-path=/var/tmp/nginx/uwsgi \ > --http-scgi-temp-path=/var/tmp/nginx/scgi \ > --with-pcre \ > --with-debug \ > --add-module=../nginx_mogilefs_module-1.0.4/ #一定记得添加mogilefs模块所在的路径,不可少。
~]# make & make install
添加nginx用户并启动nginx:
~]# useradd -s /sbin/nologin -m nginx ~]# /usr/sbin/nginx
3.配置nginx
单trackers示例:
location /imgs/ { mogilefs_tracker 192.168.29.111:7001; #单trackers示例 mogilefs_domain imgs; #指定domain mogilefs_class png jpg; #指定class mogilefs_pass { #传输相关配置 proxy_pass $mogilefs_path; proxy_hide_header content-type; proxy_buffering off; } }
多trackers示例:
在nginx配置中的http配置段添加调度模块:
1 upstream mogsvr { 2 server 192.168.29.111:7001; 3 server 192.168.29.112:7001; 4 server 192.168.29.113:7001; 5 }
在nginx配置中的server配置段添:
location /imgs/ { mogilefs_tracker mogsvr; mogilefs_domain imgs; mogilefs_class png jpg; mogilefs_pass { proxy_pass $mogilefs_path; proxy_hide_header content-type; proxy_buffering off; } }
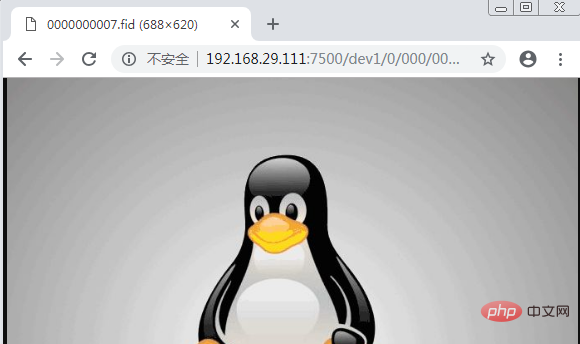
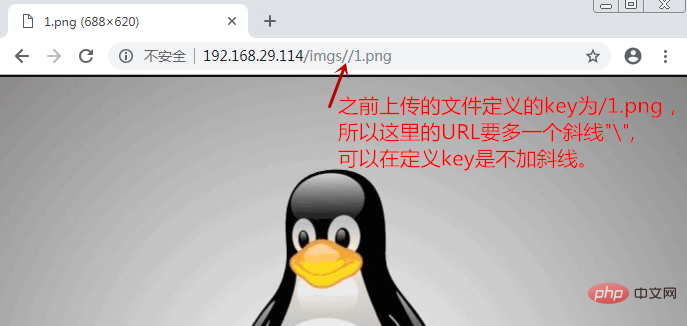
重新启动nginx,并通过nginx访问之前上传的图片:
The above is the detailed content of How to use Nginx to replace Mogilefs distributed storage. For more information, please follow other related articles on the PHP Chinese website!


![[Web front-end] Node.js quick start](https://img.php.cn/upload/course/000/000/067/662b5d34ba7c0227.png)


