How to configure Java environment variables and Tomcat server
Step one: Configure jdk environment variables consistent with the system (32-bit/64-bit)
(1) Download the jdk installation package from the official website:
Official website download address:
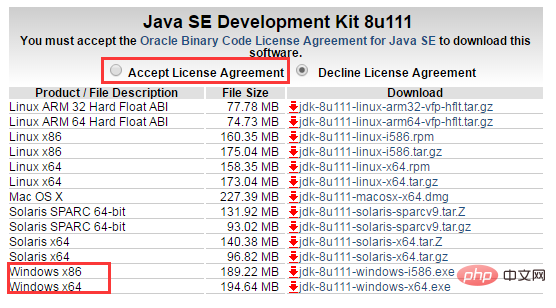
Choose the corresponding installation package according to your operating system (be sure to accept the license agreement)
(2) Install jdk:
Install jdk. Select the installation directory. During the installation process, two installation prompts will appear. The first time is to install jdk, and the second time is to install jre. It is recommended to install both in different folders within the same java folder. (They cannot both be installed in the root directory of the java folder. An error will occur if jdk and jre are installed in the same folder)
The installation is completed as shown in the figure below

(3) Configure environment variables
Configure environment variables after installing jdk Computer→Properties→Advanced System Settings→Advanced→Environment Variables
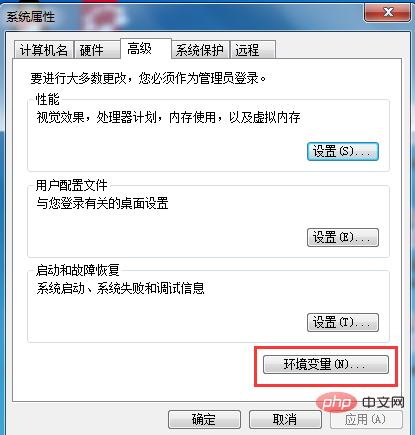
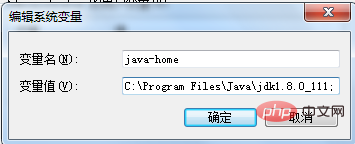
System variables→New java-home variable.
Fill in the installation directory of jdk with the variable value (I am c:\programfiles\java\jdk1.8.0_111)
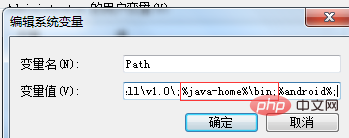
System variables→Look for path variables→ Edit
Enter %java-home%\bin;
at the end of the variable value (note whether there is a ; sign at the end of the variable value of the original path. If not, enter the ; sign first and then enter the above Code)
System variables→Create new classpath variable
Fill in the variable value .;%java-home%\lib;%java-home%\lib\ tools.jar (note the dot at the front)
System variables are configured.
Second step: Verify whether jdk is configured successfully (32-bit/64-bit)
Verify whether the configuration is successful. Run cmd and enter java -version (between java and -version There are spaces between them)
If the version information is displayed as shown in the figure, the installation and configuration are successful.
64-bit is as shown below, there will be a clear version comment, if not, it will be 32-bit


##Step Three: tomcat9 installation and configuration
(1) Download tomcat9 from the official website
Download the latest version of tomcat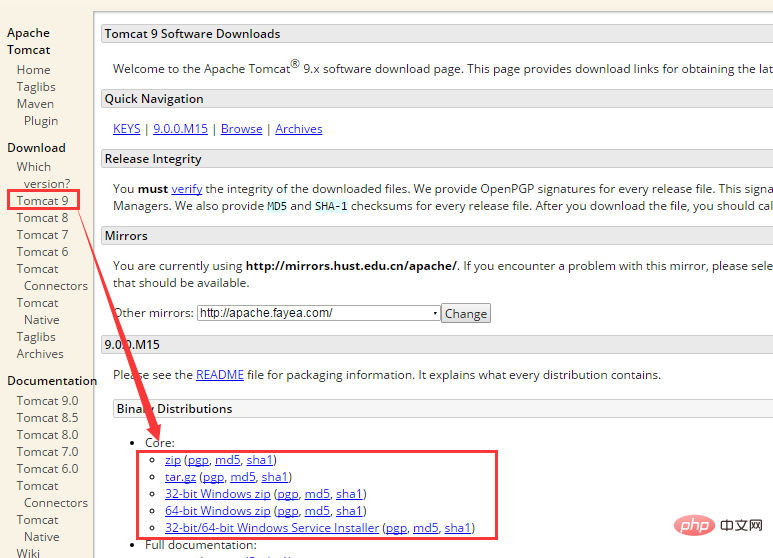
Note that 32 is located in a 64-bit jdk, otherwise a specific error 1 will be reported when starting tomcat
(2) cmd command to configure tomcat

(3) Four ways to start tomcat
- Double-click startup.bat batch processing in the bin directory to run tomcat (The advantage of this is that you can see the running status, the database appears, and the code reports errors. Recommended)
- Run cmd as an administrator to run the net starttomcat9 command (9 is the version number)
- Run through the service in the task manager
- Double-click tomcat9w.exe in the bin directory to check in and click start to run tomcat. The demonstration picture is as follows:
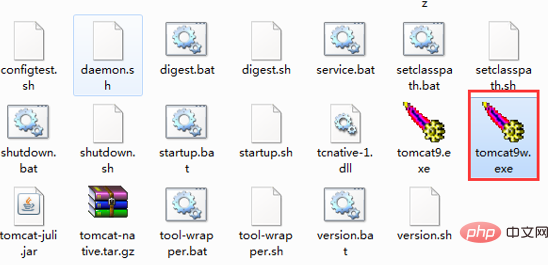
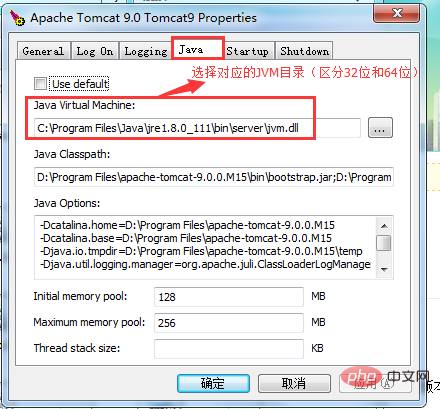
(4) Successful demonstration
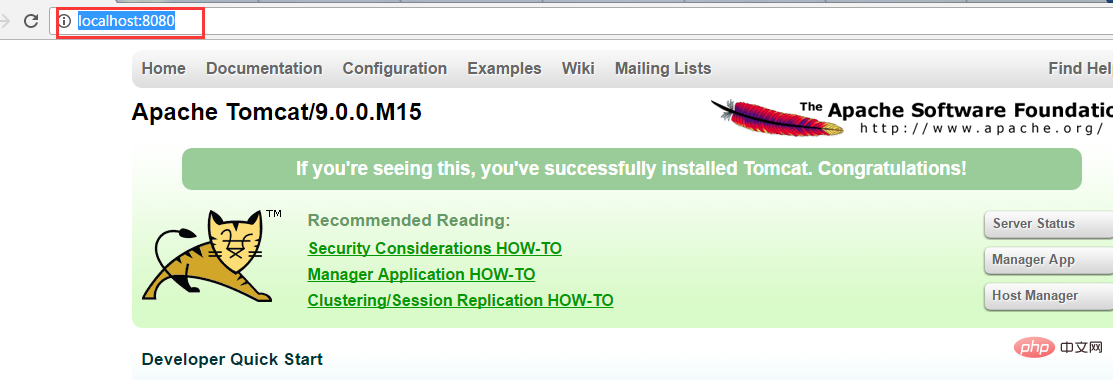
The above is the detailed content of How to configure Java environment variables and Tomcat server. For more information, please follow other related articles on the PHP Chinese website!

Hot AI Tools

Undress AI Tool
Undress images for free

Undresser.AI Undress
AI-powered app for creating realistic nude photos

AI Clothes Remover
Online AI tool for removing clothes from photos.

Clothoff.io
AI clothes remover

Video Face Swap
Swap faces in any video effortlessly with our completely free AI face swap tool!

Hot Article

Hot Tools

Notepad++7.3.1
Easy-to-use and free code editor

SublimeText3 Chinese version
Chinese version, very easy to use

Zend Studio 13.0.1
Powerful PHP integrated development environment

Dreamweaver CS6
Visual web development tools

SublimeText3 Mac version
God-level code editing software (SublimeText3)

Hot Topics
 VSCode settings.json location
Aug 01, 2025 am 06:12 AM
The settings.json file is located in the user-level or workspace-level path and is used to customize VSCode settings. 1. User-level path: Windows is C:\Users\\AppData\Roaming\Code\User\settings.json, macOS is /Users//Library/ApplicationSupport/Code/User/settings.json, Linux is /home//.config/Code/User/settings.json; 2. Workspace-level path: .vscode/settings in the project root directory
 How to handle transactions in Java with JDBC?
Aug 02, 2025 pm 12:29 PM
To correctly handle JDBC transactions, you must first turn off the automatic commit mode, then perform multiple operations, and finally commit or rollback according to the results; 1. Call conn.setAutoCommit(false) to start the transaction; 2. Execute multiple SQL operations, such as INSERT and UPDATE; 3. Call conn.commit() if all operations are successful, and call conn.rollback() if an exception occurs to ensure data consistency; at the same time, try-with-resources should be used to manage resources, properly handle exceptions and close connections to avoid connection leakage; in addition, it is recommended to use connection pools and set save points to achieve partial rollback, and keep transactions as short as possible to improve performance.
 python itertools combinations example
Jul 31, 2025 am 09:53 AM
itertools.combinations is used to generate all non-repetitive combinations (order irrelevant) that selects a specified number of elements from the iterable object. Its usage includes: 1. Select 2 element combinations from the list, such as ('A','B'), ('A','C'), etc., to avoid repeated order; 2. Take 3 character combinations of strings, such as "abc" and "abd", which are suitable for subsequence generation; 3. Find the combinations where the sum of two numbers is equal to the target value, such as 1 5=6, simplify the double loop logic; the difference between combinations and arrangement lies in whether the order is important, combinations regard AB and BA as the same, while permutations are regarded as different;
 Mastering Dependency Injection in Java with Spring and Guice
Aug 01, 2025 am 05:53 AM
DependencyInjection(DI)isadesignpatternwhereobjectsreceivedependenciesexternally,promotingloosecouplingandeasiertestingthroughconstructor,setter,orfieldinjection.2.SpringFrameworkusesannotationslike@Component,@Service,and@AutowiredwithJava-basedconfi
 python pytest fixture example
Jul 31, 2025 am 09:35 AM
fixture is a function used to provide preset environment or data for tests. 1. Use the @pytest.fixture decorator to define fixture; 2. Inject fixture in parameter form in the test function; 3. Execute setup before yield, and then teardown; 4. Control scope through scope parameters, such as function, module, etc.; 5. Place the shared fixture in conftest.py to achieve cross-file sharing, thereby improving the maintainability and reusability of tests.
 Understanding the Java Virtual Machine (JVM) Internals
Aug 01, 2025 am 06:31 AM
TheJVMenablesJava’s"writeonce,runanywhere"capabilitybyexecutingbytecodethroughfourmaincomponents:1.TheClassLoaderSubsystemloads,links,andinitializes.classfilesusingbootstrap,extension,andapplicationclassloaders,ensuringsecureandlazyclassloa
 How to work with Calendar in Java?
Aug 02, 2025 am 02:38 AM
Use classes in the java.time package to replace the old Date and Calendar classes; 2. Get the current date and time through LocalDate, LocalDateTime and LocalTime; 3. Create a specific date and time using the of() method; 4. Use the plus/minus method to immutably increase and decrease the time; 5. Use ZonedDateTime and ZoneId to process the time zone; 6. Format and parse date strings through DateTimeFormatter; 7. Use Instant to be compatible with the old date types when necessary; date processing in modern Java should give priority to using java.timeAPI, which provides clear, immutable and linear
 Troubleshooting Common Java `OutOfMemoryError` Scenarios
Jul 31, 2025 am 09:07 AM
java.lang.OutOfMemoryError: Javaheapspace indicates insufficient heap memory, and needs to check the processing of large objects, memory leaks and heap settings, and locate and optimize the code through the heap dump analysis tool; 2. Metaspace errors are common in dynamic class generation or hot deployment due to excessive class metadata, and MaxMetaspaceSize should be restricted and class loading should be optimized; 3. Unabletocreatenewnativethread due to exhausting system thread resources, it is necessary to check the number of threads, use thread pools, and adjust the stack size; 4. GCoverheadlimitexceeded means that GC is frequent but has less recycling, and GC logs should be analyzed and optimized.


