


Let’s first review the architecture of traditional virtualization technology: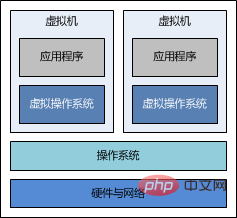
It can be seen that we can install multiple virtual machines on the host operating system, and on each In a virtual machine, a virtual operating system is implemented through virtualization technology. Then, you can install the applications you need on the virtual operating system. All this seems very simple, but the technical details are quite mysterious, and even great people may not be able to explain it clearly.
Anyone who has used a virtual machine should know that starting a virtual machine is like starting a computer. The initialization process is quite slow. We need to wait for a long time before we can see the login interface. Once the virtual machine is started, a network connection can be established with the host to ensure that the virtual machine and the host are interconnected. Different virtual machines are isolated from each other. That is to say, each virtual machine does not know the existence of the other, but each virtual machine occupies the hardware and network resources of the host machine.
Let’s compare the architecture of docker technology: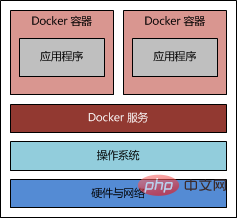
It can be seen that on the host operating system, there is a docker service running (or called " docker engine"), on this service, we can open multiple docker containers, and each docker container can run its own required applications. Docker containers are also isolated from each other. Similarly, they all occupy the same host. Host hardware and network resources.
Compared with virtual machines, docker containers are completely different in terms of technical implementation. The startup speed is an essential leap compared to virtual machines. Starting a container only takes the blink of an eye. Whether it is a virtual machine or a docker container, they are designed to isolate the running environment of the application, save our hardware resources, and provide benefits for our developers.
Prerequisites
First, you need to prepare a centos operating system, or a virtual machine. In short, you can access the centos operating system through Linux client tools.
It should be noted that ubuntu or other linux operating systems can also play docker, but this article chooses to use centos as an example, that's all.
centos specific requirements are as follows:
Must be a 64-bit operating system
It is recommended that the kernel be 3.8 or above
Check your centos kernel through the following command:
uname -r
If after executing the above command, the output kernel version number is lower than 3.8, please refer to the following method to upgrade your linux kernel.
For centos 6.5, the default kernel version is 2.6. First, you can install the latest kernel through the following command:
rpm --import https://www.elrepo.org/rpm-gpg-key-elrepo.org rpm -ivh http://www.elrepo.org/elrepo-release-6-5.el6.elrepo.noarch.rpm yum -y --enablerepo=elrepo-kernel install kernel-lt
Then, edit the following configuration file:
vi /etc/grub.conf
Change default=1 to default=0.
Finally, restart the operating system through the reboot command.
If nothing goes wrong after restarting, check the kernel again. Your centos kernel will be displayed as 3.10.
If you get here, the results you expect are consistent with ours. congratulations! Let's install docker together.
Install docker
Just use the following command to install docker software:
rpm -uvh http://download.fedoraproject.org/pub/epel/6/i386/epel-release-6-8.noarch.rpm yum -y install docker-io
You can use the following command to check whether docker is installed successfully:
docker version
If the version number of docker is output, it means the installation is successful, and we can start using docker.
You can start the docker service through the following command:
service docker start
How to do it
Just like installing software, we first need to have a CD with the software burned on it. If you use If it is a virtual optical drive, you need to run a file called "image" through which to install the software. In the world of docker, there is also something called "mirror". The operating system we need has been installed. We generally call it a "docker image", which is referred to as "mirror" in this article.
Then the question is, where do we download the image?
Docker official website has indeed provided all the image download addresses, but unfortunately it is not accessible in China. Fortunately, kind-hearted people in China have provided a docker Chinese website, where we can download the docker image we need.
Download the image
We might as well take centos as an example and download a centos image through the following steps.
First, visit the docker Chinese website and search for the image named "centos" on the homepage. In the search results, there is an "official image", which is what we need.
Then, enter the centos official image page. In the "pull this repository" input box, there is a command. Copy it and run the command on your own command line. The image will be downloaded immediately.
Finally, use the following command to view all local mirrors:
docker images
When the download is complete, you should see:
repository tag image id created virtual size
docker.cn/docker/centos centos6 25c5298b1a36 7 weeks ago 215.8 mb
如果看到以上输出,说明您可以使用“docker.cn/docker/centos”这个镜像了,或将其称为仓库(repository),该镜像有一个名为“centos6”的标签(tag),此外还有一个名为“25c5298b1a36 ”的镜像 id(可能您所看到的镜像 id 与此处的不一致,那是正常现象,因为这个数字是随机生成的)。此外,我们可以看到该镜像只有 215.8 mb,非常小巧,而不像虚拟机的镜像文件那样庞大。
现在镜像已经有了,我们下面就需要使用该镜像,来启动容器。
启动容器
容器是在镜像的基础上来运行的,一旦容器启动了,我们就可以登录到容器中,安装自己所需的软件或应用程序。既然镜像已经下载到本地,那么如何才能启动容器呢?
只需使用以下命令即可启动容器:
docker run -i -t -v /root/software/:/mnt/software/ 25c5298b1a36 /bin/bash
这条命令比较长,我们稍微分解一下,其实包含以下三个部分:
docker run
<相关参数>
<镜像 id>
<初始命令>
其中,相关参数包括:
-i:表示以“交互模式”运行容器
-t:表示容器启动后会进入其命令行
-v:表示需要将本地哪个目录挂载到容器中,格式:-v <宿主机目录> : <容器目录>
假设我们的所有安装程序都放在了宿主机的/root/software/目录下,现在需要将其挂载到容器的/mnt/software/目录下。
需要说明的是,不一定要使用“镜像 id”,也可以使用“仓库名:标签名”,例如:docker.cn/docker/centos:centos6。
初始命令表示一旦容器启动,需要运行的命令,此时使用“/bin/bash”,表示什么也不做,只需进入命令行即可。
安装相关软件
为了搭建 java web 运行环境,我们需要安装 jdk 与 tomcat,下面的过程均在容器内部进行。我们不妨选择/opt/目录作为安装目录,首先需要通过cd /opt/命令进入该目录。
安装 jdk()
首先,解压 jdk 程序包:
tar -zxf /mnt/software/jdk-7u67-linux-x64.tar.gz -c .
然后,重命名 jdk 目录:
mv jdk1.7.0_67/ jdk/
安装 tomcat
首先,解压 tomcat 程序包:
tar -zxf /mnt/software/apache-tomcat-7.0.55.tar.gz -c .
然后,重命名 tomcat 目录:
mv apache-tomcat-7.0.55/ tomcat/
设置环境变量
首先,编辑.bashrc文件
vi ~/.bashrc
然后,在该文件末尾添加如下配置:
export java_home=/opt/jdk export path=$path:$java_home
最后,需要使用source命令,让环境变量生效:
source ~/.bashrc
编写运行脚本
我们需要编写一个运行脚本,当启动容器时,运行该脚本,启动 tomcat,具体过程如下:
首先,创建运行脚本:
vi /root/run.sh
然后,编辑脚本内容如下:
#!/bin/bash source ~/.bashrc sh /opt/tomcat/bin/catalina.sh run
注意:这里必须先加载环境变量,然后使用 tomcat 的运行脚本来启动 tomcat 服务。
最后,为运行脚本添加执行权限:
chmod u+x /root/run.sh
退出容器
当以上步骤全部完成后,可使用exit命令,退出容器。
随后,可使用如下命令查看正在运行的容器:
docker ps
此时,您应该看不到任何正在运行的程序,因为刚才已经使用exit命令退出的容器,此时容器处于停止状态,可使用如下命令查看所有容器:
docker ps -a
输出如下内容:
container id image command created status ports names
57c312bbaad1 docker.cn/docker/centos:centos6 "/bin/bash" 27 minutes ago exited (0) 19 seconds ago naughty_goldstine
记住以上container id(容器 id),随后我们将通过该容器,创建一个可运行 java web 的镜像。
创建 java web 镜像
使用以下命令,根据某个“容器 id”来创建一个新的“镜像”:
docker commit 57c312bbaad1 huangyong/javaweb:0.1
该容器的 id 是“57c312bbaad1”,所创建的镜像名是“huangyong/javaweb:0.1”,随后可使用镜像来启动 java web 容器。
启动 java web 容器
有必要首先使用docker images命令,查看当前所有的镜像:
repository tag image id created virtual size
huangyong/javaweb 0.1 fc826a4706af 38 seconds ago 562.8 mb
docker.cn/docker/centos centos6 25c5298b1a36 7 weeks ago 215.8 mb
可见,此时已经看到了最新创建的镜像“huangyong/javaweb:0.1”,其镜像 id 是“fc826a4706af”。正如上面所描述的那样,我们可以通过“镜像名”或“镜像 id”来启动容器,与上次启动容器不同的是,我们现在不再进入容器的命令行,而是直接启动容器内部的 tomcat 服务。此时,需要使用以下命令:
docker run -d -p 58080:8080 --name javaweb huangyong/javaweb:0.1 /root/run.sh
稍作解释:
-d:表示以“守护模式”执行/root/run.sh脚本,此时 tomcat 控制台不会出现在输出终端上。
-p:表示宿主机与容器的端口映射,此时将容器内部的 8080 端口映射为宿主机的 58080 端口,这样就向外界暴露了 58080 端口,可通过 docker 网桥来访问容器内部的 8080 端口了。
--name:表示容器名称,用一个有意义的名称命名即可。
关于 docker 网桥的内容,需要补充说明一下。实际上 docker 在宿主机与容器之间,搭建了一座网络通信的桥梁,我们可通过宿主机 ip 地址与端口号来映射容器内部的 ip 地址与端口号,
在一系列参数后面的是“镜像名”或“镜像 id”,怎么方便就怎么来。最后是“初始命令”,它是上面编写的运行脚本,里面封装了加载环境变量并启动 tomcat 服务的命令。
当运行以上命令后,会立即输出一长串“容器 id”,我们可通过docker ps命令来查看当前正在运行的容器。
container id image command created status ports names
82f47923f926 huangyong/javaweb:0.1 "/root/run.sh" 4 seconds ago up 3 seconds 0.0.0.0:58080->8080/tcp javaweb
The above is the detailed content of Docker builds Java Web running environment example analysis. For more information, please follow other related articles on the PHP Chinese website!


![[Web front-end] Node.js quick start](https://img.php.cn/upload/course/000/000/067/662b5d34ba7c0227.png)


