


First, let’s take a look at the implementation steps, and then talk about the problems you may encounter
1. Introduce javax.mail dependency. I am using springboot, so the dependency is introduced like this
org.springframework.boot spring-boot-starter-mail
If you don’t use the springboot framework, you can find it yourself
2. Construct basic email information class
package com.example.demo.comment.sendemail; import java.util.Properties; /** * 发送邮件需要使用的基本信息 * * @author 860118060 */ public class MailSenderInfo { /** * 发送邮件的服务器的IP和端口 */ private String mailServerHost; private String mailServerPort = "25"; /** * 邮件发送者的地址 */ private String fromAddress; /** * 邮件接收者的地址 */ private String toAddress; /** * 登陆邮件发送服务器的用户名和密码 */ private String userName; private String password; /** * 是否需要身份验证 */ private boolean validate = false; /** * 邮件主题 */ private String subject; /** * 邮件的文本内容 */ private String content; /** * 邮件附件的文件名 */ private String[] attachFileNames; /** * 获得邮件会话属性 */ public Properties getProperties() { Properties p = new Properties(); p.put("mail.smtp.host", this.mailServerHost); p.put("mail.smtp.port", this.mailServerPort); p.put("mail.smtp.auth", validate ? "true" : "false"); return p; } public String getMailServerHost() { return mailServerHost; } public void setMailServerHost(String mailServerHost) { this.mailServerHost = mailServerHost; } public String getMailServerPort() { return mailServerPort; } public void setMailServerPort(String mailServerPort) { this.mailServerPort = mailServerPort; } public boolean isValidate() { return validate; } public void setValidate(boolean validate) { this.validate = validate; } public String[] getAttachFileNames() { return attachFileNames; } public void setAttachFileNames(String[] fileNames) { this.attachFileNames = fileNames; } public String getFromAddress() { return fromAddress; } public void setFromAddress(String fromAddress) { this.fromAddress = fromAddress; } public String getPassword() { return password; } public void setPassword(String password) { this.password = password; } public String getToAddress() { return toAddress; } public void setToAddress(String toAddress) { this.toAddress = toAddress; } public String getUserName() { return userName; } public void setUserName(String userName) { this.userName = userName; } public String getSubject() { return subject; } public void setSubject(String subject) { this.subject = subject; } public String getContent() { return content; } public void setContent(String textContent) { this.content = textContent; } }
3. Build the email sender
package com.example.demo.comment.sendemail; import java.util.Date; import java.util.Properties; import javax.mail.Address; import javax.mail.BodyPart; import javax.mail.Message; import javax.mail.MessagingException; import javax.mail.Multipart; import javax.mail.Session; import javax.mail.Transport; import javax.mail.internet.InternetAddress; import javax.mail.internet.MimeBodyPart; import javax.mail.internet.MimeMessage; import javax.mail.internet.MimeMultipart; /** * 简单邮件(不带附件的邮件)发送器 */ public class SimpleMailSender { /** * 以文本格式发送邮件 * @param mailInfo 待发送的邮件的信息 */ public static boolean sendTextMail(MailSenderInfo mailInfo) { // 判断是否需要身份认证 MyAuthenticator authenticator = null; Properties pro = mailInfo.getProperties(); if (mailInfo.isValidate()) { // 如果需要身份认证,则创建一个密码验证器 authenticator = new MyAuthenticator(mailInfo.getUserName(), mailInfo.getPassword()); } // 根据邮件会话属性和密码验证器构造一个发送邮件的session Session sendMailSession = Session.getDefaultInstance(pro,authenticator); try { // 根据session创建一个邮件消息 Message mailMessage = new MimeMessage(sendMailSession); // 创建邮件发送者地址 Address from = new InternetAddress(mailInfo.getFromAddress()); // 设置邮件消息的发送者 mailMessage.setFrom(from); // 创建邮件的接收者地址,并设置到邮件消息中 Address to = new InternetAddress(mailInfo.getToAddress()); mailMessage.setRecipient(Message.RecipientType.TO,to); // 设置邮件消息的主题 mailMessage.setSubject(mailInfo.getSubject()); // 设置邮件消息发送的时间 mailMessage.setSentDate(new Date()); // 设置邮件消息的主要内容 String mailContent = mailInfo.getContent(); mailMessage.setText(mailContent); // 发送邮件 Transport.send(mailMessage); return true; } catch (MessagingException ex) { ex.printStackTrace(); } return false; } /** * 以HTML格式发送邮件 * @param mailInfo 待发送的邮件信息 */ public static boolean sendHtmlMail(MailSenderInfo mailInfo){ // 判断是否需要身份认证 MyAuthenticator authenticator = null; Properties pro = mailInfo.getProperties(); //如果需要身份认证,则创建一个密码验证器 if (mailInfo.isValidate()) { authenticator = new MyAuthenticator(mailInfo.getUserName(), mailInfo.getPassword()); } // 根据邮件会话属性和密码验证器构造一个发送邮件的session Session sendMailSession = Session.getDefaultInstance(pro,authenticator); try { // 根据session创建一个邮件消息 Message mailMessage = new MimeMessage(sendMailSession); // 创建邮件发送者地址 Address from = new InternetAddress(mailInfo.getFromAddress()); // 设置邮件消息的发送者 mailMessage.setFrom(from); // 创建邮件的接收者地址,并设置到邮件消息中 Address to = new InternetAddress(mailInfo.getToAddress()); // Message.RecipientType.TO属性表示接收者的类型为TO mailMessage.setRecipient(Message.RecipientType.TO,to); // 设置邮件消息的主题 mailMessage.setSubject(mailInfo.getSubject()); // 设置邮件消息发送的时间 mailMessage.setSentDate(new Date()); // MiniMultipart类是一个容器类,包含MimeBodyPart类型的对象 Multipart mainPart = new MimeMultipart(); // 创建一个包含HTML内容的MimeBodyPart BodyPart html = new MimeBodyPart(); // 设置HTML内容 html.setContent(mailInfo.getContent(), "text/html; charset=utf-8"); mainPart.addBodyPart(html); // 将MiniMultipart对象设置为邮件内容 mailMessage.setContent(mainPart); // 发送邮件 Transport.send(mailMessage); return true; } catch (MessagingException ex) { ex.printStackTrace(); } return false; } }
4. Build a password validator
package com.example.demo.comment.sendemail; import javax.mail.*; /** * @author 860118060 */ public class MyAuthenticator extends Authenticator{ String userName=null; String password=null; public MyAuthenticator(){ } public MyAuthenticator(String username, String password) { this.userName = username; this.password = password; } @Override protected PasswordAuthentication getPasswordAuthentication(){ return new PasswordAuthentication(userName, password); } }
Now that the preparation work is completed, let’s take a look at how to call it
5. Call Demo
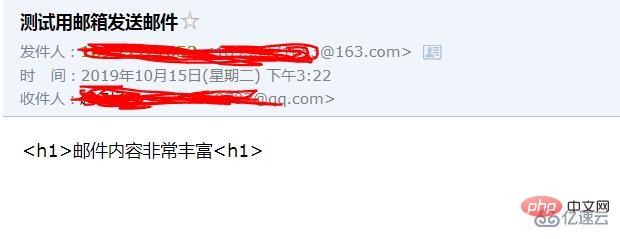
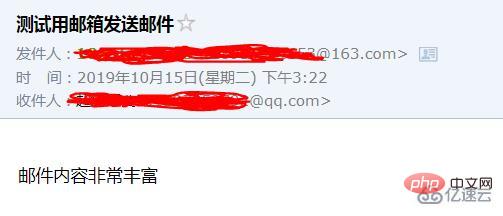
package com.example.demo.comment.sendemail; public class SendEmailDemo { public static void main(String[] args){ //这个类主要是设置邮件 MailSenderInfo mailInfo = new MailSenderInfo(); mailInfo.setMailServerHost("smtp.163.com"); mailInfo.setMailServerPort("25"); mailInfo.setValidate(true); // 发送方邮箱 mailInfo.setUserName("xxxxxxxx@163.com"); // 发送方邮箱密码 mailInfo.setPassword("xxxxxxxx"); // 发送方邮箱 mailInfo.setFromAddress("xxxxxxxx@163.com"); // 接收方邮箱 mailInfo.setToAddress("xxxxxxxx@qq.com"); // 邮件标题 mailInfo.setSubject("测试用邮箱发送邮件"); // 邮件内容 mailInfo.setContent("邮件内容非常丰富"); //发送文体格式 SimpleMailSender.sendTextMail(mailInfo); //发送html格式 SimpleMailSender.sendHtmlMail(mailInfo); } }
There are two email sending formats
If nothing else goes wrong, the two emails should have been successfully sent. However, everything is bound to happen. Let’s analyze what problems will cause failure?
1.mailInfo.setMailServerHost("smtp.163.com"); and mailInfo.setFromAddress("xxxxxxxx@163.com");. That is, if you use the 163smtp server, then the email address must be a 163 email address. If not, the email will not be sent successfully.
2. Do not use the email address you have just registered to send emails in the program. If your 163 email address has just been registered, then you should not use "smtp.163.com". Because you can't send it out. The email you just registered will not give you this kind of permission, which means you cannot pass the verification. Use the email address you frequently use and the one you use for a long time
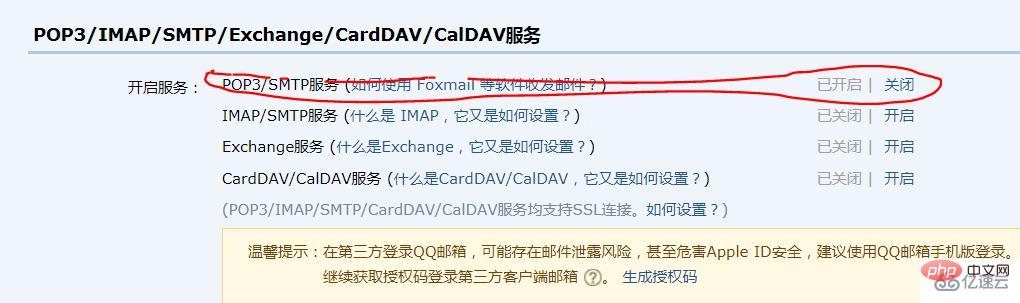
3. QQ mailbox as the sender may require authorization verification.
Authorization is as follows:
Find the account in the settings, scroll down to find and follow the prompts to enable authorization, and then use the obtained authorization code as your email password to successfully send the email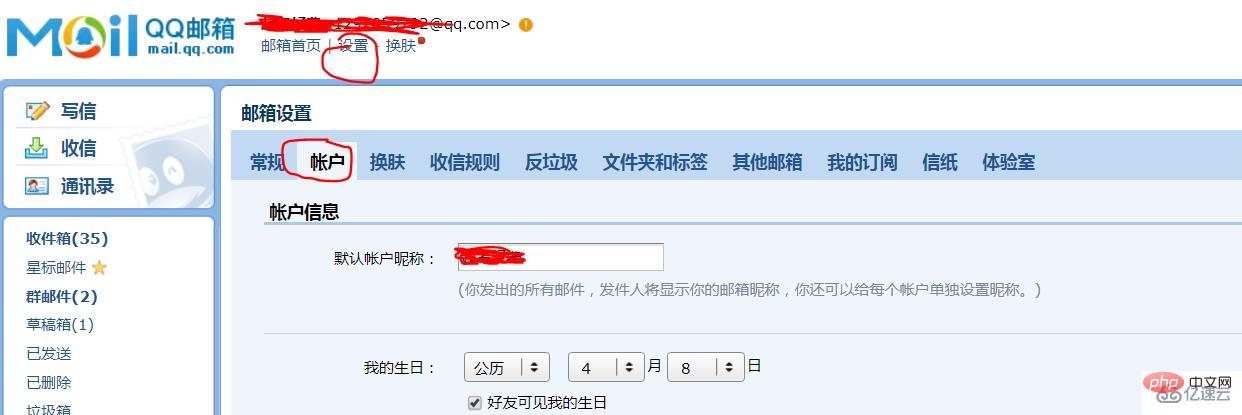
POP3 server address: pop3.sina.com.cn (port: 110) SMTP server address: smtp.sina.com.cn (port: 25)
sinaVIP:
POP3 server: pop3.vip.sina.com (port: 110) SMTP server: smtp.vip.sina.com (port: 25)
sohu.com:
POP3 server address: pop3.sohu.com (port: 110) SMTP server address: smtp.sohu.com (port: 25)
126 Email:
POP3 server address: pop.126.com (port: 110) SMTP server address: smtp.126.com (port: 25)
139 Email:
POP3 server address: POP.139.com (port: 110) SMTP server address: SMTP.139.com (port: 25)
163.com:
POP3 server address: pop.163.com (port: 110) SMTP server address: smtp.163.com (port: 25)
QQ mailbox
POP3 server address: pop.qq.com (port: 110)
SMTP server address: smtp.qq.com (port: 25)
QQ business email
POP3 server address: pop.exmail.qq.com (SSL enabled, port: 995) SMTP server address: smtp.exmail.qq.com (SSL enabled, port: 587/465)
yahoo.com:
POP3 server address: pop.mail.yahoo.com SMTP server address: smtp.mail.yahoo.com
yahoo.com.cn:
POP3 server address: pop.mail.yahoo.com.cn (port: 995) SMTP server address: smtp.mail.yahoo.com.cn (port: 587
POP3 server address: pop3.live.com (port: 995) SMTP server address: smtp.live.com (port: 587)
gmail(google.com)
POP3 server address: pop.gmail.com (SSL enabled, port: 995) SMTP server address: smtp.gmail.com (SSL enabled, port: 587)
263.net:
POP3 server address: pop3.263.net (port: 110) SMTP server address: smtp.263.net (port: 25)
263.net.cn:
POP3 server address: pop.263.net.cn (port: 110) SMTP server address: smtp.263.net.cn (port: 25)
x263.net:
POP3 server address: pop.x263.net (port: 110) SMTP server address: smtp.x263.net (port: 25)
21cn.com:
POP3 server address: pop.21cn.com (port: 110) SMTP server address: smtp.21cn.com (port: 25)
Foxmail:
POP3 server address: POP.foxmail.com (port: 110) SMTP server address: SMTP.foxmail.com (port: 25)
china.com:
POP3 server address: pop.china.com (port: 110) SMTP server address: smtp.china.com (port: 25)
tom.com:
POP3 server address: pop.tom.com (port: 110) SMTP server address: smtp.tom.com (port: 25)
etang.com:
POP3 server address: pop.etang.com SMTP server address: smtp.etang.com
The above is the detailed content of How to send email using java. For more information, please follow other related articles on the PHP Chinese website!


![[Web front-end] Node.js quick start](https://img.php.cn/upload/course/000/000/067/662b5d34ba7c0227.png)


