

 Common Problem
Mac Don't have an administrator account in macOS Monterey or Big Sur? this is a fix
Common Problem
Mac Don't have an administrator account in macOS Monterey or Big Sur? this is a fix
Mac Don't have an administrator account in macOS Monterey or Big Sur? this is a fix

Missing a Mac administrator account? Create a new administrator account in macOS
This process will involve booting into recovery mode to remove the setup files from your Mac, which allows the macOS Setup Assistant to run again, allowing you to create a new administrator on your Mac account. This works on macOS Monterey and Big Sur and earlier, on M1 and Intel Macs.
- Boot your Mac into recovery mode by restarting your Mac and holding down Command R (Intel Mac) or the power button (M1 Mac)
- For M1 Mac , select "Options" in the boot menu that appears
- On the macOS Utilities screen, open Disk Utility
- Select "Macintosh HD – Data" and select the "Mount" data drive
- Exit Disk Utility
- Draw down the "Utilities" menu and select "Terminal"
- Enter the following command in the terminal:
- Boot your Mac into recovery mode by restarting your Mac and holding down Command R (Intel Mac) or the power button (M1 Mac)
cd /Volumes/Macintosh HD/var/db/
- The following is exactly the same Enter the following command as shown in the picture:
##rm .AppleSetupDone
- Restart your Mac and complete the Setup Assistant program. Create a new admin user account on your Mac like your Mac is new, this will be an admin account
- Boot into your newly created administrator account, then pull down the Apple menu and select System Preferences
- Go to Users and group" and click the padlock icon to modify the user account
- Select the original user account you want to modify to administrator account permissions
- Select the "Allow user to manage this computer" checkbox
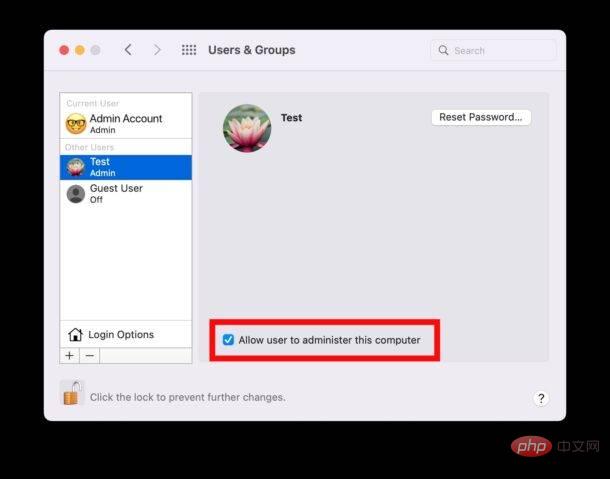
- Restart your Mac again, this time logging into the original user account, which has now been upgraded to an administrator user account
convert a standard user account to an admin account via the command line, which is more suitable for advanced user.
The above is the detailed content of Mac Don't have an administrator account in macOS Monterey or Big Sur? this is a fix. For more information, please follow other related articles on the PHP Chinese website!

Hot AI Tools

Undress AI Tool
Undress images for free

Undresser.AI Undress
AI-powered app for creating realistic nude photos

AI Clothes Remover
Online AI tool for removing clothes from photos.

Clothoff.io
AI clothes remover

Video Face Swap
Swap faces in any video effortlessly with our completely free AI face swap tool!

Hot Article
Hot Tools

Notepad++7.3.1
Easy-to-use and free code editor

SublimeText3 Chinese version
Chinese version, very easy to use

Zend Studio 13.0.1
Powerful PHP integrated development environment

Dreamweaver CS6
Visual web development tools

SublimeText3 Mac version
God-level code editing software (SublimeText3)


 How to completely uninstall an application on a Mac?
Jul 24, 2025 am 12:38 AM
How to completely uninstall an application on a Mac?
Jul 24, 2025 am 12:38 AM
Completely uninstalling Mac applications requires clearing residual files. There are four specific methods: 1. Manually delete the main program and check the residual files in ~/Library/ApplicationSupport/, ~/Library/Preferences/, ~/Library/Caches/; 2. Use Launchpad to uninstall the app installed in AppStore, but the configuration files may still be left behind; 3. Use AppCleaner or CleanMyMacX and other tools to clear the associated files in one click, suitable for users who are not familiar with the system; 4. Use special software such as Adobe and ParallelsDesktop to use official uninstall tools or reference official websites
 How to type special characters on a Mac
Jul 21, 2025 am 01:11 AM
How to type special characters on a Mac
Jul 21, 2025 am 01:11 AM
Thereareseveralbuilt-inmethodstotypespecialcharactersonaMac.1.UsekeyboardshortcutswiththeOptionorShiftkeyforcommonsymbols,suchasOption ethenspacebarforanacuteaccent(´),orOption gforthecopyrightsymbol©.2.Pressandholdaletterkeytoaccessaccentedvariantsl
 How to change the screen resolution on a Mac or external display?
Jul 21, 2025 am 12:17 AM
How to change the screen resolution on a Mac or external display?
Jul 21, 2025 am 12:17 AM
Modifying the screen resolution on a Mac requires system settings and terminal commands. The specific steps are as follows: 1. To change the built-in screen resolution, you need to go to System Settings > Desktop and Screen Saver > Monitor > Advanced... to enable more options; 2. The external monitor can hold down Option and click "Zoom" to detect low resolution and adjust manually; 3. If the resolution cannot be adjusted, you need to check the monitor support, cable interface and graphics card performance to ensure device compatibility. When operating, refer to the equipment instructions to avoid forcibly overclocking affecting the experience.
 what is a kernel panic on Mac
Jul 31, 2025 pm 12:03 PM
what is a kernel panic on Mac
Jul 31, 2025 pm 12:03 PM
Kernel crashes are system crashes that occur when the Mac operating system encounters a serious error that cannot be recovered, usually caused by software or hardware problems. Common reasons include: 1. Flawed driver or kernel extension; 2. Hardware problems such as memory or storage failures; 3. Software conflicts; 4. Corrupted system files; 5. Peripheral triggers. It can be identified by white-word prompts on black or gray screens and "kernelpanic" records in the system log. Solutions include: 1. Disconnect all peripherals and restart; 2. View the crash log through the console application; 3. Enter safe mode to boot; 4. Reinstall macOS; 5. Run Apple diagnostic tools. Occasional occurrence may be accidental, but frequent occurrences require troubleshooting of software and hardware problems.
 How to set up email on a Mac?
Aug 04, 2025 am 07:48 AM
How to set up email on a Mac?
Aug 04, 2025 am 07:48 AM
OpentheMailappandclickAddAccount,thenenteryourname,email,andpassword.2.Selectyouremailprovider—iCloud,Gmail,Yahoo,orOutlook.comwillauto-configureusingOAuth.3.Forunsupportedproviders,choosemanualsetupandenterIMAP/SMTPserverdetailsincludinghostnames,po
 How to change sound output on Mac
Jul 28, 2025 am 01:30 AM
How to change sound output on Mac
Jul 28, 2025 am 01:30 AM
Clickthesoundiconinthemenubartoquicklyselectanavailableoutputdevice.2.GotoSystemSettings>Sound>Outputfordetailedcontrolovervolume,balance,andaudioformat.3.UsetheOptionkeywiththesoundiconortheAirPlayicontostreamaudiotoAirPlay-compatibledevices.4
 How to fix a flashing folder with a question mark on Mac
Jul 26, 2025 am 03:04 AM
How to fix a flashing folder with a question mark on Mac
Jul 26, 2025 am 03:04 AM
RestartandholdtheOptionkeytoaccesstheStartupManagerandselectyourstartupdisk.2.BootintoRecoveryModeusingCommand R,thencheckorchangethestartupdiskintheStartupDiskutility.3.UseDiskUtility’sFirstAidtorepairtheinternaldriveifitappearsbutwon’tmount.4.Reset
 How to install Windows on a Mac without Boot Camp
Jul 31, 2025 am 11:58 AM
How to install Windows on a Mac without Boot Camp
Jul 31, 2025 am 11:58 AM
Without BootCamp, installing Windows on Mac is feasible and works for different chips and needs. 1. First check compatibility: The M1/M2 chip Mac cannot use BootCamp, it is recommended to use virtualization tools; the Intel chip Mac can manually create a boot USB disk and install it in partition. 2. Recommended to use virtual machines (VMs) for M1 and above chip users: Windows ISO files, virtualization software (such as ParallelsDesktop or UTM), at least 64GB of free space, and reasonably allocate resources. 3. IntelMac users can manually install it by booting the USB drive: USB drive, WindowsISO, DiskU is required