This article is provided by the Git Tutorial column to introduce to you how to operate Git, which is very detailed! Below I will take you to learn how to play with Git. I hope it will be helpful to friends who need it!

On a dark and windy night, my girlfriend with a sad face suddenly told me that I couldn’t understand Git. Can you share any better experience? It was too late to say it, but it was quick to say it. Without saying anything, I immediately started writing and writing...
In the usual coding process, we still need to do something. The ability to operate Git. But there are still some scenarios where I suddenly can't remember what Git command should be used to meet my needs. At this time, I need to open Google/Baidu and search variously. Instead of wasting time on this again and again In the repetitive work, it is better to study the gameplay of our commonly used commands. Here, this article will also provide a series of cases to introduce the application scenarios and general usage of these commonly used Git systems and commands.
Of course, in addition to knowing how to use Git commands, we should also understand what the entire architecture of Git is like, so that we can have a clearer understanding of the commands we operate every day. doing what.
If there is any inappropriate expression, thank you for correcting me!
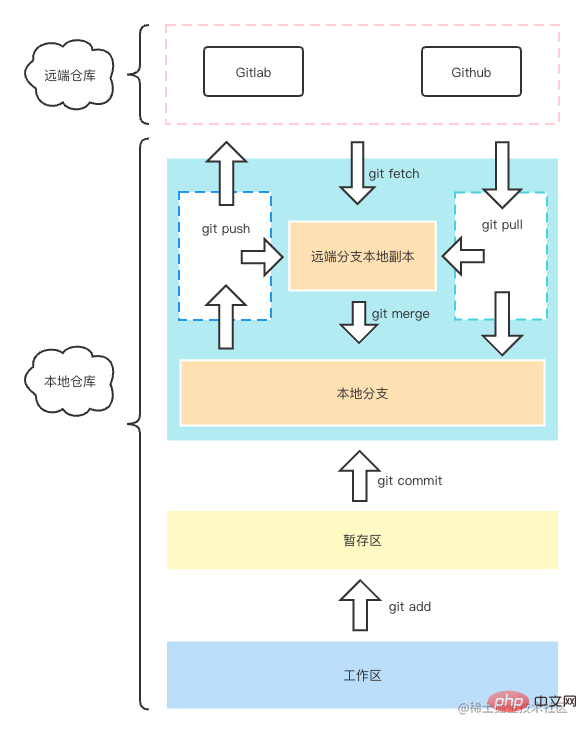
Start with a picture, and the conclusion depends on guessing.

Remote warehouse area: This is the final destination of our code submission, there is nothing to say . Local copy of the remote branch: This actually mainly stores a local copy of the data of each branch of the remote warehouse. You can open the .git file under your Git project and there is a refs in it. /remotes, the branch information of the remote warehouse is mainly stored here. Generally, when you execute push, pull, or fetch, it will be updated here. Local branch: This is the area we often deal with. After you execute commit, you are essentially submitting to this area. You can check the refs/ in your .git directory. heads directory, which contains our local branch code information. Staging area: This area is the area where we will save it every time we execute git add. It is used to create a cache with the local warehouse. It is also the underlying design of Git. It is also a relatively important area, it can help Git improve search performance when doing diff. Workspace: This is generally where we write code, such as the project opened by your vscode, where you can edit the code. In addition, there is a special area, which is the local git storage area. What is it used for? Generally speaking, you may use it in certain scenarios. Sometimes we change the code locally, but suddenly someone comes over to ask you a question about another branch. At the same time, you are implementing a certain function, which is half implemented. If you don’t want to submit to the Git warehouse, then you can consider using git stash save "temporarily save". At this time, it will save it to this storage area for you, and you can go to other branches and come back after finishing the work. , and then git stash pop will be fine.
But the author still doesn’t recommend using this function, because one day you switch away and then switch back, forget this storage, and write something else, you will be cheated at this time. Just cry. Of course, this function is still very useful, but it does need to be used carefully.
In daily work, the process of frequent interaction that we may use Git is roughly like this (there will be some differences under different specifications, but the big difference is Not big):
git add to submit the code to the staging area. git commit Submit the code to the local warehousegit push Submit the code to the remote branchThe above process roughly summarizes the general Git flow process. Different companies may design their own specifications, so I won’t give too many instructions here.
git stashgit clonegit init git remotegit branchgit checkoutgit addgit commitgit rmgit pushgit pullgit fetchCommand Analysis
git stash (temporarily inserted for a quick introduction)
git clone
git init
However, the local init warehouse cannot interact with the remote one, so we still need to go to github/gitlab to create a remote warehouse and then associate it, which is the
git remote command. git remote
git remote add origin xxx.gitFirst add to the local warehousegit push -u origin master: Indicates the master branch of the current warehouse Associating it with the master branch of the remote warehouse, we can perform push or pull operations very conveniently later. After getting a project, you should first take a look at what branches are currently in the current warehouse. Don't create new branches later and find problems such as duplicate names. , then at this time we can use git branch to check the relevant branches.
git branch: View all local branch informationgit branch -r: View all branches of the remote warehousegit branch -a: View all branches of local and remote warehousesGenerally speaking, if there are too many branches, it is recommended to use visual tools to view branch information, such as vscode or source tree and other software, etc.
Of course IDEA is also available.
If we want to create a new branch based on the current branch and switch to it, we can use the following command.
git checkout -b branch1
git add
: Add one or more files to the temporary storage area
: Add all file changes in the current directory to the temporary storage area
: Add all file changes in the current warehouse to the temporary storage area Storage area
For the author, the git add -A command is the most used, because in most cases, we should add all changes to the temporary storage area. If not, then most likely you have forgotten it.git commitAfter the file is added to the staging area, we can perform the next step.
: Submit the contents of the staging area to the local git version repository, you don’t need to add it again; for files that have not been managed by git (that is, newly added files), you still need to execute git add -A before they can be committed correctly. Local git repository.
git commit -m 'feat: do something', which sets the current commit information. Of course, if you don’t have a strong demand that git add and git commit must be separated, then you can choose git commit -am, which is convenient and fast.
git rm .env: After executing this command, it means that the .env file has been deleted from the git warehouse. Cooperating with .gitignore can ensure that all future .env There is no need to worry about file changes being submitted to the remote warehouse.
git rm -r dist: If we want to delete a directory, just add the -r parameter.
Normally, if the current branch has established a connection with the remote branch, then if we want to merge the remote branch, we only need to execute git pull is just fine, no other parameters are needed, but if there is a conflict with the git push mentioned above, before the connection is established, we need to specify which branch of code needs to be pulled down for merging.
git pull origin branch1
The origin here is our reference to the remote warehouse You can change the name if you want, but origin is generally used.
Back to the conflict issue mentioned above, we can directly use git pull and then specify the remote branch that we want to merge with the current local branch, then resolve the conflict locally, then submit the changes, and then execute git push --set-upstream origin branch1 The command is done.
After understanding the git pull command described above, this command is actually easy to understand. At certain times, maybe we just want to The changes to the corresponding branch in the warehouse are only pulled locally and do not want to be automatically merged into my workspace (the workspace where you are currently making code changes). I will consider merging it later after I finish writing a certain part of the code. Then you can You can use git fetch first.
After fetch is completed, I submitted the changes I am currently working on to the local warehouse, and then want to merge the changes on the remote branch. At this time, execute git merge origin/[current branch name] (The default is generally to use origin to represent the remote branch prefix).
Merge the specified branch code to the current branch. Generally speaking, the scenario we use more often is that the master branch of the remote warehouse has changed, and at this time we are preparing to mention the MR, so we need to merge the master code first, and resolve the conflicts if there are conflicts. At this time we can do the following:
Similarly, the git merge origin/xxx introduced above is also used in the same way.
As the name suggests, it means log. After executing this command, we can see the submission record information of the current branch, such as commitId and submission time description, etc., which is probably as follows Like this:
commit e55c4d273141edff401cbc6642fe21e14681c258 (HEAD -> branch1, origin/branch1)
Author: 陌小路 <44311619+STDSuperman@users.noreply.github.com>
Date:   Mon Aug 1 23:16:11 2022 +0800

    Initial commit复制代码
At this time, some readers may ask, what is this used for? The simple usage is to see who has submitted what, and the more important usage is to perform code versioning. Rollback, or other interesting operations, let the author explain it to you.
The following analysis is based on the following parameter HEAD^, that is git reset HEAD^.
--soft: Reset your latest submitted version without modifying your staging area and workspace. --mixed: Default parameters, used to reset the files in the staging area to be consistent with the last submission (commit), and the contents of the workspace files remain unchanged. --hard: Reset all submissions to the previous version and modify your workspace. This will completely return to the previous submission version and the current submission cannot be seen in the code. The code, that is, your workspace changes are also killed. After talking for a long time, it seems that it is not very easy to understand. Let’s give an example to understand:
For example:
git add , at this time, if you check the staging area, you will find that the change has been submitted, and is marked by vscode as having been submitted to the staging area git commit, this At that time, a submission was completedNext we want to withdraw this submission. The performance reflected by the above three parameters will be like this:
--soft:我们对 README 的更改状态现在变成已被提交至暂存区,也就是上面 2 的步骤。--mixed: 我们对 README 的更改变成还未被提交至暂存区,也就是上面 1 的步骤。--hard:我们对 README 的所有更改全没了,git log 中也找不到我们对 README 刚刚那次修改的痕迹。默认情况下我们不加参数,就是 --mixed,也就是重置暂存区的文件到上一次提交的版本,文件内容不动。一般会在什么时候用到呢?
可能大部分情况下,比如 vscode 其实大家更习惯于使用可视化的撤销能力,但是呢,这里我们其实也可以稍微了解下这其中的奥秘,其实也很简单:
git reset
git reset HEAD
其实一二都是一样,如果 reset 后面不跟东西就是默认 HEAD。
当你某个改动提交到本地仓库之后,也就是 commit 之后,这个时候你想撤回来,再改点其他的,那么就可以直接使用 git reset HEAD^。这个时候你会惊奇的发现,你上一版的代码改动,全部变成了未被提交到暂存区的状态,这个时候你再改改代码,然后再提交到暂存区,然后一起再 commit 就可满足你的需求了。
除了这种基础用法,我们还可以配合其他命令操作一下。
某一天你老板跟你说,昨天新加的功能不要了,给我切回之前的版本看看效果,那么这个时候,你可能就需要将工作区的代码回滚到上一个 commit 版本了,操作也十分简单:
git log 查看上一个 commit 记录,并复制 commitIdgit reset --hard commitId 直接回滚。如果某一个你开发需求正开心呢,突然发现,自己以前改的某个东西怎么不见了,你想起来好像是某次合并,没注意被其他提交冲掉了,你心一想,完了,写了那么多,怎么办?很简单,回到有这份代码的那个版本就好了(前提你提交过到本地仓库)。
假设我们有这么两个提交记录,我们需要下面那个 365 开头 commitId 的代码:
commit e62b559633387ab3a5324ead416f09bf347d8e4a (HEAD -> master)
Author: xiaohang.lin <xiaohang.lin@alibaba-inc.com>
Date:   Sun Aug 14 18:08:56 2022 +0800

    merge

commit 36577ea21d79350845f104eee8ae3e740f19e038 (origin/master, origin/HEAD)
Author: 陌小路 <44311619+STDSuperman@users.noreply.github.com>
Date:   Sun Aug 14 15:57:34 2022 +0800

    Update README.md复制代码
git log 找到有你这个代码的那个 commitId(也就是 36577ea21d79350845f104eee8ae3e740f19e038)git reset --hard commitId
这个时候你想把复制好的代码写回去,该怎么办呢,你可能会再 git log 看一下我们 reset 之前的 commitId,你会发现,完了,之前的 commitId 都没了,只有这个 365 了。
commit 36577ea21d79350845f104eee8ae3e740f19e038 (origin/master, origin/HEAD)
Author: 陌小路 <44311619+STDSuperman@users.noreply.github.com>
Date:   Sun Aug 14 15:57:34 2022 +0800

    Update README.md复制代码
不要慌,请记住一句话,只要你不删你本地的 .git 仓库,你都能找回以前所有的提交。
git log 看不到的话,我们就可以祭出我们的绝招了:git reflog
36577ea (HEAD -> master, origin/master, origin/HEAD) HEAD@{0}: reset: moving to 36577ea21d79350845f104eee8ae3e740f19e038
e62b559 HEAD@{1}: reset: moving to e62b559633387ab3a5324ead416f09bf347d8e4a复制代码这里我们可以看到两行记录,一个是我们执行 reset 到 365 的记录,另一条不知道是啥,不重要,我们想回到我们刚刚 reset 之前的状态也很简单,直接复制它上一次的变动也就是这个 e62b559,然后执行 git reset --hard e62b559,然后你会惊奇的发现,你之前的代码又回来了。
接下来把你以前版本的代码,再 Ctrl + v 放进来就完成了。
介绍:用来查看你的所有操作记录。
既然 git log 看不到我之前 commitId 了,那么就回到 reset 之前的状态吧!
当然了,如果是针对 master 的操作,为了安全起见,一般还是建议使用 revert 命令,他也能实现和 reset 一样的效果,只不过区别来说,reset 是向后的,而 revert 是向前的,怎么理解呢?简单来说,把这个过程当做一次时光穿梭,reset 表示你犯了一个错,他会带你回到没有犯错之前,而 revert 会给你一个弥补方案,采用这个方案之后让你得到的结果和没犯错之前一样。
举个栗子: 假设你改了 README 的描述,新增了一行文字,提交上去了,过一会你觉得这个写了有问题,想要撤销一下,但是又不想之前那个提交消失在当前历史当中,那么你就可以选择使用 git revert [commitId],那么它就会产生一次新的提交,提交的内容就是帮你删掉你上面新增的内容,相当于是一个互补的操作。
PS D:\Code\other\git-practice> git revert 3b18a20ad39eea5264b52f0878efcb4f836931ce
On branch branch2
Your branch is ahead of 'origin/branch2' by 1 commit.
  (use "git push" to publish your local commits)
这个时候,它会提示你可以把新的改动 push 上去了。
其实你如果在 gitlab 进行 mr 之后,想要回滚这个 mr,一般它会给你一个 revert 的按钮选项,让你进行更安全的回滚操作。
其实对于我们工作中大部分场景下应该用不到这个功能,但是呢有的时候这个命令又能挽救你于水火之间,那就是当某个倒霉蛋忘记切分支,然后在 master 分支上改了代码,并且提交到了本地仓库中,这个时候使用git cherry-pick简直就是神器了。
git cherry-pick:将执行分支的指定提交合并到当前分支。一听介绍就来精神了,雀氏有点东西,比如我在 master 分支提交了某个需求的代码,同时还没提交到远程分支,那么你就可以先 git log 查看一下当前的提交,找到 master 分支正常提交之后的所有 commitId,然后复制出来,然后再切到你建好的开发分支,接着执行 git cherry-pick master commitId1 commitId2 commitId4。
完事之后记得清理一下作案现场,把你的 master 分支代码恢复到正常的提交上去。
顾名思义,也就是打标签的意思。一般可能会在你发布了某个版本,需要给当前版本打个标签,你可以翻阅 vite 的官方 git 仓库,查看它的 tag 信息,它这里就标注了各个版本发布时候的 tag 标签。
它有两种标签形式,一种是轻量标签,另一种是附注标签。
git tag v1.0.0
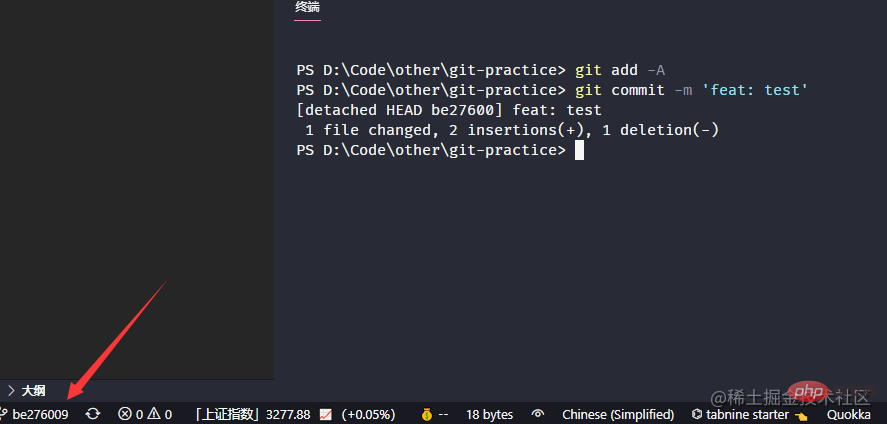
它有点像是对某个提交的引用,从表现上来看,它又有点像基于当前分支提交给你创建了一个不可变的分支,它是支持你直接 checkout 到这个分支上去,但是它和普通分支还是有着本质的区别的,如果你切换到了这个 tag "分支",你去修改代码同时产生了一次提交,亦或者是 reset 版本,这对于该 tag 本身不会有任何影响,而是为你生成了一个独立的提交,但是却在你的分支历史中是找不到的,你只能通过 commitId 来切换到本次提交,看图:

那如果你从其他分支通过 commitId 切换到这个改动上,它会提示你以下内容:
Note: switching to 'be276009'.

changes and commit them, and you can discard any commits you make in this
state without impacting any branches by switching back to a branch.

If you want to create a new branch to retain commits you create, you may
do so (now or later) by using -c with the switch command. Example:

  git switch -c <new-branch-name>

Or undo this operation with:

  git switch -
大致意思就是你可以选择丢弃或者保留当前更改,如果需要保留的话直接使用下面的 git switch 命令创建一个新分支即可。
git tag -a v1.0.1 -m "发布正式版 1.0.1"
引用官方文档的描述:
而附注标签是存储在 Git 数据库中的一个完整对象, 它们是可以被校验的,其中包含打标签者的名字、电子邮件地址、日期时间, 此外还有一个标签信息,并且可以使用 GNU Privacy Guard (GPG)签名并验证。
从概念上看,轻量标签更像是一个临时的标签,而附注标签更加正式一点,能够保留更多的信息。它创建的方式和轻量标签区别主要是 -a 和 -m 参数,如果你的 -m 参数不传,那么编辑器会让你手动填写。
打完标签之后,我们可以使用 git show 命令来看看这两种标签最终体现的信息有哪些。
commit dcbd335be87f51eaa0cc1852400e64e9f46e84d8 (HEAD -> test-branch1, tag: v1.0.2, tag: v1.0.1)
Author: STDSuperman <2750556766@qq.com>
Date:   Tue Aug 16 22:54:36 2022 +0800

    xx

diff --git a/README.md b/README.md
index 715766a..b4cdea6 100644
--- a/README.md
+++ b/README.md
@@ -1 +1,3 @@-# git-practice\ No newline at end of file
+# git-practice
+
+test tag
tag v1.0.1
Tagger: STDSuperman <2750556766@qq.com>
Date:   Tue Aug 16 22:58:27 2022 +0800

发布正式版 1.0.0

commit dcbd335be87f51eaa0cc1852400e64e9f46e84d8 (HEAD -> test-branch1, tag: v1.0.1)
Author: STDSuperman <2750556766@qq.com>
Date:   Tue Aug 16 22:54:36 2022 +0800

    xx

diff --git a/README.md b/README.md
index 715766a..b4cdea6 100644
--- a/README.md
+++ b/README.md
从信息丰富度上来说,附注标签能保留的信息会更多。
git push origin tagName$> git push origin v1.0.1Enumerating objects: 6, done. Counting objects: 100% (6/6), done. Delta compression using up to 12 threads Compressing objects: 100% (3/3), done. Writing objects: 100% (4/4), 448 bytes | 448.00 KiB/s, done. Total 4 (delta 0), reused 0 (delta 0), pack-reused 0 To github.com:STDSuperman/git-practice.git * [new tag] v1.0.1 -> v1.0.1
当然,附注标签和轻量标签都是可以被推送到远端的。
git tag
git tag -l v1.0.1
git tag -d v1.0.1
git push origin --delete v1.0.2git push origin :refs/tags/v1.0.1
这块其实涉及的玩法会相对来说复杂一点,可能还是需要拿来和 merge 做一下对比才更加有意义,东西有点多,先搁置一下。
WIP...
The above is the detailed content of Haven't played with Git yet? Arrange now!. For more information, please follow other related articles on the PHP Chinese website!