


This article brings you relevant knowledge about python, which mainly introduces issues related to process pools and process locks, including process pool creation modules, process pool functions, etc. , let’s take a look at it, I hope it will be helpful to everyone.

Recommended learning: python video tutorial
We mentioned the issue about processes in the previous chapter. If too many processes are created, resources will be consumed too much. In order to avoid this situation, we need to fix the number of processes, and at this time we need the help of the process pool.
We can think of the process pool as a pool in which a certain number of processes are created in advance. See the picture below:
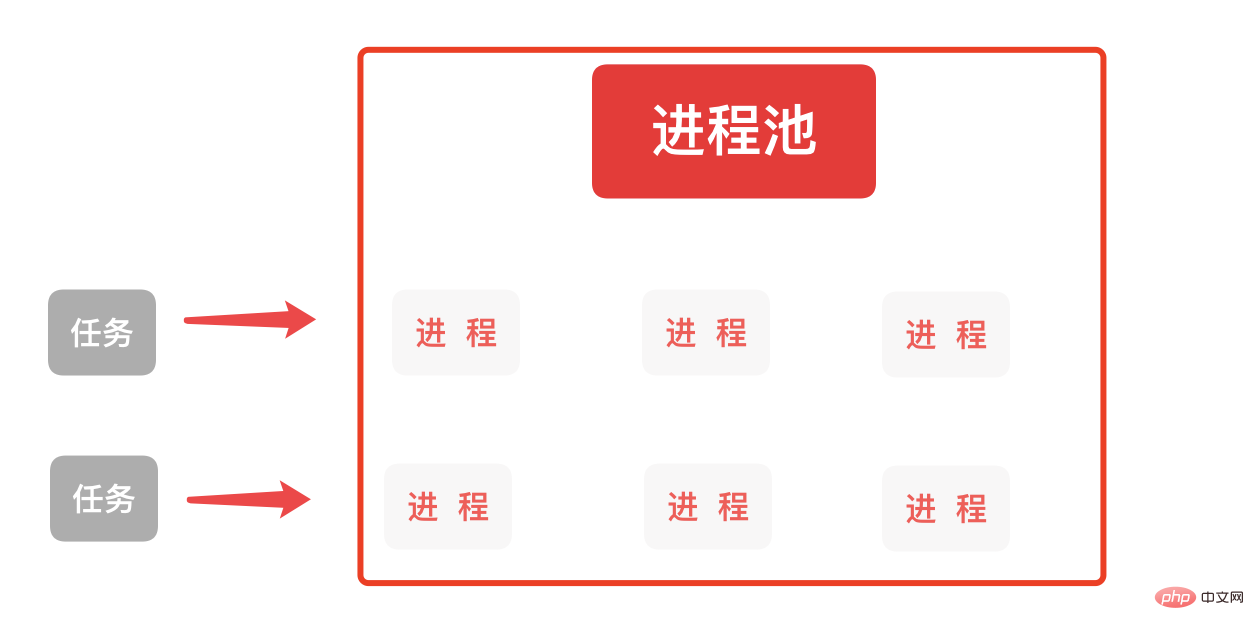
For example, this red rectangular array represents a process pool, and there are 6 processes in this pool. These 6 processes will be created together with the process pool. Not only that, we once said when learning the object-oriented life cycle that each instantiated object will be recycled by the memory manager after use.
Our process will also be recycled by the memory manager along with the process of creation and shutdown. This is the case for each one. The process created when the process is closed will also consume a certain amount of performance. The processes in the process pool will not be closed after they are created, and can be reused all the time, thus avoiding the resource consumption of creation and closing, and avoiding the repeated operations of creation and closing, which improves efficiency.
Of course, when we finish executing the program and the process pool is closed, the process will also be closed.
When we have a task that needs to be executed, we will determine whether there is an idle process in the current process pool (the so-called idle process is actually a process that does not execute tasks in the process pool). When a process is idle, the task will find the process to perform the task. If all the processes in the current process pool are in a non-idle state, the task will enter the waiting state. It will not enter or exit the process pool until a process in the process pool is idle to execute the task.
This is the role of the process pool.
| Function name | Introduction | Parameters | Return value |
|---|---|---|---|
| Pool | Creation of process pool | Processcount | Process pool object |
Pool function introduction: by calling the "multiprocessing" module The "Pool" function helps us create a "process pool object". It has a parameter "Processcount" (an integer), which represents how many processes we create in this process pool.
After creating a process pool object, we need to operate its process. Let's take a look at what are the commonly used methods. Method (function).
| Function name | Introduction | Parameters | Return value |
|---|---|---|---|
| apply_async | Task added to the process pool (asynchronous) | func, args | None |
| close | Close the process pool | None | None |
| join | Wait for the process pool task to end | None | None |
- apply_async function: Its function is to add tasks to the process pool, and is implemented asynchronously.
AsynchronousWe haven’t learned this knowledge yet, so don’t worry about what it means. It has two parameters:func and agrs, func is a function added to the process pool; args is a tuple, representing the parameters of a function, which is exactly the same as when we create and use a process. Consistent.- close function: After we have finished using the process pool, we can close the process pool by calling the close function. It has no parameters and no return value.
- Join function: It is consistent with the join function we learned in the previous chapter to create a process. Only after all tasks in the process pool are executed, subsequent tasks will be executed. However, it is generally used when the process pool is closed (
close function).
Next we create a script in Pycharm to practice the use of process pool.
- Define a function and print out the number of times the function is executed each time and the process number
- Define the number of process pools and the number of processes executed each time The maximum number of processes set for the process pool
The sample code is as follows:
# coding:utf-8import osimport timeimport multiprocessingdef work(count):
# 定义一个 work 函数,打印输出 每次执行的次数 与 该次数的进程号
    print('\'work\' 函数 第 {} 次执行,进程号为 {}'.format(count, os.getpid()))
    time.sleep(3)
    # print('********')if __name__ == '__main__':
    pool = multiprocessing.Pool(3)
    # 定义进程池的进程数量,同一时间每次执行最多3个进程
    for i in range(21):
        pool.apply_async(func=work, args=(i,))
        # 传入的参数是元组,因为我们只有一个 i 参数,所以我们要写成 args=(i,)

    time.sleep(15)
# 这里的休眠时间是必须要加上的,否则我们的进程池还未运行,主进程就已经运行结束,对应的进程池也会关闭。The running results are as follows:
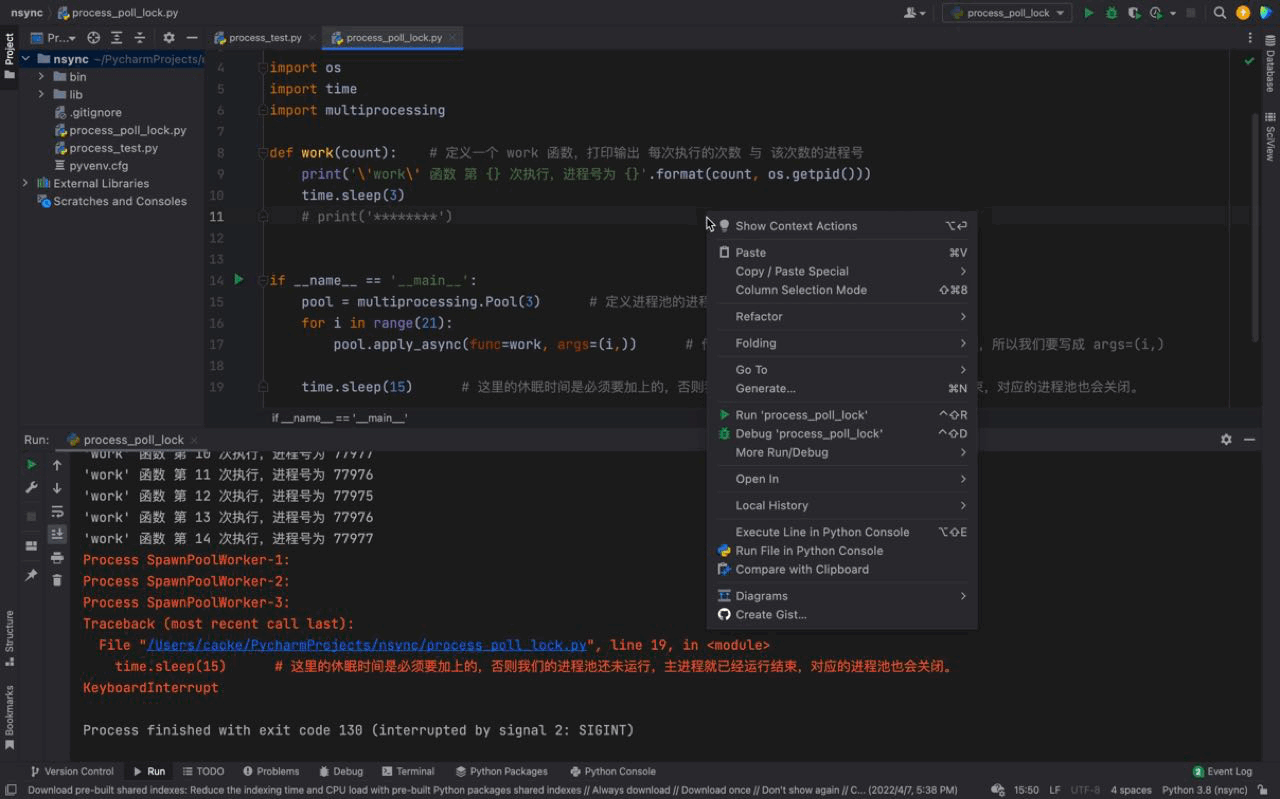
From the picture above, we can see that three processes are run at once each time. The process number of each process is different, but if you look carefully, you will find that the same process number exists, which shows that the process pool The process number is being reused. This proves what we introduced above, the processes in the process pool will not be closed and can be used repeatedly.
And we can also see that 3 processes are executed every 3 seconds, because there are only 3 processes in our process pool; although there are 21 tasks in our for loop , the work function will be executed 21 times, but since there are only 3 processes in our process pool. So after executing 3 tasks (sleeping for 3 seconds), the subsequent tasks will wait for the process in the process pool to be idle before continuing to execute.
Similarly, there is a certain difference in the order of process numbers. The reason is because we are using an asynchronous method (asynchronous means asynchronous). This causes the three tasks executed together by work function to be out of order, which is why our process numbers appear in inconsistent order. (We will introduce more asynchronous knowledge in detail in the asynchronous chapter)
Principle of process pool: The above script case confirms the limitations of our process pool on processes. Only when the processes in our process pool are idle will tasks waiting outside the process pool be thrown into the process pool for work.
In the above script, we use time.sleep(15) Helps us block the main process for 15 seconds and exit again, thus giving our process pool enough time to complete the loop task of our work() function.
What if there is no time.sleep(15)? In fact, you can use the join function of the process here. However, we also mentioned above that the join() function of a process is generally used when the process pool is closed (close function). Next, we will replace time.sleep(15) in the above script with the join() function and give it a try.
The sample code is as follows:
# coding:utf-8import osimport timeimport multiprocessingdef work(count):
# 定义一个 work 函数,打印输出 每次执行的次数 与 该次数的进程号
    print('\'work\' 函数 第 {} 次执行,进程号为 {}'.format(count, os.getpid()))
    time.sleep(3)
    # print('********')if __name__ == '__main__':
    pool = multiprocessing.Pool(3)      # 定义进程池的进程数量,同一时间每次执行最多3个进程
    for i in range(21):
        pool.apply_async(func=work, args=(i,))
        # 传入的参数是元组,因为我们只有一个 i 参数,所以我们要写成 args=(i,)

    # time.sleep(15)
    pool.close()
pool.join()The running results are as follows:
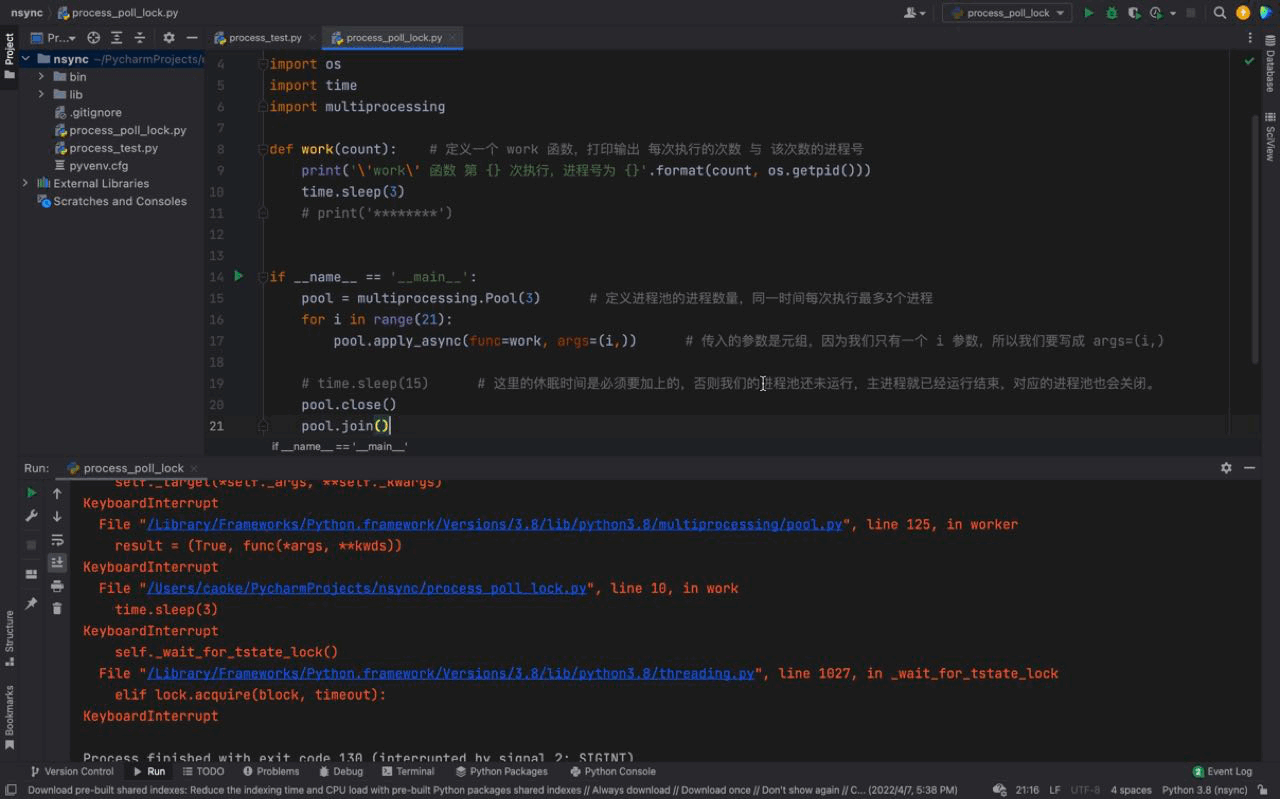
We can see from the above animation,work() The tasks of the function and the processes in the process pool are consistent with the results of using time.sleep(15).
PS: If our main process will always execute and will not exit. Then we don't need to add the close() and join() functions, we can keep the process pool started until a task comes in and it will be executed.
After learning WEB development later, it is commonplace to work without exiting the main process. There are also some tasks that need to be executed for a long time and will not be closed. However, if there is only a one-time execution script, you need to add the close() and join() functions to ensure that the main process is completed after all the tasks in the process pool are completed. Exit again. Of course, if the main process is closed, it will no longer accept new tasks, which means the end of the process pool.
Let’s look at another example and add a return to the
work function.You may have a question here. The knowledge point about the process in the previous chapter clearly stated that
The process cannot obtain the return value, so here iswork()What is the significance of thereturnadded to the function?其实不然,在我们的使用进程池的
apply_async方法时,是通过异步的方式实现的,而异步是可以获取返回值的。针对上述脚本,我们在for循环中针对每一个异步apply_async添加一个变量名,从而获取返回值。
示例代码如下:
# coding:utf-8import osimport timeimport multiprocessingdef work(count):    # 定义一个 work 函数,打印输出 每次执行的次数 与 该次数的进程号
    print('\'work\' 函数 第 {} 次执行,进程号为 {}'.format(count, os.getpid()))
    time.sleep(3)
    return '\'work\' 函数 result 返回值为:{}, 进程ID为:{}'.format(count, os.getpid())if __name__ == '__main__':
    pool = multiprocessing.Pool(3)      # 定义进程池的进程数量,同一时间每次执行最多3个进程
    results = []
    for i in range(21):
        result = pool.apply_async(func=work, args=(i,))      # 传入的参数是元组,因为我们只有一个 i 参数,所以我们要写成 args=(i,)
        results.append(result)

    for result in results:
        print(result.get())     # 可以通过这个方式返回 apply_async 的返回值,
                                # 通过这种方式也不再需要 使用 close()、join() 函数就可以正常执行。

    # time.sleep(15)      # 这里的休眠时间是必须要加上的,否则我们的进程池还未运行,主进程就已经运行结束,对应的进程池也会关闭。
    # pool.close()
# pool.join()运行结果如下:
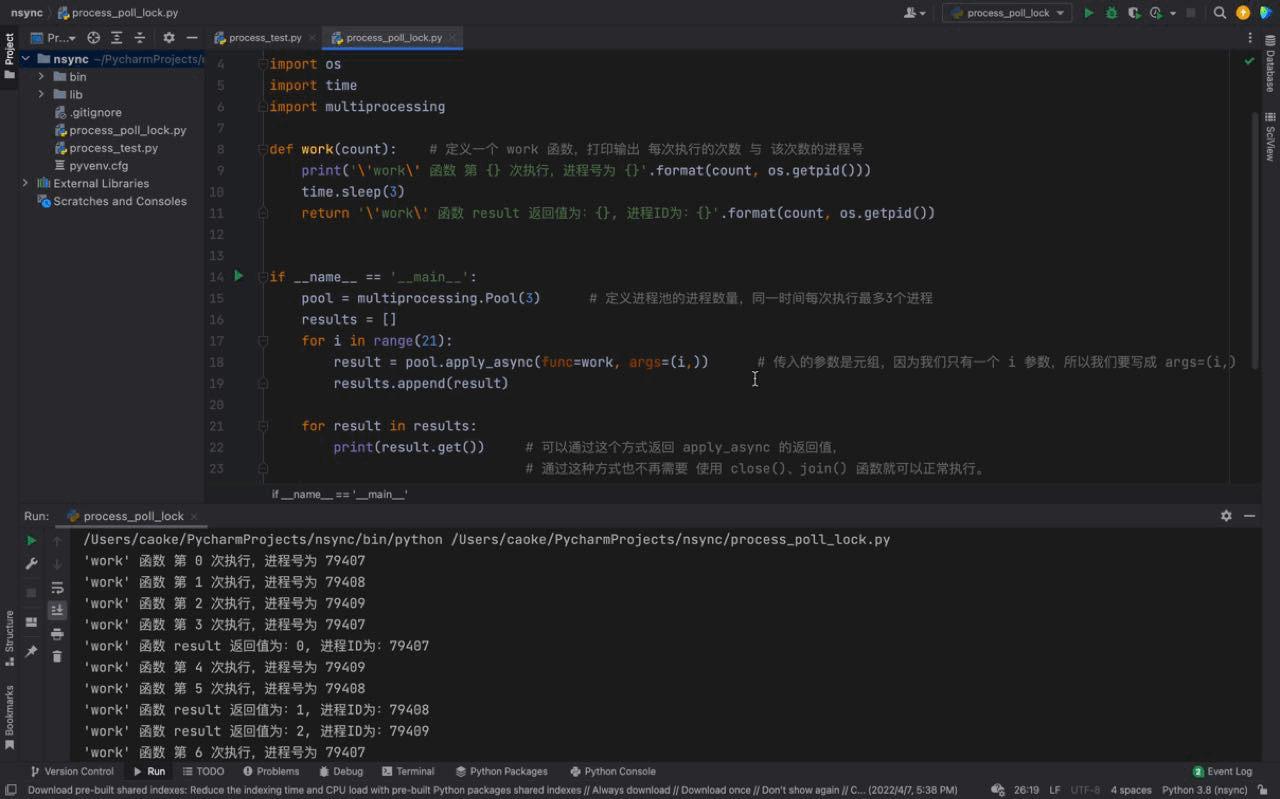
从运行结果可以看出,首先 work() 函数被线程池的线程执行了一遍,当第一组任务执行完毕紧接着执行第二次线程池任务的时候,打印输出了 apply_async 的返回值,证明返回值被成功的返回了。然后继续下一组的任务…
这些都是主要依赖于 异步 ,关于 异步 的更多知识会在 异步 的章节进行详细的介绍。
锁:大家都知道,我们可以给一个大门上锁。
结合这个场景来举一个例子:比如现在有多个进程同时冲向一个 "大门" ,当前门内是没有 "人"的(其实就是进程),锁也没有锁上。当有一个进程进去之后并且把 “门” 锁上了,这时候门外的那些进程是进不来的。在门内的 “人” ,可以在 “门” 内做任何事情且不会被干扰。当它出来之后,会解开门锁。这时候又有一个 “人” 进去了门内,并且重复这样的操作,这就是 进程锁。它可以让锁后面的工作只能被一个任务来处理,只有它解锁之后下一个任务才会进入,这就是 “锁” 的概念。
而 进程锁 就是仅针对于 进程 有效的锁,当进程的任务开始之后,就会被上一把 “锁”;与之对应的是 线程锁 ,它们的原理几乎是一样的。
进程锁的使用方法:
通过 multiprocessing 导入 Manager 类
from multiprocessing import Manager然后实例化 Manager
manager = Manager()再然后通过实例化后的 manager 调用 它的 Lock() 函数
lock = manager.Lock()接下来,就需要操作这个 lock 对象的函数
函数名 介绍 参数 返回值 acquire 上锁 无 无 release 解锁(开锁) 无 无
代码示例如下:
# coding:utf-8import osimport timeimport multiprocessingdef work(count, lock):    # 定义一个 work 函数,打印输出 每次执行的次数 与 该次数的进程号,增加线程锁。
    lock.acquire()        # 上锁
    print('\'work\' 函数 第 {} 次执行,进程号为 {}'.format(count, os.getpid()))
    time.sleep(3)
    lock.release()        # 解锁
    return '\'work\' 函数 result 返回值为:{}, 进程ID为:{}'.format(count, os.getpid())if __name__ == '__main__':
    pool = multiprocessing.Pool(3)      # 定义进程池的进程数量,同一时间每次执行最多3个进程
    manager = multiprocessing.Manager()
    lock = manager.Lock()
    results = []
    for i in range(21):
        result = pool.apply_async(func=work, args=(i, lock))      # 传入的参数是元组,因为我们只有一个 i 参数,所以我们要写成 args=(i,)
        # results.append(result)


    # time.sleep(15)      # 这里的休眠时间是必须要加上的,否则我们的进程池还未运行,主进程就已经运行结束,对应的进程池也会关闭。
    pool.close()
pool.join()执行结果如下:
从上图中,可以看到每一次只有一个任务会被执行。由于每一个进程会被阻塞 3秒钟,所以我们的进程执行的非常慢。这是因为每一个进程进入到 work() 函数中,都会执行 上锁、阻塞3秒、解锁 的过程,这样就完成了一个进程的工作。下一个进程任务开始,重复这个过程… 这就是 进程锁的概念。
其实进程锁还有很多种方法,在 multiprocessing 中有一个直接使用的锁,就是 ``from multiprocessing import Lock。这个Lock的锁使用和我们刚刚介绍的Manager` 的锁的使用有所区别。(这里不做详细介绍,感兴趣的话可以自行拓展一下。)
锁 的使用可以让我们对某个任务 在同一时间只能对一个进程进行开发,但是 锁也不可以乱用 。因为如果某些原因造成 锁没有正常解开 ,就会造成死锁的现象,这样就无法再进行操作了。
因为 锁如果解不开 ,后面的任务也就没有办法继续执行任务,所以使用锁一定要谨慎。
推荐学习:python视频教程
The above is the detailed content of Learn more about Python process pools and process locks. For more information, please follow other related articles on the PHP Chinese website!


![[Web front-end] Node.js quick start](https://img.php.cn/upload/course/000/000/067/662b5d34ba7c0227.png)


