


This article brings you relevant knowledge aboutpython, which mainly introduces related issues about how Python operates XML files, including an overview of XML basics, Python parsing XML files, and writing XML Files, update XML files, etc. Let’s take a look at them below. I hope it will be helpful to everyone.

Recommended learning:python video tutorial
XML (Extensible Markup Language): Extensible Markup Language. XML is an important tool for Internet data transmission. It can span any platform on the Internet and is not limited by programming languages and languages. It can be said that it Is a data carrier with the highest level of access to the Internet. XML is a very powerful technology in currently processing structured document information. XML helps shuttle structured data between servers, which allows developers to more easily control the storage and transmission of data.
Xml is a markup language used to mark electronic files to make them structural. It can be used to mark data and define data types. It is a source language that allows users to define their own markup language. Xml is a subset of Standard Generalized Markup Language (SGML) and is very suitable for Web transmission. XML provides a unified way to describe and exchange structured data independent of applications or vendors.
Features:
Function:
Configure applications and websites;
Data interaction;
The cornerstone of Ajax.
Similar to HTML, XML is another markup language that stores data between tags. It is human-readable and extensible; that is, we are free to define our own markup. Attributes, elements, and tags in XML are similar to those in HTML. XML files can have declarations or no declarations. However, if it has a declaration, then it must be the first line of the XML file. For example:
This declaration statement has three parts: version, encoding and independence. Version specifies the version of the XML standard in use; Encoding indicates the type of character encoding used in this file; Standalone tells the parser whether it wants external information to interpret the contents of the XML file.
XML files can be represented as: XML trees. This XML tree starts from the root element (parent element). This root element further branches to child elements. Each element of an XML file is a node in the XML tree. Those elements that have no child nodes are leaf nodes. The following figure clearly distinguishes the original XML file and the tree representation of the XML file: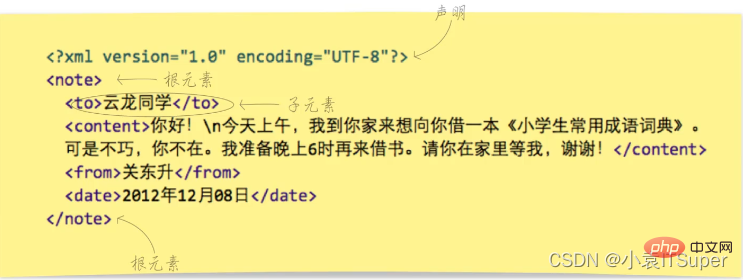
1.xmlfile:
202200110 小白 202200220 小红 202200330 小黑
The ElementTree module provides a lightweight, Pythonic API, and also There is an efficient C language implementation, xml.etree.cElementTree. Compared with DOM, ET is faster and the API is more direct and convenient to use. Compared with SAX, the ET.iterparse function also provides on-demand parsing functionality and does not read the entire document into memory at once. The performance of ET is roughly similar to that of the SAX module, but its API is higher-level and more convenient for users to use.
Element object method:
| Class method | Description |
|---|---|
##Element.iter(tag=None) | Traverse all descendants of the Element, or you can specify a tag to traverse and search.
|
Element.iterfind(path, namespaces=None) | Find all descendants based on tag or path.
|
Element.itertext() | Traverse all descendants and return the text value.
|
Element.findall(path) | Find the direct node under the current element that the tag or path can match
|
Element.findtext(path, default=None, namespaces=None) | Find the first matching child element and return its text value. The matching object can be tag or path.
|
Element.find(path) | Find the first direct node under the current element that the tag or path can match.
|
Element.text | Get the text value of the current element.
|
Element.get(key, default=None) | Get the attribute value corresponding to the specified key of the element. If there is no such attribute, return default value.
|
Element.keys() | Returns a list of element attribute names
|
|
|
|
|
|
|
|
Method name
| ##Element.tag | |
|---|---|
| Element.attrib
|
| Element.text
|
| Element.tail
|
| Element[:]
|
1)接下来,我们加载这个文档,并进行解析: >>> import xml.etree.ElementTree as ET>>> tree = ET.ElementTree(file='1.xml')
Copy after login
2) 然后,我们获取根元素(root element): >>> tree.getroot()
Copy after login
3)根元素(root)是一个Element对象。我们看看根元素都有哪些属性: >>> root = tree.getroot()>>> root.tag, root.attrib('collection', {'shelf': 'New Arrivals'})
Copy after login
4)根元素也具备遍历其直接子元素的接口: >>> for child_of_root in root:... print(child_of_root.tag, child_of_root.attrib)...class {'className': '1班'}class {'className': '2班'}class {'className': '3班'}
Copy after login
5)通过索引值来访问特定的子元素: >>> root[0].tag, root[0].text('class', '\n\t ')
Copy after login
6) 查找需要的元素 从上面的示例中,可以明显发现我们能够通过简单的递归方法(对每一个元素,递归式访问其所有子元素)获取树中的所有元素。但是,由于这是十分常见的工作,ET提供了一些简便的实现方法。 Element对象有一个iter方法,可以对某个元素对象之下所有的子元素进行深度优先遍历(DFS)。ElementTree对象同样也有这个方法。下面是查找XML文档中所有元素的最简单方法: >>> for elem in tree.iter():... print(elem.tag, elem.attrib)...collection {'shelf': 'New Arrivals'}class {'className': '1班'}code {}number {}teacher {}class {'className': '2班'}code {}number {}teacher {}class {'className': '3班'}code {}number {}teacher {}
Copy after login
7)对树进行任意遍历——遍历所有元素,iter方法可以接受tag名称,然后遍历所有具备所提供tag的元素: >>> for elem in tree.iter(tag='teacher'):... print(elem.tag, elem.text)...teacher 小白 teacher 小红 teacher 小黑
Copy after login
8)支持通过XPath查找元素 >>> for elem in tree.iterfind('class/teacher'):... print(elem.tag, elem.text)...teacher 小白 teacher 小红 teacher 小黑
Copy after login
9)查找所有具备某个name属性的className元素: >>> for elem in tree.iterfind('class[@className="1班"]'):... print(elem.tag, elem.attrib)...class {'className': '1班'}
Copy after login
10)完整解析代码 import xml.etree.ElementTree as ET tree = ET.ElementTree(file='1.xml')print(type(tree))root = tree.getroot() # root是根元素print(type(root))print(root.tag)for index, child in enumerate(root): print("第%s个%s元素,属性:%s" % (index, child.tag, child.attrib)) for i, child_child in enumerate(child): print("标签:%s,内容:%s" % (child_child.tag, child_child.text))
Copy after login
输出结果:
Copy after login
2、DOM 方式
解析代码: from xml.dom.minidom import parse# 读取文件dom = parse('1.xml')# 获取文档元素对象elem = dom.documentElement# 获取 classclass_list_obj = elem.getElementsByTagName('class')print(class_list_obj)print(type(class_list_obj))for class_element in class_list_obj: # 获取标签中内容 code = class_element.getElementsByTagName('code')[0].childNodes[0].nodeValue number = class_element.getElementsByTagName('number')[0].childNodes[0].nodeValue teacher = class_element.getElementsByTagName('teacher')[0].childNodes[0].nodeValue print('code:', code, ', number:', number, ', teacher:', teacher)
Copy after login
输出结果: [
Copy after login
三、Python写入XML文件
语法格式: 参数说明:
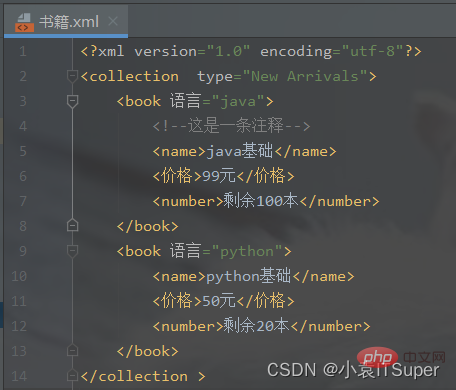
案例代码: import xml.dom.minidom # 1、在内存中创建一个空的文档doc = xml.dom.minidom.Document() # 2、创建根元素root = doc.createElement('collection ')# print('添加的xml标签为:',root.tagName) # 3、设置根元素的属性root.setAttribute('type', 'New Arrivals') # 4、将根节点添加到文档对象中doc.appendChild(root) # 5、创建子元素book = doc.createElement('book') # 6、添加注释book.appendChild(doc.createComment('这是一条注释')) # 7、设置子元素的属性book.setAttribute('语言', 'java') # 8、子元素中嵌套子元素,并添加文本节点name = doc.createElement('name')name.appendChild(doc.createTextNode('java基础'))price = doc.createElement('价格')price.appendChild(doc.createTextNode('99元'))number = doc.createElement('number')number.appendChild(doc.createTextNode('剩余100本'))# 9、将子元素添加到boot节点中book.appendChild(name)book.appendChild(price)book.appendChild(number)# 10、将book节点添加到root根元素中root.appendChild(book)# 创建子元素book = doc.createElement('book')# 设置子元素的属性book.setAttribute('语言', 'python')# 子元素中嵌套子元素,并添加文本节点name = doc.createElement('name')name.appendChild(doc.createTextNode('python基础'))price = doc.createElement('价格')price.appendChild(doc.createTextNode('50元'))number = doc.createElement('number')number.appendChild(doc.createTextNode('剩余20本'))# 将子元素添加到boot节点中book.appendChild(name)book.appendChild(price)book.appendChild(number)# 将book节点添加到root根元素中root.appendChild(book)print(root.toxml())fp = open('./书籍.xml', 'w', encoding='utf-8') # 需要指定utf-8的文件编码格式,不然notepad中显示十六进制doc.writexml(fp, indent='', addindent='\t', newl='\n', encoding='utf-8')fp.close()
Copy after login
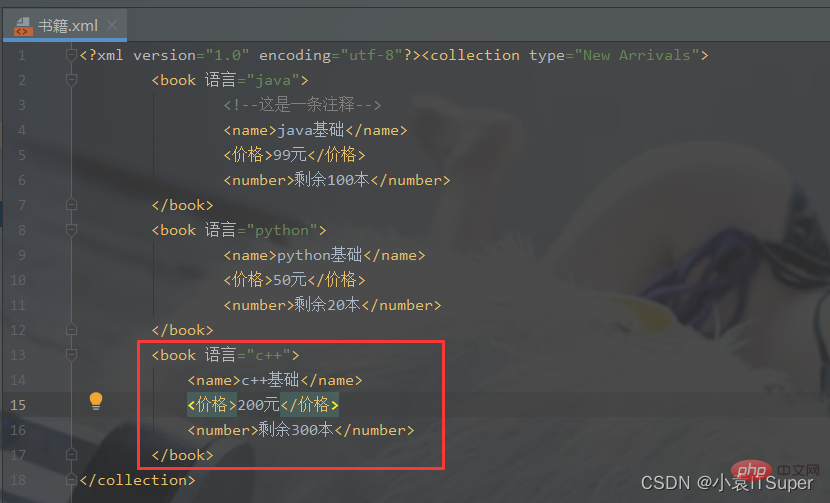
生成
四、Python更新XML文件
案例代码: import xml.dom.minidomfrom xml.dom.minidom import parse# 对book.xml新增一个子元素english,并删除math元素xml_file = './书籍.xml'# 拿到根节点domTree = parse(xml_file)rootNode = domTree.documentElement# rootNode.removeChild(rootNode.getElementsByTagName('book')[0])# print(rootNode.toxml())# 在内存中创建一个空的文档doc = xml.dom.minidom.Document()book = doc.createElement('book')book.setAttribute('语言', 'c++')# 子元素中嵌套子元素,并添加文本节点name = doc.createElement('name')name.appendChild(doc.createTextNode('c++基础'))price = doc.createElement('价格')price.appendChild(doc.createTextNode('200元'))number = doc.createElement('number')number.appendChild(doc.createTextNode('剩余300本'))# 将子元素添加到boot节点中book.appendChild(name)book.appendChild(price)book.appendChild(number)math_book = rootNode.getElementsByTagName('book')[0]# insertBefore方法 父节点.insertBefore(新节点,父节点中的子节点)rootNode.insertBefore(book, math_book)# appendChild将新产生的子元素在最后插入rootNode.appendChild(book)print(rootNode.toxml())with open(xml_file, 'w', encoding='utf-8') as fh: domTree.writexml(fh, indent='', addindent='\t', newl='', encoding='utf-8')
Copy after login
输出结果:添加了新节点 五、XML文件和JSON文件互转
cmd控制台安装第三方模块: pip install xmltodict
Copy after login
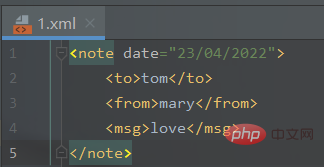
1、XML文件转为JSON文件新建一个
Copy after login
转换代码实现: import jsonimport xmltodictdef xml_to_json(xml_str): """parse是的xml解析器,参数需要 :param xml_str: xml字符串 :return: json字符串 """ xml_parse = xmltodict.parse(xml_str) # json库dumps()是将dict转化成json格式,loads()是将json转化成dict格式。 # dumps()方法的ident=1,格式化json json_str = json.dumps(xml_parse, indent=1) return json_str XML_PATH = './1.xml' # xml文件的路径with open(XML_PATH, 'r') as f: xmlfile = f.read() with open(XML_PATH[:-3] + 'json', 'w') as newfile: newfile.write(xml_to_json(xmlfile))
Copy after login
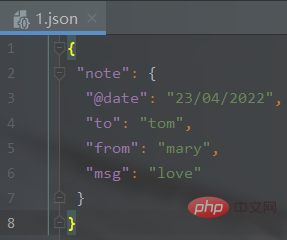
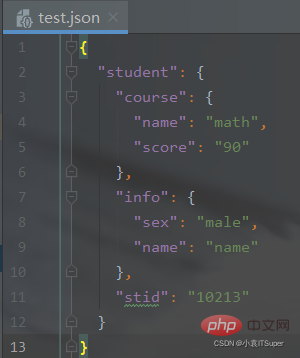
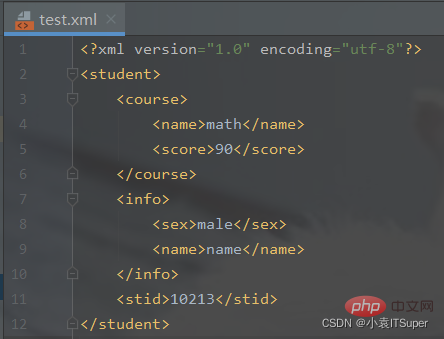
输出结果(生成json文件): 2、JSON文件转换为XML文件新建 { "student": { "course": { "name": "math", "score": "90" }, "info": { "sex": "male", "name": "name" }, "stid": "10213" }}
Copy after login
转换代码实现: import xmltodictimport jsondef json_to_xml(python_dict): """xmltodict库的unparse()json转xml :param python_dict: python的字典对象 :return: xml字符串 """ xml_str = xmltodict.unparse(python_dict) return xml_str JSON_PATH = './test.json' # json文件的路径with open(JSON_PATH, 'r') as f: jsonfile = f.read() python_dict = json.loads(jsonfile) # 将json字符串转换为python字典对象 with open(JSON_PATH[:-4] + 'xml', 'w') as newfile: newfile.write(json_to_xml(python_dict))
Copy after login
输出结果(生成xml文件): 推荐学习:python视频教程 |
The above is the detailed content of Let's analyze how Python operates XML files. For more information, please follow other related articles on the PHP Chinese website!


![[Web front-end] Node.js quick start](https://img.php.cn/upload/course/000/000/067/662b5d34ba7c0227.png)


