


This article brings you a detailed introductory tutorial on Git and Github. Git is currently the most advanced distributed version control system in the world. Github is a website that provides Git services to users. I hope it will be helpful to everyone.

1.Git is currently the most advanceddistributedversion control system# in the world ##.
Problems solved:Record each modification: version, content, operating user, modification time, document name, etc.
2. The difference between Git and GithubGit is a distributed version control system. Simply put, it is a software used to record changes in the content of one or several files for future reference. Software that checks the revision status of a specific version.
Three areas of Git local operation :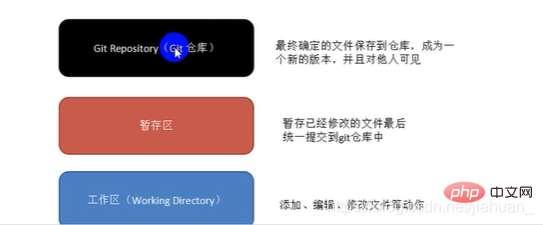 Work flow:
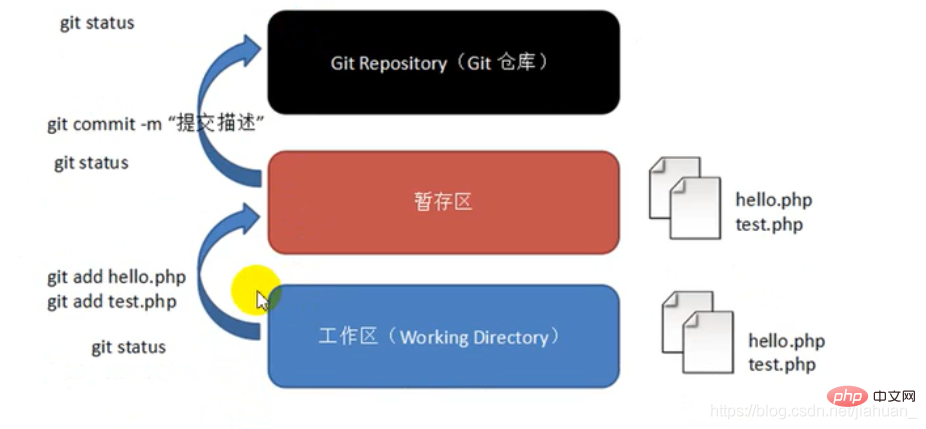
2. Local warehouse operationWhat is a warehouse?
The warehouse is also called a version library, and the English name is repository. We can simply understand it as a directory for storing code. All files in this directory can be managed by Git, and each file can be modified, deleted, etc. Git can track it.
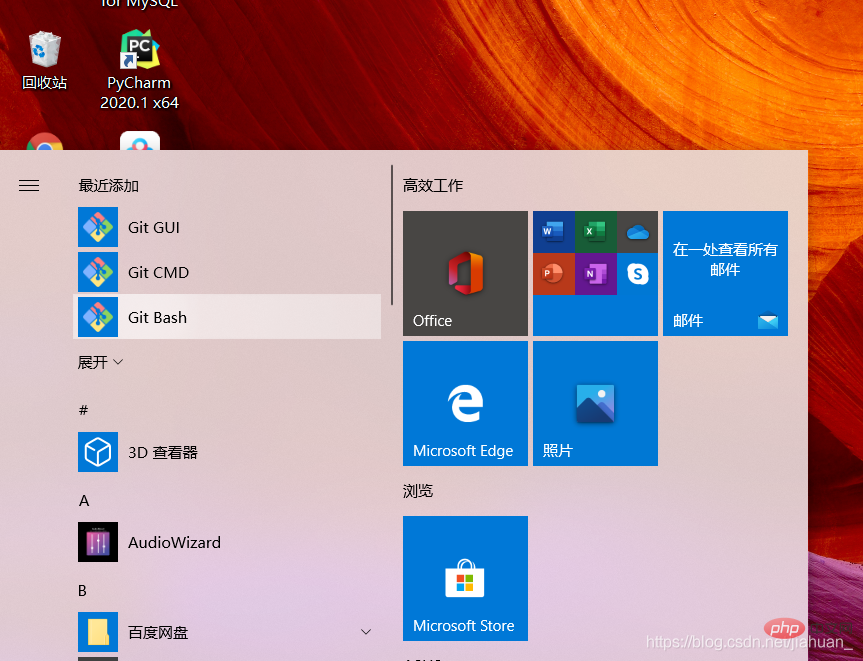
You need to perform global configuration before using it for the first time after installation:
1. Click "Git Bash Here" to open the Git command line window:
$ git config --global user.name "用户名" $ git config --global user.email "邮箱地址"
2. Create a local warehouseWhen we need to let Git go When managing a new project/existing project, you need to create a warehouse.
3. Create the directory
$ mkdir 目录名
4. Enter the project directory pre_git on the command line
$ cd 目录名
5. Initialization of the Git warehouseThat is, let Git know that it needs to manage this directory
$ git init
6.Git common command operationsCheck the current working status:
$ git status
8. Add the workspace file to the cache area:
说明:git add 指令,可以添加一个文件,也可以同时添加多个文件。 语法一:$ git add 文件名 语法二:$ git add 文件名1 文件名2 文件名3 ...... 语法三:$ git add . 【添加当前目录到缓存区中】
9 .Submit to the repository
$ git commit -m "注释内容"
The submission and other operations here are only submitted to the Git local warehouse.
Git version rollback operation Version rollback is divided into two steps:
1. First check the version and determine the time point you need to return toInstructions:
$ git log $ git log --pretty=oneline
2. Rollback operation:Command:
$ git reset --hard 提交编号
After going back to the past, what should I do if I want to go back to the latest state?First: Query the previous number
Instruction:
$ git reflog
$ git reset --hard 提交编号
If you want to go back to the past, first get the commit id, Then go back to the past with git reset --hard.
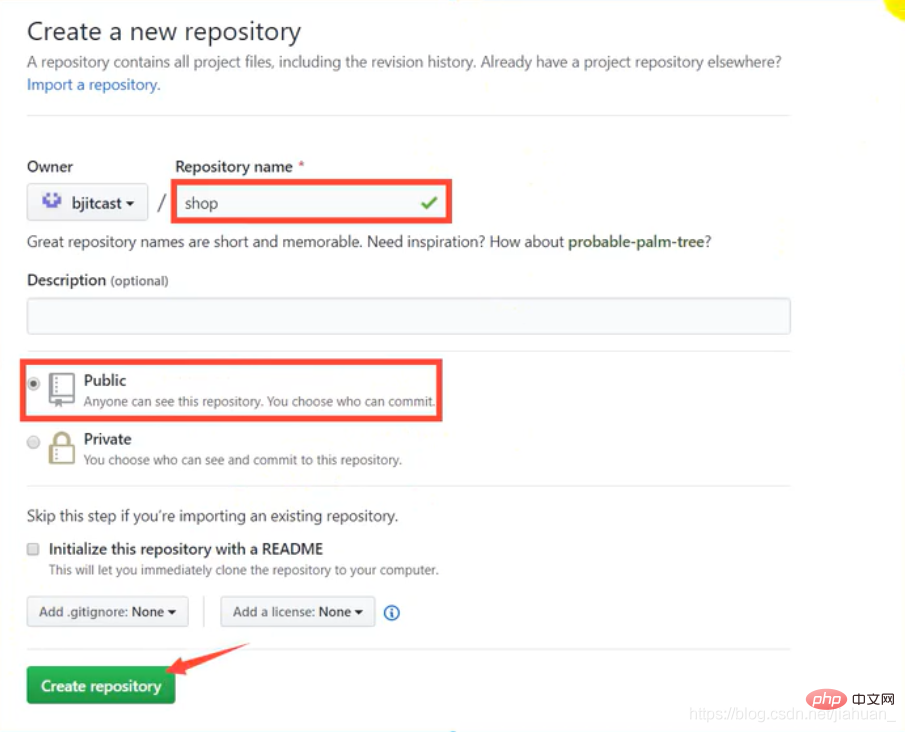
1. Creation of Github online warehouse
2.使用线上仓库
添加远程仓库(这里添加github)
注意:在git bash中输入 cd /D 注意盘名字一定要是大写。如不输入这个语句 不给git bash定位的话,默认的本地文件位置是在c盘中。然后再cd到以远程仓库相同名字的文件夹中。
第一种方式:基于https协议:
仓库就是目录:
1.创建空目录,名称为shop(任取)
2.复制https对应得地址。
然后在当前目录新建shop目录
$ mkdir shop $ cd ./shop
3.使用clone指令克隆线上仓库到本地。
$ git clone 线上仓库地址
执行后,线上的仓库就被clone下来了,如果clone下来的是一个空目录,克隆下来的目录只有隐藏的.git目录。
4.在上述操作完成后,就可以在本地仓库做对应的操作
比如:(提交至暂存区,提交到本地仓库,提交到线上仓库(远程仓库),拉取线上仓库)
前面几个操作跟上面的本地仓库操作相同。
然后提交到线上仓库:
如果是首次提交,首先应获取权限:(否则会出现403的错误)
因为不是任何人都可以往线上仓库提交内容。
获取权限:
修改".git/config 文件内容:
在url这一项中:
在github.com前面加上:用户名:密码@
如:
url=https://用户名:密码@github.com/用户名/仓库名.git
其它不变。
指令:
提交到线上仓库的指令
$ git push
提交成功之后,你会发现,线上仓库中多你提交的内容。
注意:如果你提交成功下班后:同事也向该远程仓库提交了新的内容。第二天上班时,你需要拉去线上的仓库的最新版本
使用命令:
$ git pull
因此在每天工作的第一件事就是git pull 拉取线上的最新版本,下班要做的就是 git push,将本地代码提交到线上仓库。
第二种方式:基于ssh协议(推荐使用)
该方式与前面https方式相比,只是影响github对于用户的身份鉴定方式,对于git的具体操作没有任何改变。
步骤:
1.生成客户端公私钥文件。
2.将公钥上传到Github。
实际操作:
1.创建公私钥文件
你的本地 Git 仓库和 GitHub 仓库之间的传输是通过SSH加密的,所以我们需要配置验证信息:使用以下命令生成 SSH Key:
在这里直接打开Git Bash:(也可以在桌面单击右键打开)
然后输入命令:
ssh-keygen -t rsa -C "注册邮箱"
如果你无法生成密钥(须先自行安装OpenSSH)然后在执行以上命令。
网上的一些教程使用命令:
$ ssh-keygen -t rsa-C "your_email@youremail.com"
注意:其实your_email@youremail.com表示的就是注册邮箱,即两者是相同的。
之后会要求确认路径和输入密码,我们这使用默认的一路回车就行。
2.找到id_rsa.pub文件。
成功的话会在 ~/ 下生成 .ssh 文件夹,进去,打开 id_rsa.pub,复制里面的 key。
回到 github 上,进入 Account => Settings(账户配置)。
为了验证是否成功,输入以下命令:
$ ssh -T git@github.com
结果:Hi xxxx! You’ve successfully authenticated, but GitHub does not provide shell access.
3.然后再本地新建目录(用来保存线上的项目),然后进入目录。
$ mkdir 目录名称 $ cd ./目录名称/
然后克隆目录到新建的目录中:
$ git clone ssh地址
线上的仓库ssh和https地址可以在clone和download中查看
4.后续操作跟https方式一样。
相比于https,这种方式一旦配置好后,以后的项目就不需要一个个去配置用户名和密码了,可以说一劳永益。所以推荐使用这种方式
什么是分支 ?
即项目的分支(不同的功能):
所有的分支组成一个项目。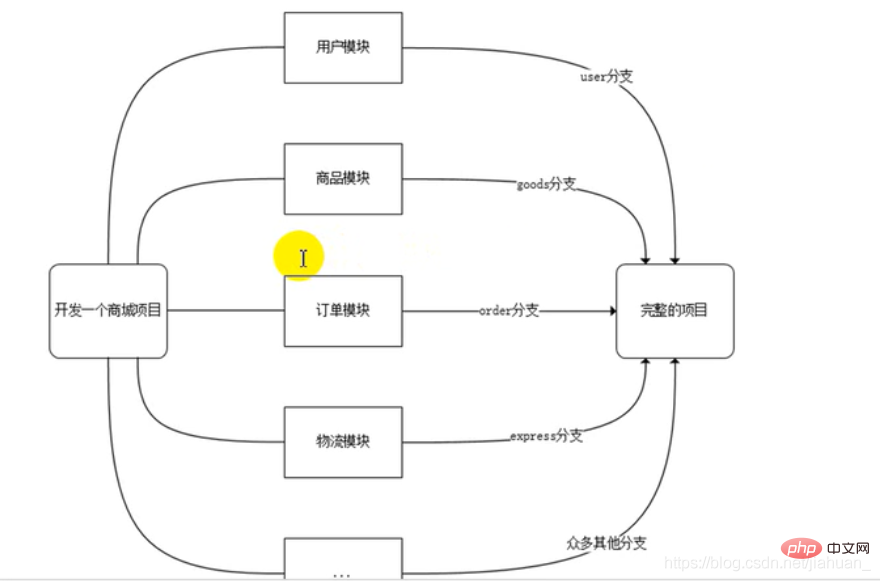
在版本回退的内容中,每次提交都会有记录,Git把他们串成时间线,形成类似于时间轴的东西,这个时间轴就是一个分支,我们称之为master分支。
在开发的时候往往是团队协作,多人进行开发,因此光有一个分支是无法满足多人同时开发的需求的,并且在分支上工作并不会影响其他分支的正常使用,会更加安全,Git鼓励开发者使用分支去完成一些开发任务。
分支的相关指令:
查看分支:git branch 创建分支:git branch 分支名 切换分支:git checkout 分支名 删除分支:git branch -d 分支名 合并分支:git merge 被合并的分支
注意:可以使用"git checkout -b 分支名" 指令来切换分支,-b选项表示创建并切换,相当于是两个操作指令。
含"*"表示当前分支。
可以看出我们都是对分支进行操作。
删除分支之前,需要退出该分支,既不能在使用中删除。
案例:模拟冲突
1.我下班之后,同事对线上项目内容进行了修改,此时本地仓库的内容与线上仓库内容不一致,第二天我忘记做git pull操作,而是直接对本地文件进行修改。
当进行提交时,会报错。
2.解决冲突
先进行指令"git pull"操作。
3.打开冲突文件,解决冲突。
和提交内容的用户商量保存哪些内容。删除哪些内容。
然后重新提交后,在进行push操作即可。
这里可以看到上班前进行 git pull 的重要性。
1.图形管理工具
Github for Desktop
对于经常使用Github的开发人员来说是非常便捷的工具。
Source tree
老牌的Git GUI管理工具,适合初学者。
TortoiseGit
对于熟悉SVN的开发人员来说,非常友善。其前辈TortoiseSVN。
自带的Git GUI管理工具。
项目中存在万年不变的目录,例如css,js,images等,或者还有些目录即便有改动,我们也不想让其提交到远程的文档,此时我们可以使用"忽略文件”机制来实现需求。
忽略文件需要新建一个名为 .gitignore的文件,该文件用于声明忽略文件或不忽略文件的规则,规则对当前目录及其子目录生效。
注意:该文件因为没有文件名,没办法在windows目录下直接创建,可以通过命令行Git Bash来创建。
常见的规则如下: 1.过滤整个文件夹 /mtk/ 2.过滤所有.zip文件 *.zip 3.过滤某个具体文件 /mtk/do.c 4.不过滤具体某个文件 lindex.php
新建.gitignore的文件
指令:
$ touch .gitignore
配置文件.gitignore:
如:
1.忽略/js目录
/js/
作用:借助github托管项目代码。
1.仓库(Repository)
仓库即你的项目,你想在Github上开源一个项目,那就必须要新建一个Repository,如果开源的项目多了,你就拥有多个Repositories。
2.收藏(star)
意为收藏项目的人数。方便下次查看。
3.复制克隆项目(Fork)
浏览他人项目时,点击fork,会在自己的账号里新建一个相同的仓库,该仓库是独立存在的,但是会显示 forked from 谁的仓库。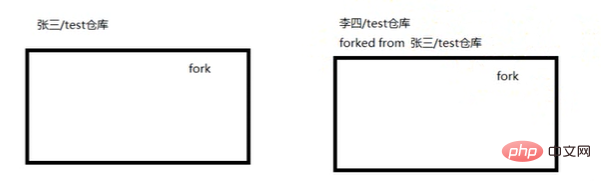
4.发起请求(Pull Request)
这是基于Fork的,李四在自己克隆的项目里进行改进完成后,想要将自己改进的项目合并到原来的项目中,于是他就发送了一个Pull Request,给原项目的创建人。假如你是这个项目的创建人,你就可以收到这个请求,这时候你会仔细review他的代码,如果觉得不错,就可以接受他的请求,这时候他做的改进,在你的项目里就有了。
步骤:
1.fork项目
2.修改fork的项目
3.新建pull request
4.等待项目新建者合并项目
5.关注(Watch)
如果你关注了某个项目,那么以后只要这个项目有任何的更新,都会接收到通知。
6.事务卡片(Issue)
就是你开源了一个项目,别人再查看你的项目时发现了Bug,或则有些地方做的不好,他就可以给你提个Issue,即问题,然后你看到了这些问题就可以去完善,完善好了就可以将其一个个的Close掉。
即发现代码Bug,但是目前没有成型的代码,需要讨论时使用。
如:别人给Itcastphpgit2提交一个issue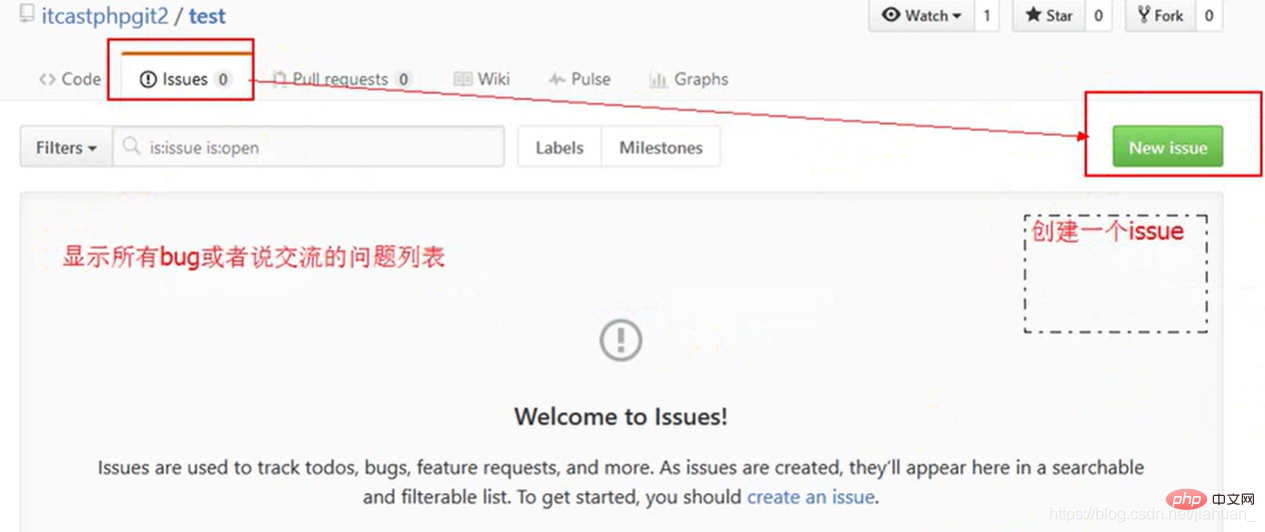
主页概念:
1.Github主页
显示用户动态以及关注用户或关注仓库的动态。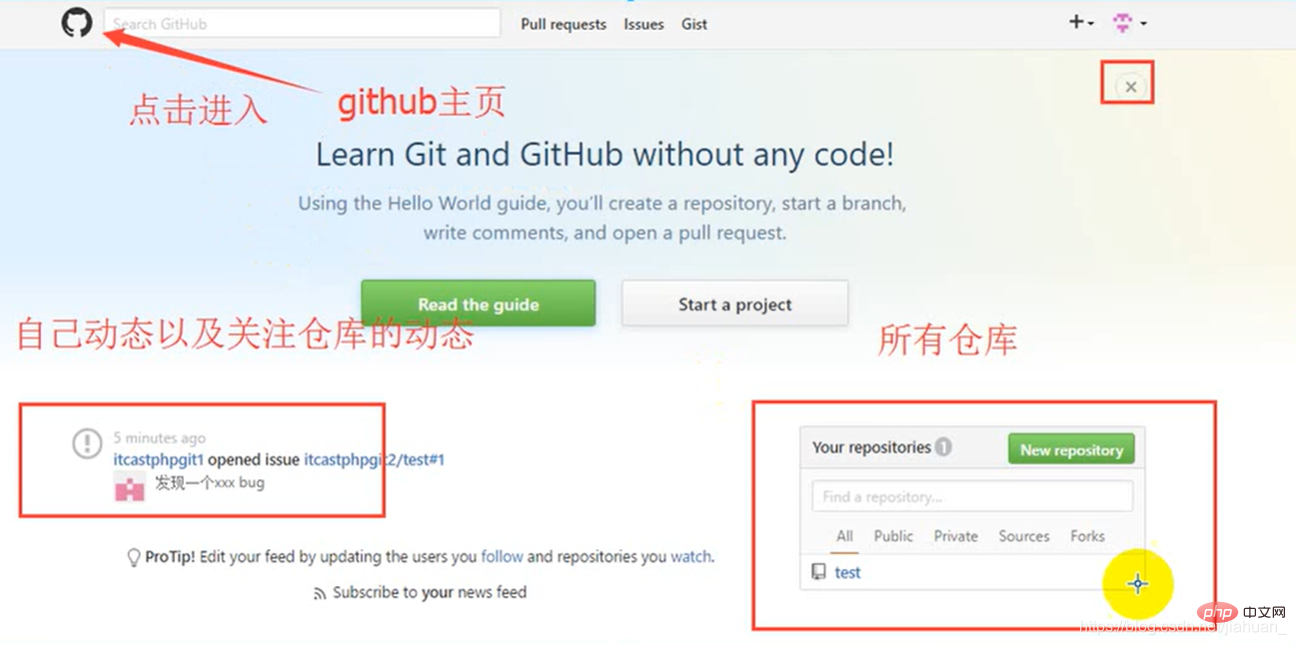
2.仓库主页
项目信息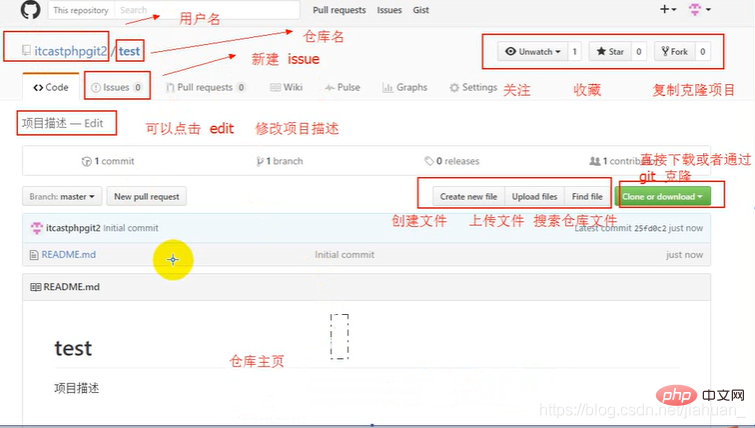
3.个人主页
个人信息
Official website: Github.com
New Github account: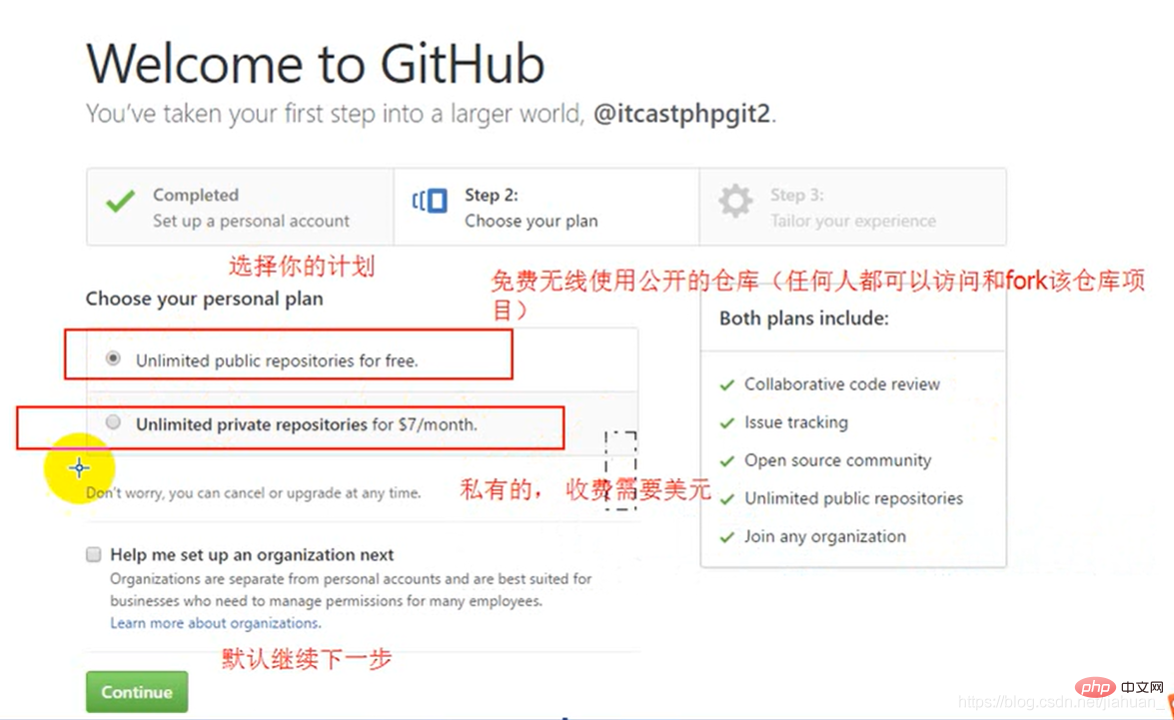
Note: The github server is abroad, so access is difficult Slow or inaccessible.
Verify the email address and create a remote warehouse based on the operation.
Operations of remote warehouse:
1. Create new file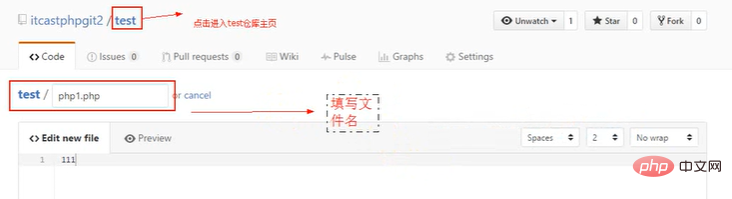
2.Edit file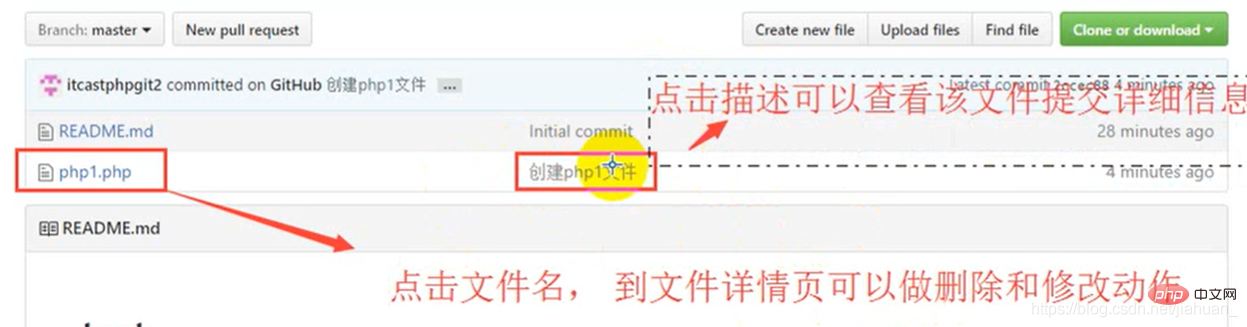
Click on the file name, then click on the "small pen" pattern.
3. Upload file
Click to upload the file and add a description. (Upload files)
4. Search warehouse files
Click to search (Find file)
5. Download project
Click Clone or download
Personal site
Visit:
https://username.github.io
Building steps
1. Create a personal site –> Create a new warehouse (Note: the warehouse name must be [username.github.io]
2. Under the warehouse Just create a new index.html file.
Note: github pages only supports static web pages
2. Only .html files can be stored in the warehouse.
Recommended study: "Git tutorial》
The above is the detailed content of Take you ten minutes to organize a detailed introductory tutorial for Git and Github. For more information, please follow other related articles on the PHP Chinese website!


![[Web front-end] Node.js quick start](https://img.php.cn/upload/course/000/000/067/662b5d34ba7c0227.png)


