

 Operation and Maintenance
Linux Operation and Maintenance
Linux installation of docker and summary of basic operations of docker
Operation and Maintenance
Linux Operation and Maintenance
Linux installation of docker and summary of basic operations of docker
Linux installation of docker and summary of basic operations of docker

This article brings you how to install docker on Linux and the basic operations of docker. I hope it will be helpful to you.

1. Install docker
Docker is required to run on Centos 7, the system is required to be 64-bit, and the system kernel version is 3.10 or above
1.uname -an View the current system version
2.yum -y install docker Download and install docker
3.service docker start Start the docker service
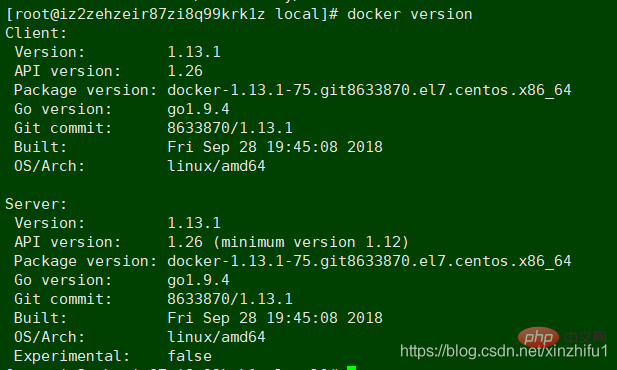
4.docker version Check whether docker is installed successfully
When you see the information in the picture below, it means The local docker has been installed successfully, it is very simple
2. Mirror operation
Creating a container must be based on the image, so first Let’s talk about the operation of docker images
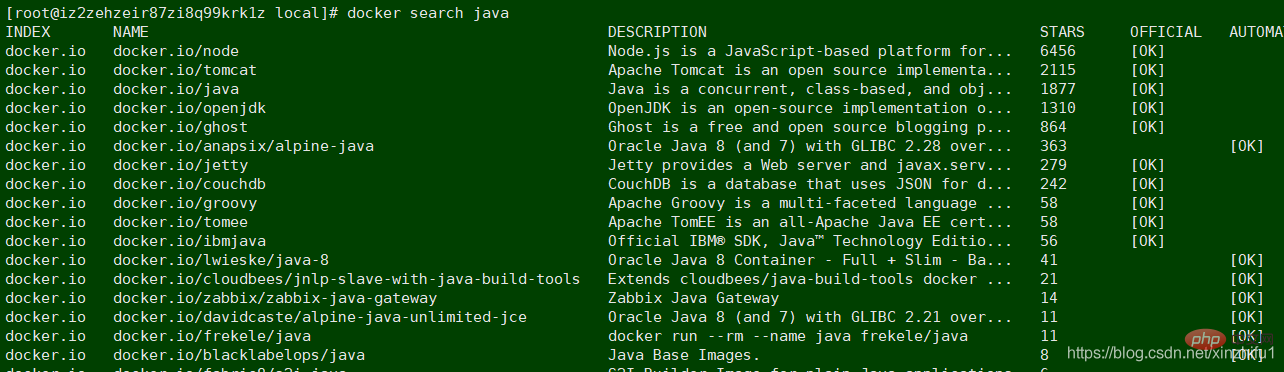
Search for images
docker images ll Check whether the local machine already has an image
Currently there is no image in the machine, go to Docker Hub to download (the image can also be customized, I won’t go into details here)
docker search java , you can also specify a specific version to download,
For example: docker search Ubuntu: 1.2.5.4, you can search docker Hub and many images will be listed
Download the image
docker pull docker.io/nginx to download
The image downloaded locally is larger than the one searched on docker Hub because it is automatically decompressed during the download process , when viewing the image list, you will see the image you just downloaded
The list includes the warehouse name, version label, image ID, creation time and occupied space

##Delete image
Delete useless image docker rmi image id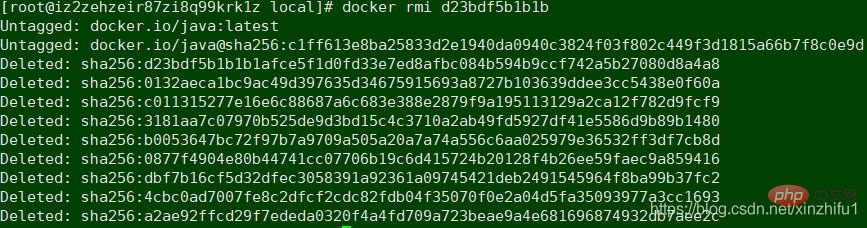
We have downloaded the Nginx image earlier, and then we will create a container with only Nginx application docker run -i -t
docker run -idt --name container_nginx -p 8080:80 docker.io/nginxStart a container using the image docker.io/nginx, named container_nginx, -p 8080:80 means mapping the container's port 80 to the host's 8080 port, so that we only need to access the 8080 port of the host to access the container's service.
Note: There are two - in front of the name, -p in front of the port, docker.io/nginx is the image name, 8080 is the port of the host, and 80 is the port of the Nginx application
A port on the host can only be mapped to one container port, and multiple container ports cannot correspond to one host port (if the container is installed on a centos-like system, the container port can be set casually, but if the container is It is just a simple application, then the container port should be the port of the application itself)

exit 退出容器

docker ps 查看运行中的容器

docker ps -a  查看运行中和非运行中的所有容器

docker exec -it container_nginx /bin/bash  进入容器

如果容器还未启动 执行docker start container_nginx
Start Nginx after entering the container
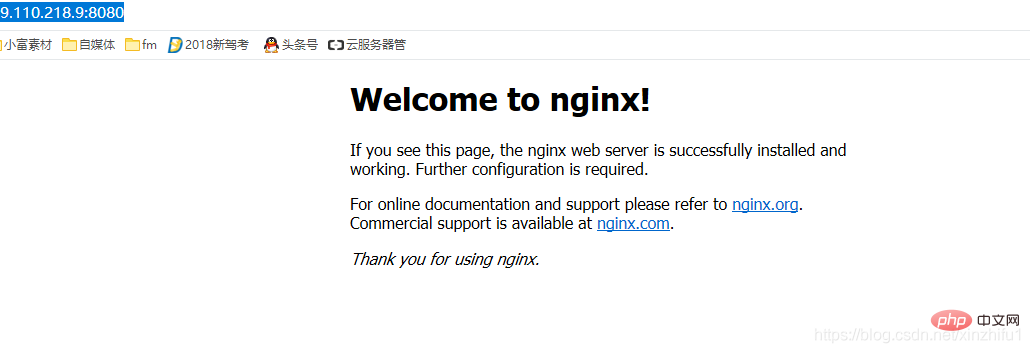
whereis nginx 找Nginx的启动目录

[root@iz2zehzeir87zi8q99krk1z ~]# docker start container_nginx
container_nginx
[root@iz2zehzeir87zi8q99krk1z ~]# docker exec -it container_nginx /bin/bash
root@84683e425116:/# whereis  nginx
nginx: /usr/sbin/nginx /usr/lib/nginx /etc/nginx /usr/share/nginx
root@84683e425116:/#  /usr/sbin/nginx
At this time, visit http://51.110.218.9:8080/ in the browser to directly access Nginx in the container
/ sbin / iptables -I INPUT -p tcp --dport 8080 -j ACCEPTSince I use the Alibaba Cloud server, I need to set port 8080 in Alibaba Cloud. Open
Delete container
容器删除之前先将容器停止

docker stop container_nginx 或者是容器的id

docker rm -f container_nginx  容器删除
The difference between docker start and docker run
docker start name 启动一个已经创建的容器

docker run 创建并启动一个容器
## The #docker run command is actually a combination of docker create and docker start. First execute docker create to create a container, and then docker start to start.The host and container files copy each other
从主机复制到容器 sudo docker cp host_path containerID:container_path

从容器复制到主机 sudo docker cp containerID:container_path host_path
docker cp container_nginx:/usr/local/xin.txt /usr/local/software/ 容器向主机复制文件 这样一个基础的docker容器就创建完了 。。。。。。。。。。。。 反过来大家再看一看docker的容器与镜像的区别 https://www.cnblogs.com/linjiaxin/p/7381421.html 那么其实镜像与容器的本质区别并不大,那么镜像可以生成容器 ,容器是否可以做成镜像呢? 用当前的容器生成了redis镜像 例如:A、B两台机器都想安装redis,A机器上创建容器并在容器中做好redis的一切配置,让后将这个容器docker commit 成镜像image_redis,B机器也想要安装redis,直接用镜像image_redis创建容器就行了,docker就是做这样一劳永逸的事情。 而且传统方式得在每台机器上安装配置redis非常麻烦 镜像压缩打包 (主机上进行操作),有两种方式 docker save 与 docker load 和 docker export 与 docker import docker save 是直接将镜像进行打包 docker save <镜像名>或<镜像id>
docker cp /usr/local/xinzhifu.txt container_nginx:/usr/local/ 主机向容器复制文件docket commit container_nginx image_nginx:v1
容器名 自己起一个镜像的名字:版本号
四.镜像的导入与导出
docker save nginx | gzip > nginx_xin_image.tar.gz  将现有的镜像压缩打包

docker load -i nginx_xin_image.tar.gz  压缩的镜像解压

docker images 进行查看
docker export container_nginx> nginx_image.tar

cat nginx_image.tar | sudo docker import  - nginx_image:import
docker export 是直接将容器进行打包 docker save <容器名>或<容器id>
需要注意两种方法配套的,切不可混用。虽然导入导出时没问题,但是在创建容器时候会报错
如果使用import导入save产生的文件,虽然导入不提示错误,但是启动容器时会提示失败,
会出现类似"docker: Error response from daemon: Container command not found or does not exist"的错误。
类似,使用load载入export产生的文件,也会出现问题。
相关推荐:《Linux视频教程》
The above is the detailed content of Linux installation of docker and summary of basic operations of docker. For more information, please follow other related articles on the PHP Chinese website!

Hot AI Tools

Undress AI Tool
Undress images for free

Undresser.AI Undress
AI-powered app for creating realistic nude photos

AI Clothes Remover
Online AI tool for removing clothes from photos.

Clothoff.io
AI clothes remover

Video Face Swap
Swap faces in any video effortlessly with our completely free AI face swap tool!

Hot Article
Hot Tools

Notepad++7.3.1
Easy-to-use and free code editor

SublimeText3 Chinese version
Chinese version, very easy to use

Zend Studio 13.0.1
Powerful PHP integrated development environment

Dreamweaver CS6
Visual web development tools

SublimeText3 Mac version
God-level code editing software (SublimeText3)
Hot Topics


 Postman Integrated Application on CentOS
May 19, 2025 pm 08:00 PM
Postman Integrated Application on CentOS
May 19, 2025 pm 08:00 PM
Integrating Postman applications on CentOS can be achieved through a variety of methods. The following are the detailed steps and suggestions: Install Postman by downloading the installation package to download Postman's Linux version installation package: Visit Postman's official website and select the version suitable for Linux to download. Unzip the installation package: Use the following command to unzip the installation package to the specified directory, for example /opt: sudotar-xzfpostman-linux-x64-xx.xx.xx.tar.gz-C/opt Please note that "postman-linux-x64-xx.xx.xx.tar.gz" is replaced by the file name you actually downloaded. Create symbols
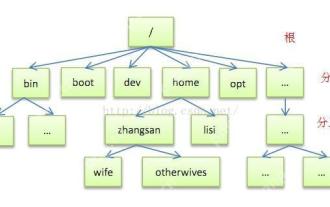 Detailed introduction to each directory of Linux and each directory (reprinted)
May 22, 2025 pm 07:54 PM
Detailed introduction to each directory of Linux and each directory (reprinted)
May 22, 2025 pm 07:54 PM
[Common Directory Description] Directory/bin stores binary executable files (ls, cat, mkdir, etc.), and common commands are generally here. /etc stores system management and configuration files/home stores all user files. The root directory of the user's home directory is the basis of the user's home directory. For example, the home directory of the user user is /home/user. You can use ~user to represent /usr to store system applications. The more important directory /usr/local Local system administrator software installation directory (install system-level applications). This is the largest directory, and almost all the applications and files to be used are in this directory. /usr/x11r6 Directory for storing x window/usr/bin Many
 Where is the pycharm interpreter?
May 23, 2025 pm 10:09 PM
Where is the pycharm interpreter?
May 23, 2025 pm 10:09 PM
Setting the location of the interpreter in PyCharm can be achieved through the following steps: 1. Open PyCharm, click the "File" menu, and select "Settings" or "Preferences". 2. Find and click "Project:[Your Project Name]" and select "PythonInterpreter". 3. Click "AddInterpreter", select "SystemInterpreter", browse to the Python installation directory, select the Python executable file, and click "OK". When setting up the interpreter, you need to pay attention to path correctness, version compatibility and the use of the virtual environment to ensure the smooth operation of the project.
 The difference between programming in Java and other languages Analysis of the advantages of cross-platform features of Java
May 20, 2025 pm 08:21 PM
The difference between programming in Java and other languages Analysis of the advantages of cross-platform features of Java
May 20, 2025 pm 08:21 PM
The main difference between Java and other programming languages is its cross-platform feature of "writing at once, running everywhere". 1. The syntax of Java is close to C, but it removes pointer operations that are prone to errors, making it suitable for large enterprise applications. 2. Compared with Python, Java has more advantages in performance and large-scale data processing. The cross-platform advantage of Java stems from the Java virtual machine (JVM), which can run the same bytecode on different platforms, simplifying development and deployment, but be careful to avoid using platform-specific APIs to maintain cross-platformity.
 After installing Nginx, the configuration file path and initial settings
May 16, 2025 pm 10:54 PM
After installing Nginx, the configuration file path and initial settings
May 16, 2025 pm 10:54 PM
Understanding Nginx's configuration file path and initial settings is very important because it is the first step in optimizing and managing a web server. 1) The configuration file path is usually /etc/nginx/nginx.conf. The syntax can be found and tested using the nginx-t command. 2) The initial settings include global settings (such as user, worker_processes) and HTTP settings (such as include, log_format). These settings allow customization and extension according to requirements. Incorrect configuration may lead to performance issues and security vulnerabilities.
 MySQL installation tutorial teach you step by step the detailed steps for installing and configuration of mySQL step by step
May 23, 2025 am 06:09 AM
MySQL installation tutorial teach you step by step the detailed steps for installing and configuration of mySQL step by step
May 23, 2025 am 06:09 AM
The installation and configuration of MySQL can be completed through the following steps: 1. Download the installation package suitable for the operating system from the official website. 2. Run the installer, select the "Developer Default" option and set the root user password. 3. After installation, configure environment variables to ensure that the bin directory of MySQL is in PATH. 4. When creating a user, follow the principle of minimum permissions and set a strong password. 5. Adjust the innodb_buffer_pool_size and max_connections parameters when optimizing performance. 6. Back up the database regularly and optimize query statements to improve performance.
 Experience in participating in VSCode offline technology exchange activities
May 29, 2025 pm 10:00 PM
Experience in participating in VSCode offline technology exchange activities
May 29, 2025 pm 10:00 PM
I have a lot of experience in participating in VSCode offline technology exchange activities, and my main gains include sharing of plug-in development, practical demonstrations and communication with other developers. 1. Sharing of plug-in development: I learned how to use VSCode's plug-in API to improve development efficiency, such as automatic formatting and static analysis plug-ins. 2. Practical demonstration: I learned how to use VSCode for remote development and realized its flexibility and scalability. 3. Communicate with developers: I have obtained skills to optimize VSCode startup speed, such as reducing the number of plug-ins loaded at startup and managing the plug-in loading order. In short, this event has benefited me a lot and I highly recommend those who are interested in VSCode to participate.
 Comparison between Informix and MySQL on Linux
May 29, 2025 pm 11:21 PM
Comparison between Informix and MySQL on Linux
May 29, 2025 pm 11:21 PM
Informix and MySQL are both popular relational database management systems. They perform well in Linux environments and are widely used. The following is a comparison and analysis of the two on the Linux platform: Installing and configuring Informix: Deploying Informix on Linux requires downloading the corresponding installation files, and then completing the installation and configuration process according to the official documentation. MySQL: The installation process of MySQL is relatively simple, and can be easily installed through system package management tools (such as apt or yum), and there are a large number of tutorials and community support on the network for reference. Performance Informix: Informix has excellent performance and
