 Backend Development
 Python Tutorial
 Python geographic data processing analysis uses GR for vectors
Python geographic data processing analysis uses GR for vectors

Free learning recommendations: python video tutorial
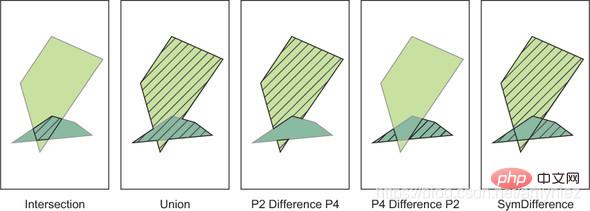
1. Overlay analysis
Overlay analysis operation: 
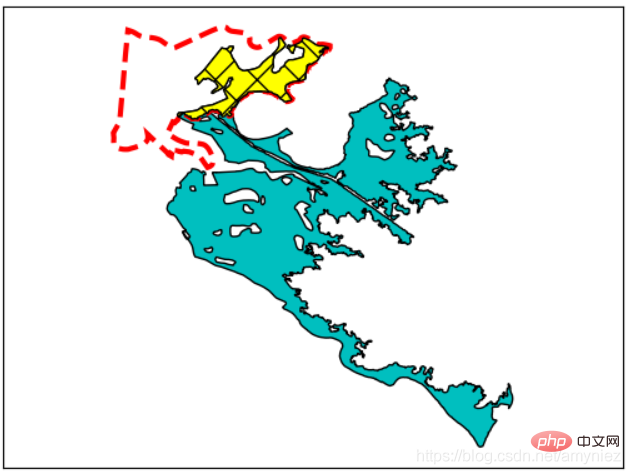
Plot color: 'r' red, 'g' green, 'b' Blue, 'c' cyan, 'y' yellow, 'm' magenta, 'k' black, 'w' white.
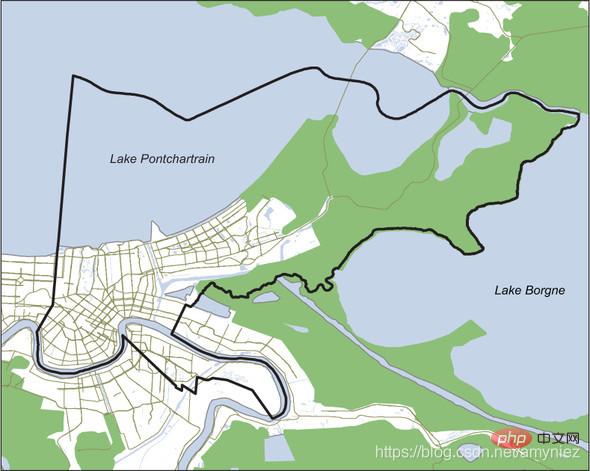
Simple map of New Orleans city boundaries, water bodies and wetlands: ## sync
synopsis  1. Analysis of urban swamp areas in New Orleans:
 import osfrom osgeo import ogrfrom ospybook.vectorplotter import VectorPlotter
data_dir = r'E:\Google chrome\Download\gis with python\osgeopy data'# 得到新奥尔良附近的一个特定的沼泽特征vp = VectorPlotter(True)water_ds = ogr.Open(os.path.join(data_dir, 'US', 'wtrbdyp010.shp'))water_lyr = water_ds.GetLayer(0)water_lyr.SetAttributeFilter('WaterbdyID = 1011327')marsh_feat = water_lyr.GetNextFeature()marsh_geom = marsh_feat.geometry().Clone()vp.plot(marsh_geom, 'c')# 获得新奥尔良边城市边界nola_ds = ogr.Open(os.path.join(data_dir, 'Louisiana', 'NOLA.shp'))nola_lyr = nola_ds.GetLayer(0)nola_feat = nola_lyr.GetNextFeature()nola_geom = nola_feat.geometry().Clone()vp.plot(nola_geom, fill=False, ec='red', ls='dashed', lw=3)# 相交沼泽和边界多边形得到沼泽的部分# 位于新奥尔良城市边界内intersection = marsh_geom.Intersection(nola_geom)vp.plot(intersection, 'yellow', hatch='x')vp.draw()
 2. Calculate the wetland area of the city: Filtering out unnecessary features can significantly reduce processing time.
3. Intersection of two layers:
# 获得城市内的湿地多边形# 将多边形的面积进行累加# 除以城市面积water_lyr.SetAttributeFilter("Feature != 'Lake'") # 限定对象water_lyr.SetSpatialFilter(nola_geom)wetlands_area = 0# 累加多边形面积for feat in water_lyr:
    intersect = feat.geometry().Intersection(nola_geom)
    wetlands_area += intersect.GetArea()pcnt = wetlands_area / nola_geom.GetArea()print('{:.1%} of New Orleans is wetland'.format(pcnt))
28.7% of New Orleans is wetland2. Proximity analysis (determining the distance between elements)
OGR includes two proximity analysis tools: measuring distances between geometric features and creating buffers.
1. Determine how many cities in the United States are within 10 miles of a volcano.A problematic way to determine the number of cities near a volcano:
# 将湖泊数据排除# 在内存中创建一个临时图层# 将图层相交,将结果储存在临时图层中water_lyr.SetAttributeFilter("Feature != 'Lake'")water_lyr.SetSpatialFilter(nola_geom)wetlands_area = 0for feat in water_lyr:
    intersect = feat.geometry().Intersection(nola_geom) # 求交
    wetlands_area += intersect.GetArea()pcnt = wetlands_area / nola_geom.GetArea()print('{:.1%} of New Orleans is wetland'.format(pcnt))water_lyr.SetSpatialFilter(None)water_lyr.SetAttributeFilter("Feature != 'Lake'")memory_driver = ogr.GetDriverByName('Memory')temp_ds = memory_driver.CreateDataSource('temp')temp_lyr = temp_ds.CreateLayer('temp')nola_lyr.Intersection(water_lyr, temp_lyr)sql = 'SELECT SUM(OGR_GEOM_AREA) AS area FROM temp'lyr = temp_ds.ExecuteSQL(sql)pcnt = lyr.GetFeature(0).GetField('area') / nola_geom.GetArea()print('{:.1%} of New Orleans is wetland'.format(pcnt))
28.7% of New Orleans is wetland
2. A better way to determine the number of cities near a volcano:
from osgeo import ogr

shp_ds = ogr.Open(r'E:\Google chrome\Download\gis with python\osgeopy data\US')volcano_lyr = shp_ds.GetLayer('us_volcanos_albers')cities_lyr = shp_ds.GetLayer('cities_albers')# 在内存中创建一个临时层来存储缓冲区memory_driver = ogr.GetDriverByName('memory')memory_ds = memory_driver.CreateDataSource('temp')buff_lyr = memory_ds.CreateLayer('buffer')buff_feat = ogr.Feature(buff_lyr.GetLayerDefn())# 缓缓冲每一个火山点,将结果添加到缓冲图层中for volcano_feat in volcano_lyr:
    buff_geom = volcano_feat.geometry().Buffer(16000)
    tmp = buff_feat.SetGeometry(buff_geom)
    tmp = buff_lyr.CreateFeature(buff_feat)# 将城市图层与火山缓冲区图层相交result_lyr = memory_ds.CreateLayer('result')buff_lyr.Intersection(cities_lyr, result_lyr)print('Cities: {}'.format(result_lyr.GetFeatureCount()))
Cities: 83Note: UnionCascaded(): Effectively combines all polygons into one composite polygon
In the first example, whenever a city is within the volcano buffer, it will be copied to the output result. Note that a city located within multiple 16,000-meter buffer zones will be included more than once. # synchronization
##from osgeo import ogr
shp_ds = ogr.Open(r'E:\Google chrome\Download\gis with python\osgeopy data\US')volcano_lyr = shp_ds.GetLayer('us_volcanos_albers')cities_lyr = shp_ds.GetLayer('cities_albers')# 将缓冲区添加到一个复合多边形,而不是一个临时图层multipoly = ogr.Geometry(ogr.wkbMultiPolygon)for volcano_feat in volcano_lyr:
buff_geom = volcano_feat.geometry().Buffer(16000)
multipoly.AddGeometry(buff_geom)# 将所有的缓冲区联合在一起得到一个可以使用的多边形作为空间过滤器cities_lyr.SetSpatialFilter(multipoly.UnionCascaded())print('Cities: {}'.format(cities_lyr.GetFeatureCount()))
Cities: 78
import osfrom osgeo import ogrfrom ospybook.vectorplotter import VectorPlotter

data_dir = r'E:\Google chrome\Download\gis with python\osgeopy data'shp_ds = ogr.Open(os.path.join(data_dir, 'US'))volcano_lyr = shp_ds.GetLayer('us_volcanos_albers')cities_lyr = shp_ds.GetLayer('cities_albers')# 西雅图到雷尼尔山的距离volcano_lyr.SetAttributeFilter("NAME = 'Rainier'")feat = volcano_lyr.GetNextFeature()rainier = feat.geometry().Clone()cities_lyr.SetSpatialFilter(None)cities_lyr.SetAttributeFilter("NAME = 'Seattle'")feat = cities_lyr.GetNextFeature()seattle = feat.geometry().Clone()meters = round(rainier.Distance(seattle))miles = meters / 1600print('{} meters ({} miles)'.format(meters, miles))
92656 meters (57.91 miles)
Taking the elevation Z value into account, the true distance is 5. # 2Dpt1_2d = ogr.Geometry(ogr.wkbPoint)pt1_2d.AddPoint(15, 15)pt2_2d = ogr.Geometry(ogr.wkbPoint)pt2_2d.AddPoint(15, 19)print(pt1_2d.Distance(pt2_2d))
4.0
# 2.5Dpt1_25d = ogr.Geometry(ogr.wkbPoint25D)pt1_25d.AddPoint(15, 15, 0)pt2_25d = ogr.Geometry(ogr.wkbPoint25D)pt2_25d.AddPoint(15, 19, 3)print(pt1_25d.Distance(pt2_25d))
4.0
The area of 2.5D is actually 141.
# 用2D计算面积ring = ogr.Geometry(ogr.wkbLinearRing)ring.AddPoint(10, 10)ring.AddPoint(10, 20)ring.AddPoint(20, 20)ring.AddPoint(20, 10)poly_2d = ogr.Geometry(ogr.wkbPolygon)poly_2d.AddGeometry(ring)poly_2d.CloseRings()print(poly_2d.GetArea())rrree
Related free learning recommendations:
python tutorial
(Video)The above is the detailed content of Python geographic data processing analysis uses GR for vectors. For more information, please follow other related articles on the PHP Chinese website!

Hot AI Tools

Undress AI Tool
Undress images for free

Undresser.AI Undress
AI-powered app for creating realistic nude photos

AI Clothes Remover
Online AI tool for removing clothes from photos.

Clothoff.io
AI clothes remover

Video Face Swap
Swap faces in any video effortlessly with our completely free AI face swap tool!

Hot Article

Hot Tools

Notepad++7.3.1
Easy-to-use and free code editor

SublimeText3 Chinese version
Chinese version, very easy to use

Zend Studio 13.0.1
Powerful PHP integrated development environment

Dreamweaver CS6
Visual web development tools

SublimeText3 Mac version
God-level code editing software (SublimeText3)
 python connect to sql server pyodbc example
Jul 30, 2025 am 02:53 AM
Install pyodbc: Use the pipinstallpyodbc command to install the library; 2. Connect SQLServer: Use the connection string containing DRIVER, SERVER, DATABASE, UID/PWD or Trusted_Connection through the pyodbc.connect() method, and support SQL authentication or Windows authentication respectively; 3. Check the installed driver: Run pyodbc.drivers() and filter the driver name containing 'SQLServer' to ensure that the correct driver name is used such as 'ODBCDriver17 for SQLServer'; 4. Key parameters of the connection string
 python django forms example
Jul 27, 2025 am 02:50 AM
First, define a ContactForm form containing name, mailbox and message fields; 2. In the view, the form submission is processed by judging the POST request, and after verification is passed, cleaned_data is obtained and the response is returned, otherwise the empty form will be rendered; 3. In the template, use {{form.as_p}} to render the field and add {%csrf_token%} to prevent CSRF attacks; 4. Configure URL routing to point /contact/ to the contact_view view; use ModelForm to directly associate the model to achieve data storage. DjangoForms implements integrated processing of data verification, HTML rendering and error prompts, which is suitable for rapid development of safe form functions.
 python pandas melt example
Jul 27, 2025 am 02:48 AM
pandas.melt() is used to convert wide format data into long format. The answer is to define new column names by specifying id_vars retain the identification column, value_vars select the column to be melted, var_name and value_name, 1.id_vars='Name' means that the Name column remains unchanged, 2.value_vars=['Math','English','Science'] specifies the column to be melted, 3.var_name='Subject' sets the new column name of the original column name, 4.value_name='Score' sets the new column name of the original value, and finally generates three columns including Name, Subject and Score.
 Optimizing Python for Memory-Bound Operations
Jul 28, 2025 am 03:22 AM
Pythoncanbeoptimizedformemory-boundoperationsbyreducingoverheadthroughgenerators,efficientdatastructures,andmanagingobjectlifetimes.First,usegeneratorsinsteadofliststoprocesslargedatasetsoneitematatime,avoidingloadingeverythingintomemory.Second,choos
 What is statistical arbitrage in cryptocurrencies? How does statistical arbitrage work?
Jul 30, 2025 pm 09:12 PM
Introduction to Statistical Arbitrage Statistical Arbitrage is a trading method that captures price mismatch in the financial market based on mathematical models. Its core philosophy stems from mean regression, that is, asset prices may deviate from long-term trends in the short term, but will eventually return to their historical average. Traders use statistical methods to analyze the correlation between assets and look for portfolios that usually change synchronously. When the price relationship of these assets is abnormally deviated, arbitrage opportunities arise. In the cryptocurrency market, statistical arbitrage is particularly prevalent, mainly due to the inefficiency and drastic fluctuations of the market itself. Unlike traditional financial markets, cryptocurrencies operate around the clock and their prices are highly susceptible to breaking news, social media sentiment and technology upgrades. This constant price fluctuation frequently creates pricing bias and provides arbitrageurs with
 python iter and next example
Jul 29, 2025 am 02:20 AM
iter() is used to obtain the iterator object, and next() is used to obtain the next element; 1. Use iterator() to convert iterable objects such as lists into iterators; 2. Call next() to obtain elements one by one, and trigger StopIteration exception when the elements are exhausted; 3. Use next(iterator, default) to avoid exceptions; 4. Custom iterators need to implement the __iter__() and __next__() methods to control iteration logic; using default values is a common way to safe traversal, and the entire mechanism is concise and practical.
 python psycopg2 connection pool example
Jul 28, 2025 am 03:01 AM
Use psycopg2.pool.SimpleConnectionPool to effectively manage database connections and avoid the performance overhead caused by frequent connection creation and destruction. 1. When creating a connection pool, specify the minimum and maximum number of connections and database connection parameters to ensure that the connection pool is initialized successfully; 2. Get the connection through getconn(), and use putconn() to return the connection to the pool after executing the database operation. Constantly call conn.close() is prohibited; 3. SimpleConnectionPool is thread-safe and is suitable for multi-threaded environments; 4. It is recommended to implement a context manager in combination with context manager to ensure that the connection can be returned correctly when exceptions are noted;
 python shutil rmtree example
Aug 01, 2025 am 05:47 AM
shutil.rmtree() is a function in Python that recursively deletes the entire directory tree. It can delete specified folders and all contents. 1. Basic usage: Use shutil.rmtree(path) to delete the directory, and you need to handle FileNotFoundError, PermissionError and other exceptions. 2. Practical application: You can clear folders containing subdirectories and files in one click, such as temporary data or cached directories. 3. Notes: The deletion operation is not restored; FileNotFoundError is thrown when the path does not exist; it may fail due to permissions or file occupation. 4. Optional parameters: Errors can be ignored by ignore_errors=True


