


【Related learning recommendations:WeChat Mini Program Tutorial】
Mini programs will encounter long lists of interactions in many scenarios. When a page renders too many wxml nodes, it will cause the mini program page to freeze and white screen. The main reasons are as follows:
1. The amount of list data is large, and it takes a long time to initialize setData and initialize the rendering list wxml;
2. There are many wxml nodes rendered, and each time SetData needs to create a new virtual tree to update the view, and the diff operation of the old tree is relatively time-consuming;
3. There are many wxml nodes rendered, the wxml that the page can accommodate is limited, and the memory occupied is high .
The scroll-view of the WeChat applet itself is not optimized for long lists. The official component recycle-view is a long list component similar to virtual-list. Now we are going to analyze the principle of virtual list and implement a virtual-list of a small program from scratch.
First of all, we need to understand what virtual-list is. This is an initialization that only loads the "visible area" and its nearby dom elements, and reuses them during the scrolling process. A scrolling list front-end optimization technology that only renders the "visible area" and its nearby DOM elements. Compared with the traditional list method, it can achieve extremely high initial rendering performance, and only maintains an ultra-lightweight DOM structure during the scrolling process.
The most important concepts of virtual lists:
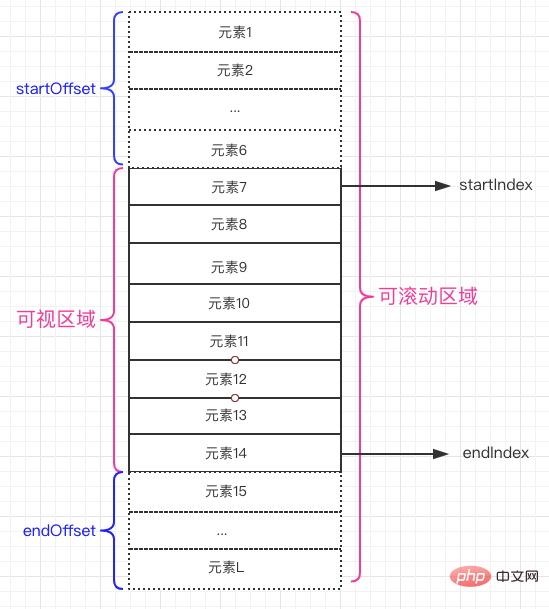
Scrollable area: For example, the height of the list container is 600, and the sum of the heights of the internal elements exceeds the height of the container. This area can be scrolled, which is the "scrollable area";
Visible area: For example, the height of the list container is 600, and there is a vertical scroll bar on the right side for scrolling, which is visually visible The internal area is the "visual area".
The core of implementing a virtual list is to listen to the scroll event and dynamically adjust the top distance and front and rear interception of the "visual area" data rendering through the scroll distance offset and the sum of the sizes of the scrolled elements, totalSize. Index value, the implementation steps are as follows:
1. Listen to the scrollTop/scrollLeft of the scroll event, and calculate the index value startIndex of the starting item and the index value endIndex of the ending item in the "visible area";
2 .Intercept the data items of the "visible area" of the long list through startIndex and endIndex, and update them to the list;
3. Calculate the height of the scrollable area and the offset of the item, and apply them to the scrollable area and item.
In the virtual list, it depends on each list item The width/height is used to calculate the "scrollable area", and it may need to be customized. Define the itemSizeGetter function to calculate the list item width/height.
itemSizeGetter(itemSize) { return (index: number) => { if (isFunction(itemSize)) { return itemSize(index); } return isArray(itemSize) ? itemSize[index] : itemSize; }; }复制代码
During the scrolling process, the itemSize of the list items that have not appeared will not be calculated. At this time, an estimated list item estimatedItemSize will be used. The purpose is to calculate the height of the "scrollable area" without measuring it. The itemSize that has been passed is replaced by estimatedItemSize.
getSizeAndPositionOfLastMeasuredItem() { return this.lastMeasuredIndex >= 0 ? this.itemSizeAndPositionData[this.lastMeasuredIndex] : { offset: 0, size: 0 }; } getTotalSize(): number { const lastMeasuredSizeAndPosition = this.getSizeAndPositionOfLastMeasuredItem(); return ( lastMeasuredSizeAndPosition.offset + lastMeasuredSizeAndPosition.size + (this.itemCount - this.lastMeasuredIndex - 1) * this.estimatedItemSize ); }复制代码
Here we see that the itemSize and offset of the most recently calculated list item are directly hit through the cache. This is because when the two parameters of each list item are obtained, they are cached.
getSizeAndPositionForIndex(index: number) { if (index > this.lastMeasuredIndex) { const lastMeasuredSizeAndPosition = this.getSizeAndPositionOfLastMeasuredItem(); let offset = lastMeasuredSizeAndPosition.offset + lastMeasuredSizeAndPosition.size; for (let i = this.lastMeasuredIndex + 1; i <= index; i++) { const size = this.itemSizeGetter(i); this.itemSizeAndPositionData[i] = { offset, size, }; offset += size; } this.lastMeasuredIndex = index; } return this.itemSizeAndPositionData[index]; }复制代码
During the scrolling process, it is necessary to calculate the index value of the first data displayed in the "visible area" through the scroll offset offset. Under normal circumstances, the itemSize of each list item can be calculated starting from 0, and once it exceeds the offset, the index value can be obtained. However, when the amount of data is too large and scrolling events are triggered frequently, there will be a large performance loss. Fortunately, the scrolling distance of the list items is completely arranged in ascending order, so you can perform a binary search on the cached data, reducing the time complexity to O(lgN).
The js code is as follows:
findNearestItem(offset: number) { offset = Math.max(0, offset); const lastMeasuredSizeAndPosition = this.getSizeAndPositionOfLastMeasuredItem(); const lastMeasuredIndex = Math.max(0, this.lastMeasuredIndex); if (lastMeasuredSizeAndPosition.offset >= offset) { return this.binarySearch({ high: lastMeasuredIndex, low: 0, offset, }); } else { return this.exponentialSearch({ index: lastMeasuredIndex, offset, }); } } private binarySearch({ low, high, offset, }: { low: number; high: number; offset: number; }) { let middle = 0; let currentOffset = 0; while (low <= high) { middle = low + Math.floor((high - low) / 2); currentOffset = this.getSizeAndPositionForIndex(middle).offset; if (currentOffset === offset) { return middle; } else if (currentOffset < offset) { low = middle + 1; } else if (currentOffset > offset) { high = middle - 1; } } if (low > 0) { return low - 1; } return 0; }复制代码
For searches that do not cache calculation results, first use exponential search to narrow the search range, and then use binary search.
private exponentialSearch({ index, offset, }: { index: number; offset: number; }) { let interval = 1; while ( index < this.itemCount && this.getSizeAndPositionForIndex(index).offset < offset ) { index += interval; interval *= 2; } return this.binarySearch({ high: Math.min(index, this.itemCount - 1), low: Math.floor(index / 2), offset, }); } }复制代码
We know the size of the "visual area" containerSize, the rolling offset offset, and adjust it by adding the number of pre-rendered bars overscanCount. Calculate the index value startIndex of the starting item and the index value endIndex of the ending item in the "visible area". The implementation steps are as follows:
1. Find the index value closest to offset. This value is the index value of the starting item. startIndex;
2. Get the offset and size of the item through startIndex, and then adjust the offset;
3. Add the offset to containerSize to get the maxOffset of the end item, and start accumulating from startIndex until Beyond maxOffset, get the end item index value endIndex.
The js code is as follows:
getVisibleRange({ containerSize, offset, overscanCount, }: { containerSize: number; offset: number; overscanCount: number; }): { start?: number; stop?: number } { const maxOffset = offset + containerSize; let start = this.findNearestItem(offset); const datum = this.getSizeAndPositionForIndex(start); offset = datum.offset + datum.size; let stop = start; while (offset < maxOffset && stop < this.itemCount - 1) { stop++; offset += this.getSizeAndPositionForIndex(stop).size; } if (overscanCount) { start = Math.max(0, start - overscanCount); stop = Math.min(stop + overscanCount, this.itemCount - 1); } return { start, stop, }; }复制代码
You can now dynamically update startIndex, endIndex, totalSize, and offset by listening to the scroll event. You can achieve virtual list scrolling.
js code is as follows:
getItemStyle(index) { const style = this.styleCache[index]; if (style) { return style; } const { scrollDirection } = this.data; const { size, offset, } = this.sizeAndPositionManager.getSizeAndPositionForIndex(index); const cumputedStyle = styleToCssString({ position: 'absolute', top: 0, left: 0, width: '100%', [positionProp[scrollDirection]]: offset, [sizeProp[scrollDirection]]: size, }); this.styleCache[index] = cumputedStyle; return cumputedStyle; }, observeScroll(offset: number) { const { scrollDirection, overscanCount, visibleRange } = this.data; const { start, stop } = this.sizeAndPositionManager.getVisibleRange({ containerSize: this.data[sizeProp[scrollDirection]] || 0, offset, overscanCount, }); const totalSize = this.sizeAndPositionManager.getTotalSize(); if (totalSize !== this.data.totalSize) { this.setData({ totalSize }); } if (visibleRange.start !== start || visibleRange.stop !== stop) { const styleItems: string[] = []; if (isNumber(start) && isNumber(stop)) { let index = start - 1; while (++index <= stop) { styleItems.push(this.getItemStyle(index)); } } this.triggerEvent('render', { startIndex: start, stopIndex: stop, styleItems, }); } this.data.offset = offset; this.data.visibleRange.start = start; this.data.visibleRange.stop = stop; },复制代码
在调用的时候,通过render事件回调出来的startIndex, stopIndex,styleItems,截取长列表「可视区域」的数据,在把列表项目的itemSize和offset通过绝对定位的方式应用在列表上
代码如下:
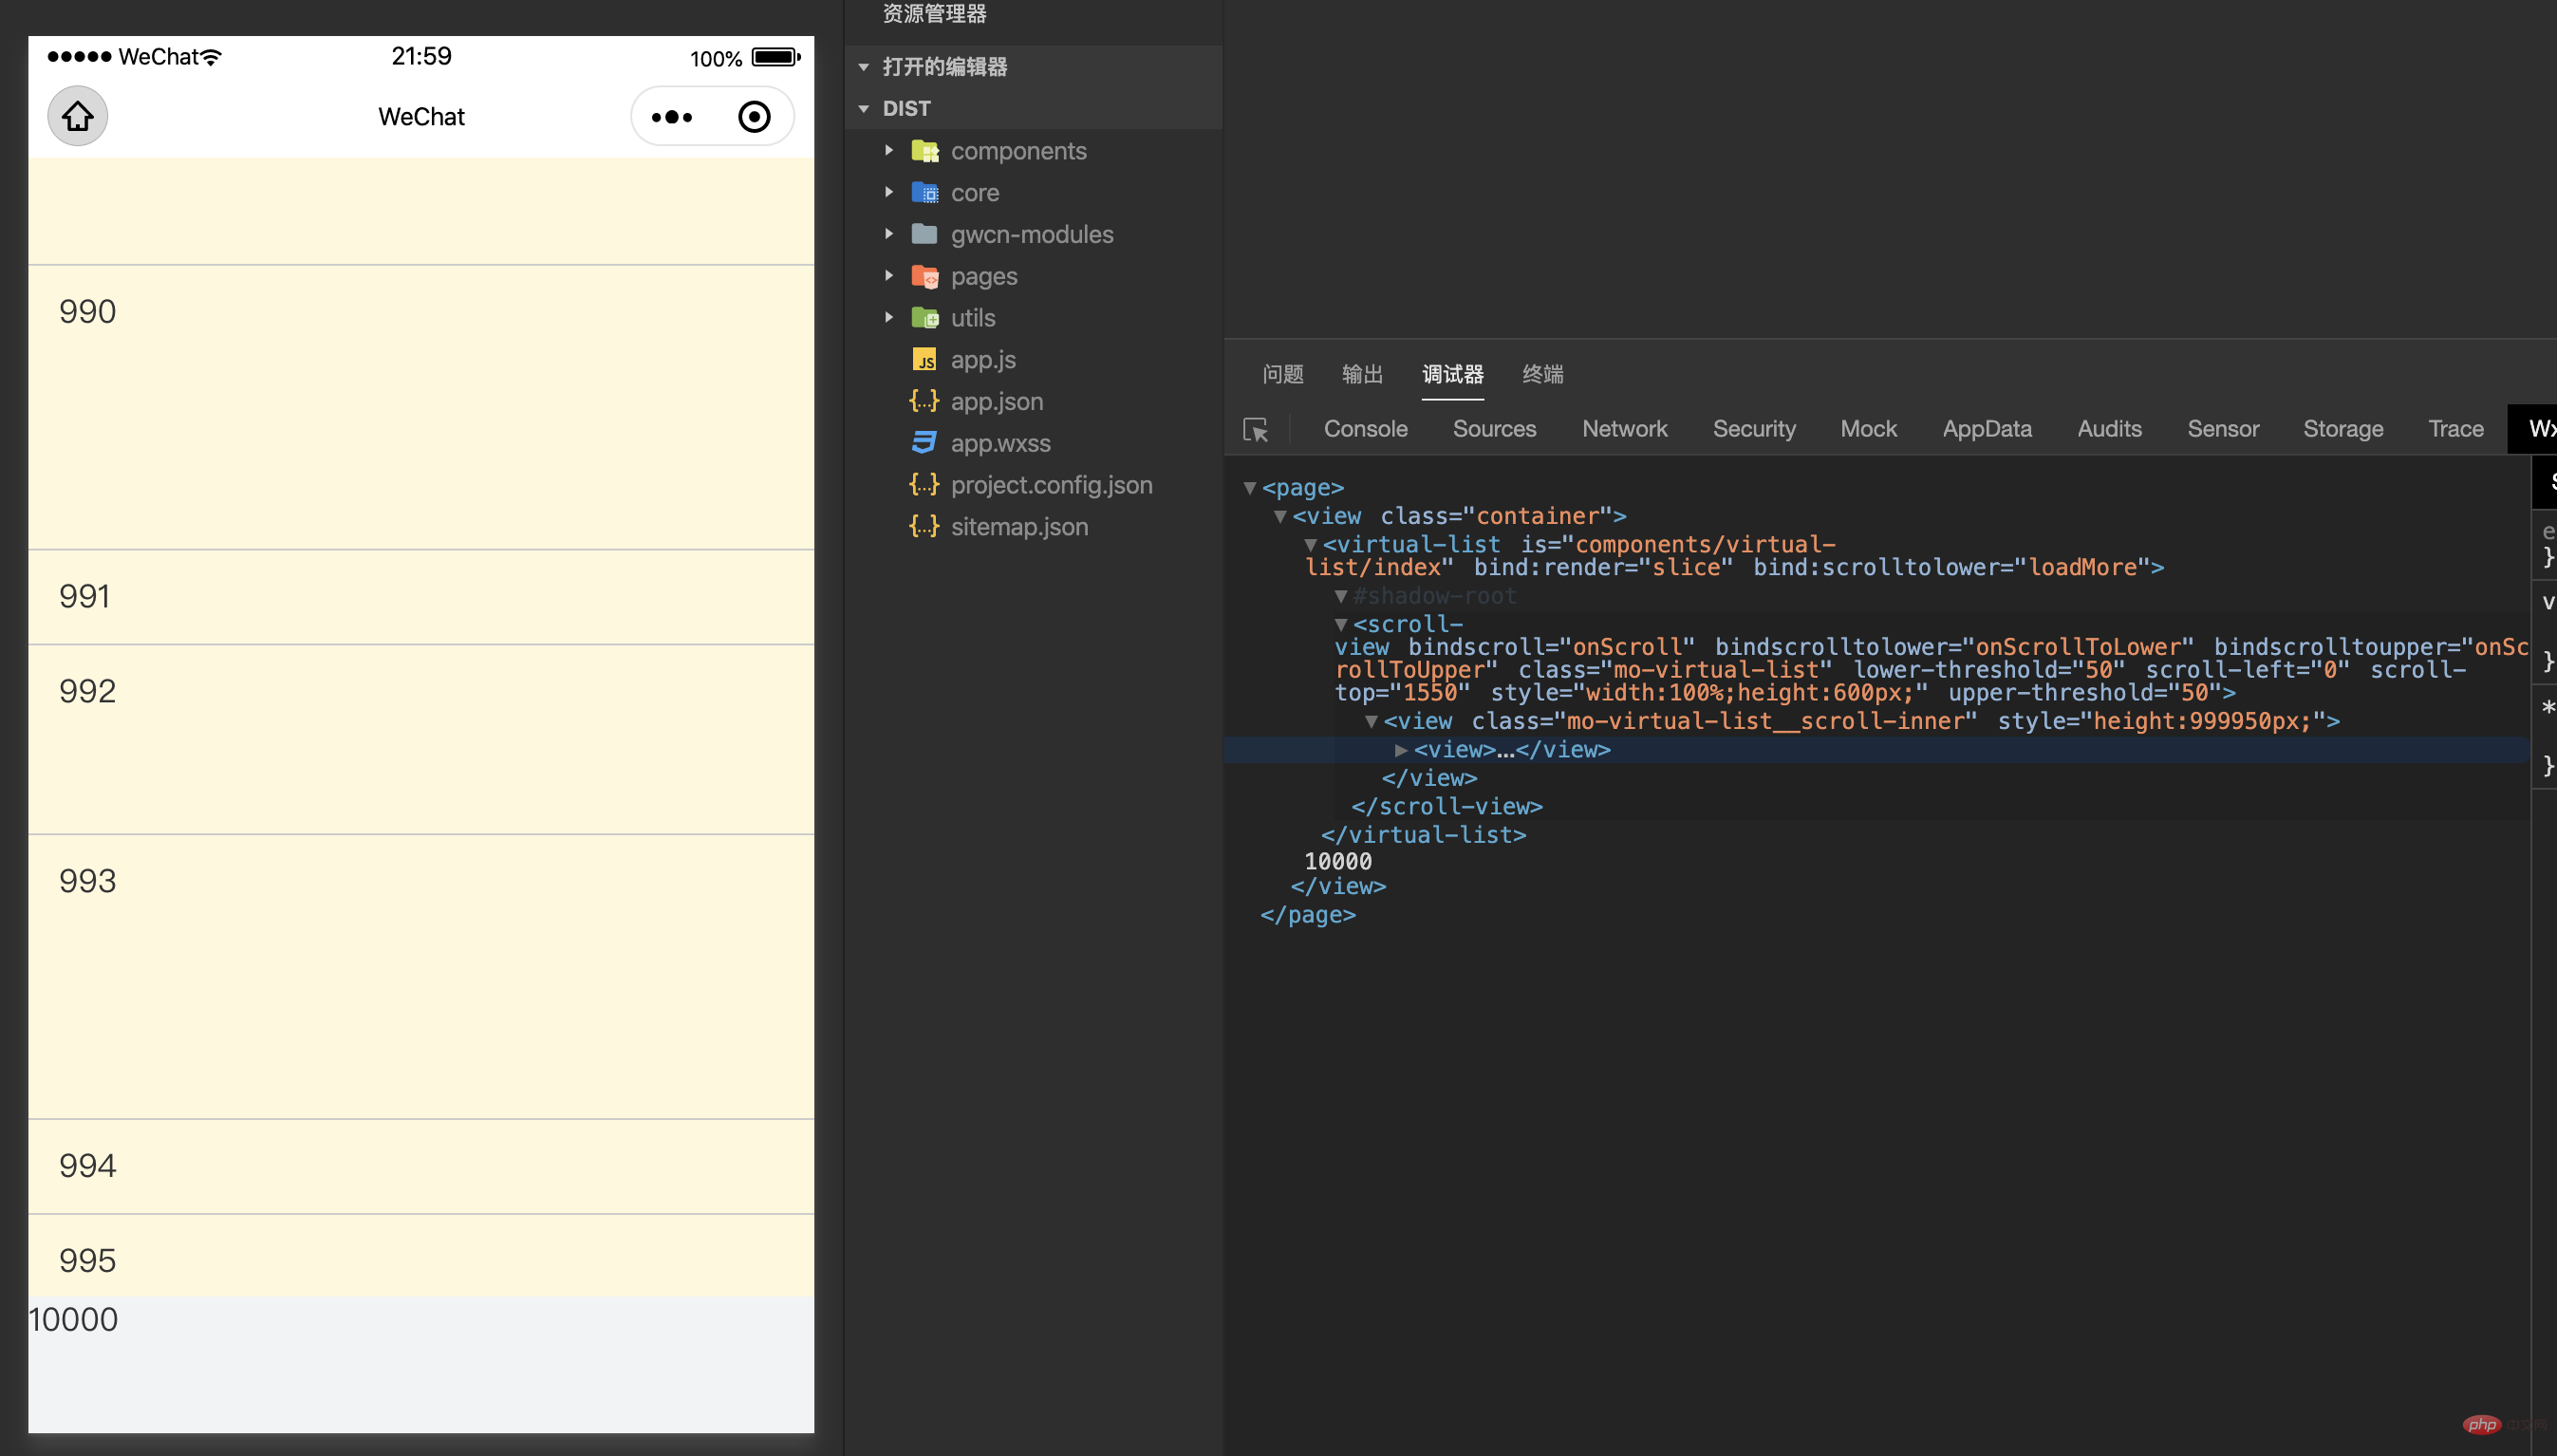
let list = Array.from({ length: 10000 }).map((_, index) => index); Page({ data: { itemSize: index => 50 * ((index % 3) + 1), styleItems: null, itemCount: list.length, list: [], }, onReady() { this.virtualListRef = this.virtualListRef || this.selectComponent('#virtual-list'); }, slice(e) { const { startIndex, stopIndex, styleItems } = e.detail; this.setData({ list: list.slice(startIndex, stopIndex + 1), styleItems, }); }, loadMore() { setTimeout(() => { const appendList = Array.from({ length: 10 }).map( (_, index) => list.length + index, ); list = list.concat(appendList); this.setData({ itemCount: list.length, list: this.data.list.concat(appendList), }); }, 500); }, });复制代码
复制代码 {{itemCount}} {{ item + 1 }}
在写这个微信小程序的virtual-list组件过程中,主要参考了一些优秀的开源虚拟列表实现方案:
通过上述解释已经初步实现了在微信小程序环境中实现了虚拟列表,并且对虚拟列表的原理有了更加深入的了解。但是对于瀑布流布局,列表项尺寸不可预测等场景依然无法适用。在快速滚动过程中,依然会出现来不及渲染而白屏,这个问题可以通过增加「可视区域」外预渲染的item条数overscanCount来得到一定的缓解。
想了解更多编程学习,敬请关注php培训栏目!
The above is the detailed content of Detailed explanation of how to implement virtual-list in WeChat applet. For more information, please follow other related articles on the PHP Chinese website!
 What is the difference between guid and mbr formats
 java string to number
 What does electronic components mean?
 AC contactor use
 Check the occupied port status in windows
 What are the file server software?
 Solution to the problem that exe files cannot be opened in win10 system
 What should I do if I forget my broadband password?


![[Web front-end] Node.js quick start](https://img.php.cn/upload/course/000/000/067/662b5d34ba7c0227.png)


