


[Related learning recommendations: mysql video tutorial]
1. Why use the snowflake algorithm
1. Background of the problem
Nowadays, more and more companies are using distributed and microservices, so the corresponding databases will be split for different services, and then when the amount of data increases Tables will also be divided when the table is divided, and then there will be the problem of id after the table is divided.
For example, in the previous single project, the data primary key id in a table was auto-incremented. MySQL used autoincrement to achieve auto-increment, while Oracle used sequences to achieve it. However, when the amount of data in a single table increases, In the future, horizontal table splitting will be necessary. Alibaba's Java development recommendation is to split tables when a single table exceeds 5 million, but the specifics still depend on the business. If the index is used, tens of millions of data in a single table is also possible. Horizontal table partitioning is to divide the data of one table into multiple tables. Then the problem arises. If the primary key ID is still made according to the previous auto-increment, then ID duplication will occur. At this time, you have to consider what solution to solve the distribution problem. There is a problem with the formula id.
2. Solution
2.1. Database table
You can maintain a table specifically in a certain library, and then each time any table needs to increment its id Check the records of this table, then use for update to lock the table, then add one to the obtained value, and then return and record the value into the table again. However, this method is suitable for projects with relatively small concurrency, so every time Gotta lock the watch.
2.2, redis
Because redis is single-threaded, you can maintain a key-value pair in redis, and then which table needs to directly go to redis to get the value and then add one, but this is the same as above Also, since single thread does not have high support for high concurrency, it is only suitable for projects with small concurrency.
2.3, uuid
You can use uuid as a unique primary key id, but a problem with uuid is that it is an unordered string. If uuid is used as the primary key, the primary key index will be invalid. .
2.4. Snowflake algorithm
The snowflake algorithm is an efficient solution to solve distributed IDs. Most Internet companies are using the snowflake algorithm, and of course there are companies that implement other solutions themselves.
2. Snowflake algorithm
1. Principle
3. Code implementation
64-bit code implementation:package com.yl.common; /** * Twitter_Snowflake
* SnowFlake的结构如下(每部分用-分开):
* 0 - 0000000000 0000000000 0000000000 0000000000 0 - 00000 - 00000 - 000000000000
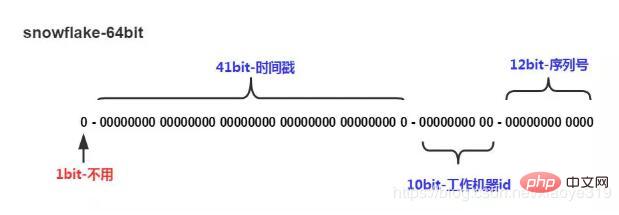
* 1位标识,由于long基本类型在Java中是带符号的,最高位是符号位,正数是0,负数是1,所以id一般是正数,最高位是0
* 41位时间截(毫秒级),注意,41位时间截不是存储当前时间的时间截,而是存储时间截的差值(当前时间截 - 开始时间截) * 得到的值),这里的的开始时间截,一般是我们的id生成器开始使用的时间,由我们程序来指定的(如下下面程序IdWorker类的startTime属性)。41位的时间截,可以使用69年,年T = (1L << 41) / (1000L * 60 * 60 * 24 * 365) = 69
* 10位的数据机器位,可以部署在1024个节点,包括5位datacenterId和5位workerId
* 12位序列,毫秒内的计数,12位的计数顺序号支持每个节点每毫秒(同一机器,同一时间截)产生4096个ID序号
* 加起来刚好64位,为一个Long型。
* SnowFlake的优点是,整体上按照时间自增排序,并且整个分布式系统内不会产生ID碰撞(由数据中心ID和机器ID作区分),并且效率较高,经测试,SnowFlake每秒能够产生26万ID左右。 */ public class SnowflakeIdWorker { // ==============================Fields=========================================== /** 开始时间截 (2020-01-01) */ private final long twepoch = 1577808000000L; /** 机器id所占的位数 */ private final long workerIdBits = 5L; /** 数据标识id所占的位数 */ private final long datacenterIdBits = 5L; /** 支持的最大机器id,结果是31 (这个移位算法可以很快的计算出几位二进制数所能表示的最大十进制数) */ private final long maxWorkerId = -1L ^ (-1L << workerIdBits); /** 支持的最大数据标识id,结果是31 */ private final long maxDatacenterId = -1L ^ (-1L << datacenterIdBits); /** 序列在id中占的位数 */ private final long sequenceBits = 12L; /** 机器ID向左移12位 */ private final long workerIdShift = sequenceBits; /** 数据标识id向左移17位(12+5) */ private final long datacenterIdShift = sequenceBits + workerIdBits; /** 时间截向左移22位(5+5+12) */ private final long timestampLeftShift = sequenceBits + workerIdBits + datacenterIdBits; /** 生成序列的掩码,这里为4095 (0b111111111111=0xfff=4095) */ private final long sequenceMask = -1L ^ (-1L << sequenceBits); /** 工作机器ID(0~31) */ private long workerId; /** 数据中心ID(0~31) */ private long datacenterId; /** 毫秒内序列(0~4095) */ private long sequence = 0L; /** 上次生成ID的时间截 */ private long lastTimestamp = -1L; //==============================Constructors===================================== /** * 构造函数 * @param workerId 工作ID (0~31) * @param datacenterId 数据中心ID (0~31) */ public SnowflakeIdWorker(long workerId, long datacenterId) { if (workerId > maxWorkerId || workerId < 0) { throw new IllegalArgumentException(String.format("worker Id can't be greater than %d or less than 0", maxWorkerId)); } if (datacenterId > maxDatacenterId || datacenterId < 0) { throw new IllegalArgumentException(String.format("datacenter Id can't be greater than %d or less than 0", maxDatacenterId)); } this.workerId = workerId; this.datacenterId = datacenterId; } // ==============================Methods========================================== /** * 获得下一个ID (该方法是线程安全的) * @return SnowflakeId */ public synchronized long nextId() { long timestamp = timeGen(); //如果当前时间小于上一次ID生成的时间戳,说明系统时钟回退过这个时候应当抛出异常 if (timestamp < lastTimestamp) { throw new RuntimeException( String.format("Clock moved backwards. Refusing to generate id for %d milliseconds", lastTimestamp - timestamp)); } //如果是同一时间生成的,则进行毫秒内序列 if (lastTimestamp == timestamp) { sequence = (sequence + 1) & sequenceMask; //毫秒内序列溢出 if (sequence == 0) { //阻塞到下一个毫秒,获得新的时间戳 timestamp = tilNextMillis(lastTimestamp); } } //时间戳改变,毫秒内序列重置 else { sequence = 0L; } //上次生成ID的时间截 lastTimestamp = timestamp; //移位并通过或运算拼到一起组成64位的ID return ((timestamp - twepoch) << timestampLeftShift) // | (datacenterId << datacenterIdShift) // | (workerId << workerIdShift) // | sequence; } /** * 阻塞到下一个毫秒,直到获得新的时间戳 * @param lastTimestamp 上次生成ID的时间截 * @return 当前时间戳 */ protected long tilNextMillis(long lastTimestamp) { long timestamp = timeGen(); while (timestamp <= lastTimestamp) { timestamp = timeGen(); } return timestamp; } /** * 返回以毫秒为单位的当前时间 * @return 当前时间(毫秒) */ protected long timeGen() { return System.currentTimeMillis(); } //==============================Test============================================= /** 测试 */ public static void main(String[] args) { SnowflakeIdWorker idWorker = new SnowflakeIdWorker(0, 0); for (int i = 0; i < 100; i++) { long id = idWorker.nextId(); System.out.println(id); } } }
Supplementary knowledge: Snowflake algorithm realizes distributed self-increasing ID
I won’t talk nonsense anymore, let’s just look at the code~/** *名称:IdWorker.java
*描述:分布式自增长ID
** Twitter的 Snowflake JAVA实现方案 ** 核心代码为其IdWorker这个类实现,其原理结构如下,我分别用一个0表示一位,用—分割开部分的作用: * 1||0---0000000000 0000000000 0000000000 0000000000 0 --- 00000 ---00000 ---000000000000 * 在上面的字符串中,第一位为未使用(实际上也可作为long的符号位),接下来的41位为毫秒级时间, * 然后5位datacenter标识位,5位机器ID(并不算标识符,实际是为线程标识), * 然后12位该毫秒内的当前毫秒内的计数,加起来刚好64位,为一个Long型。 * 这样的好处是,整体上按照时间自增排序,并且整个分布式系统内不会产生ID碰撞(由datacenter和机器ID作区分), * 并且效率较高,经测试,snowflake每秒能够产生26万ID左右,完全满足需要。 ** 64位ID (42(毫秒)+5(机器ID)+5(业务编码)+12(重复累加)) * * @author Polim */ public class IdWorker { // 时间起始标记点,作为基准,一般取系统的最近时间(一旦确定不能变动) private final static long twepoch = 1288834974657L; // 机器标识位数 private final static long workerIdBits = 5L; // 数据中心标识位数 private final static long datacenterIdBits = 5L; // 机器ID最大值 private final static long maxWorkerId = -1L ^ (-1L << workerIdBits); // 数据中心ID最大值 private final static long maxDatacenterId = -1L ^ (-1L << datacenterIdBits); // 毫秒内自增位 private final static long sequenceBits = 12L; // 机器ID偏左移12位 private final static long workerIdShift = sequenceBits; // 数据中心ID左移17位 private final static long datacenterIdShift = sequenceBits + workerIdBits; // 时间毫秒左移22位 private final static long timestampLeftShift = sequenceBits + workerIdBits + datacenterIdBits; private final static long sequenceMask = -1L ^ (-1L << sequenceBits); /* 上次生产id时间戳 */ private static long lastTimestamp = -1L; // 0,并发控制 private long sequence = 0L; private final long workerId; // 数据标识id部分 private final long datacenterId; public IdWorker(){ this.datacenterId = getDatacenterId(maxDatacenterId); this.workerId = getMaxWorkerId(datacenterId, maxWorkerId); } /** * @param workerId * 工作机器ID * @param datacenterId * 序列号 */ public IdWorker(long workerId, long datacenterId) { if (workerId > maxWorkerId || workerId < 0) { throw new IllegalArgumentException(String.format("worker Id can't be greater than %d or less than 0", maxWorkerId)); } if (datacenterId > maxDatacenterId || datacenterId < 0) { throw new IllegalArgumentException(String.format("datacenter Id can't be greater than %d or less than 0", maxDatacenterId)); } this.workerId = workerId; this.datacenterId = datacenterId; } /** * 获取下一个ID * * @return */ public synchronized long nextId() { long timestamp = timeGen(); if (timestamp < lastTimestamp) { throw new RuntimeException(String.format("Clock moved backwards. Refusing to generate id for %d milliseconds", lastTimestamp - timestamp)); } if (lastTimestamp == timestamp) { // 当前毫秒内,则+1 sequence = (sequence + 1) & sequenceMask; if (sequence == 0) { // 当前毫秒内计数满了,则等待下一秒 timestamp = tilNextMillis(lastTimestamp); } } else { sequence = 0L; } lastTimestamp = timestamp; // ID偏移组合生成最终的ID,并返回ID long nextId = ((timestamp - twepoch) << timestampLeftShift) | (datacenterId << datacenterIdShift) | (workerId << workerIdShift) | sequence; return nextId; } private long tilNextMillis(final long lastTimestamp) { long timestamp = this.timeGen(); while (timestamp <= lastTimestamp) { timestamp = this.timeGen(); } return timestamp; } private long timeGen() { return System.currentTimeMillis(); } /** *
* 获取 maxWorkerId *
*/ protected static long getMaxWorkerId(long datacenterId, long maxWorkerId) { StringBuffer mpid = new StringBuffer(); mpid.append(datacenterId); String name = ManagementFactory.getRuntimeMXBean().getName(); if (!name.isEmpty()) { /* * GET jvmPid */ mpid.append(name.split("@")[0]); } /* * MAC + PID 的 hashcode 获取16个低位 */ return (mpid.toString().hashCode() & 0xffff) % (maxWorkerId + 1); } /** ** 数据标识id部分 *
*/ protected static long getDatacenterId(long maxDatacenterId) { long id = 0L; try { InetAddress ip = InetAddress.getLocalHost(); NetworkInterface network = NetworkInterface.getByInetAddress(ip); if (network == null) { id = 1L; } else { byte[] mac = network.getHardwareAddress(); id = ((0x000000FF & (long) mac[mac.length - 1]) | (0x0000FF00 & (((long) mac[mac.length - 2]) << 8))) >> 6; id = id % (maxDatacenterId + 1); } } catch (Exception e) { System.out.println(" getDatacenterId: " + e.getMessage()); } return id; } }
Related recommendations:
The above is the detailed content of Snowflake algorithm implemented by mysql. For more information, please follow other related articles on the PHP Chinese website!


![[Web front-end] Node.js quick start](https://img.php.cn/upload/course/000/000/067/662b5d34ba7c0227.png)


