


Binary tree is an extremely common data structure, and there are countless articles on how to traverse its elements. However, most articles explain pre-order/mid-order/post-order traversal. There are not many articles about printing elements layer by layer. The explanations in existing articles are also relatively obscure and difficult to read. This article will use vivid pictures and clear code to help you understand the implementation of level-order traversal. At the same time, we use smart pointers provided by modern C to simplify resource management of tree data structures.
Related tutorials: Data structure tree tutorial
So now let’s get to the point.
What we want to implement here is a binary tree that simply simulates a binary search tree, providing an insertion function that meets the requirements of a binary search tree, including in-order traversal . At the same time, we use shared_ptr to manage resources.
Now we only implement the two methods insert and ldr. The implementation of the other methods is not what this article is concerned about, but we will discuss them one by one in subsequent articles. Introduction:
struct BinaryTreeNode: public std::enable_shared_from_this<BinaryTreeNode> {
    explicit BinaryTreeNode(const int value = 0)
    : value_{value}, left{std::shared_ptr<BinaryTreeNode>{}}, right{std::shared_ptr<BinaryTreeNode>{}}
    {}

    void insert(const int value)
    {
        if (value < value_) {
            if (left) {
                left->insert(value);
            } else {
                left = std::make_shared<BinaryTreeNode>(value);
            }
        }

        if (value > value_) {
            if (right) {
                right->insert(value);
            } else {
                right = std::make_shared<BinaryTreeNode>(value);
            }
        }
    }

    // 中序遍历
    void ldr()
    {
        if (left) {
            left->ldr();
        }

        std::cout << value_ << "\n";

        if (right) {
            right->ldr();
        }
    }

    // 分层打印
    void layer_print();

    int value_;
    // 左右子节点
    std::shared_ptr<BinaryTreeNode> left;
    std::shared_ptr<BinaryTreeNode> right;

private:
    // 层序遍历
    std::vector<std::shared_ptr<BinaryTreeNode>> layer_contents();
}; Our node object inherits from enable_shared_from_this. Usually this is not necessary, but in order to facilitate operation during layer order traversal, we need to construct it from this Smart pointers, so this step is necessary. insert will insert elements smaller than root into the left subtree, and elements larger than root into the right subtree; ldr is the most conventional in-order traversal, which is implemented here to View all elements in the tree in the normal way.
It is worth noting that for node nodes, it is best to use make_shared to create them instead of initializing them as global/local objects, otherwise will occur during layer order traversal. The destruction of shared_ptr in turn causes the object to be destroyed, causing undefined behavior.
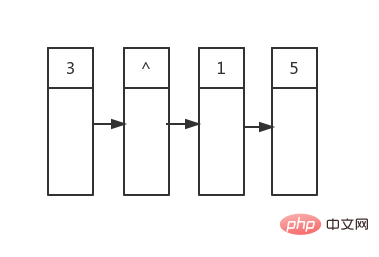
Now suppose we have a set of data: [3, 1, 0, 2, 5, 4, 6, 7], taking the first element as the root, and inserting all the data into our tree will result in the following A binary tree:
auto root = std::make_shared<BinaryTreeNode>(3);
root->insert(1);
root->insert(0);
root->insert(2);
root->insert(5);
root->insert(4);
root->insert(6);
root->insert(7);

You can see that the nodes are divided into four layers. Now we need to print layer by layer. How to do it?
In fact, the idea is very simple. We adopt the breadth-first idea, first print all the children of the node, and then print the children of the child nodes.
Take the above picture as an example. We first print the value of the root node 3, and then we print the values of all its child nodes, which are 1 and 5, then the child nodes of the left and right child nodes, and so on. . . . . .
It sounds very simple, but it will cause trouble when writing the code. We cannot simply use recursion to solve the problem like in-order traversal (in fact, we can use an improved recursive algorithm), because it will go directly to the leaf nodes, which is not the result we want. But it doesn’t matter, we can use the queue to add the child node queue to the end of the queue, then traverse from the beginning of the queue, which is the root node, add its child nodes to the queue, and then do the same operation on the second node. When encountering At the end of a line, we use nullptr to mark it.
Let’s look at the specific code first:
std::vector<std::shared_ptr<BinaryTreeNode>>
BinaryTreeNode::layer_contents()
{
    std::vector<std::shared_ptr<BinaryTreeNode>> nodes;
    // 先添加根节点,根节点自己就会占用一行输出,所以添加了作为行分隔符的nullptr
    // 因为需要保存this,所以这是我们需要继承enable_shared_from_this是理由
    // 同样是因为这里,当返回的结果容器析构时this的智能指针也会析构
    // 如果我们使用了局部变量则this的引用计数从1减至0,导致对象被销毁,而使用了make_shared创建的对象引用计数是从2到1,没有问题
    nodes.push_back(shared_from_this());
    nodes.push_back(nullptr);
    // 我们使用index而不是迭代器,是因为添加元素时很可能发生迭代器失效,处理这一问题将会耗费大量精力,而index则无此烦恼
    for (int index = 0; index < nodes.size(); ++index) {
        if (!nodes[index]) {
            // 子节点打印完成或已经遍历到队列末尾
            if (index == nodes.size()-1) {
                break;
            }

            nodes.push_back(nullptr); // 添加分隔符
            continue;
        }

        if (nodes[index]->left) { // 将当前节点的子节点都添加进队列
            nodes.push_back(nodes[index]->left);
        }
        if (nodes[index]->right) {
            nodes.push_back(nodes[index]->right);
        }
    }

    return nodes;
}The code itself is not complicated, the important thing is the idea behind it.
It doesn’t matter if you don’t understand this code the first time, we will provide a diagram below:
The first is the state at the beginning of the loop, The content of the first line has been determined (^ represents a null pointer):
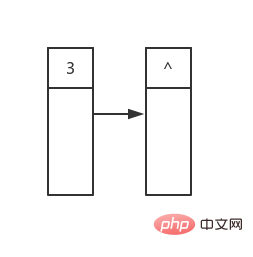
#Then we start traversing from the first element. The first one traversed is root, which has two children, the values are 1 and 5 respectively:
Then the index value 1, this time it traverses to nullptr, because it is not at the end of the queue, so we simply add a nullptr At the end of the queue, so that the nodes in the second row are all in the queue:

# Then we start traversing the nodes in the second row and use their child nodes as the third The content of the line is put into the queue, and a line delimiter is added at the end, and so on:

In short, all the nodes of the previous line are cached through the queue, and then Then all the nodes of the next row are obtained based on the cache of the previous row, and the cycle continues until the last level of the binary tree. Of course, not only binary trees, but also level-order traversal of other multi-trees can be implemented using similar ideas.
Okay, now that we know how to get the content of each row, we can process the nodes row by row:
void BinaryTreeNode::layer_print()
{
    auto nodes = layer_contents();
    for (auto iter = nodes.begin(); iter != nodes.end(); ++iter) {
        // 空指针代表一行结束,这里我们遇到空指针就输出换行符
        if (*iter) {
            std::cout << (*iter)->value_ << " ";
        } else {
            std::cout << "\n";
        }
    }
}如你所见,这个方法足够简单,我们把节点信息保存在额外的容器中是为了方便做进一步的处理,如果只是打印的话大可不必这么麻烦,不过简单通常是有代价的。对于我们的实现来说,分隔符的存在简化了我们对层级之间的区分,然而这样会导致浪费至少log2(n)+1个vector的存储空间,某些情况下可能引起性能问题,而且通过合理得使用计数变量可以避免这些额外的空间浪费。当然具体的实现读者可以自己挑战一下,原理和我们上面介绍的是类似的因此就不在赘述了,也可以参考园内其他的博客文章。
最后让我们看看完整的测试程序,记住要用make_shared创建root实例:
int main()
{
    auto root = std::make_shared<BinaryTreeNode>(3);
    root->insert(1);
    root->insert(0);
    root->insert(2);
    root->insert(5);
    root->insert(4);
    root->insert(6);
    root->insert(7);
    root->ldr();
    std::cout << "\n";
    root->layer_print();
}输出:
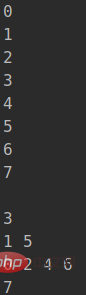
可以看到上半部分是中序遍历的结果,下半部分是层序遍历的输出,而且是逐行打印的,不过我们没有做缩进。所以不太美观。
另外你可能已经发现了,我们没有写任何有关资源释放的代码,没错,这就是智能指针的威力,只要注意资源的创建,剩下的事都可以放心得交给智能指针处理,我们可以把更多的精力集中在算法和功能的实现上。
如有错误和疑问欢迎指出!
The above is the detailed content of c++ graphic layer-order traversal and layer-by-layer printing of binary trees constructed by smart pointers. For more information, please follow other related articles on the PHP Chinese website!
 Usage of treenode
 What are the differences between c++ and c language
 Recommended learning order for c++ and python
 Cost-effectiveness analysis of learning python and c++
 Is c language the same as c++?
 Which is better to learn first, c language or c++?
 The difference and connection between c language and c++
 C++ software Chinese change tutorial


![[Web front-end] Node.js quick start](https://img.php.cn/upload/course/000/000/067/662b5d34ba7c0227.png)


