
This article will tell you about the installation and basic usage tutorial of memcache. It is under the Linux system. Friends who are interested can learn more.
memcache is a distributed cache system,characterized by key-value storage
1. Compile and install onlinux Memcache, redis, etc.requiregcc, make, cmake, autoconf, libtool and other tools, just use yum to install them directly:
yum install gcc make cmake autoconf libtool
2. Download the official source code:
memcacheddepends on thelibevent library,so you need to installlibevent first, download address: http://libevent.org/
memcache official website download address: http:// memcached.org/
cd usrlocalgithub.comlibeventlibeventreleasesdownloadrelease.stablelibevent.www.memcached.orgfilesmemcached..tar.gz
3. Install libevent dependencies and memcache:
tar zxvf libevent-2.0.21-stable.tar.gz cd libevent-2.0.21-stable ./configure --prefix=/usr/local/libevent make && make install cd .. tar zxvf memcached-1.4.5.tag.gz cd memcached-1.4.5 ./configure --prefix=/usr/local/memcached --with-libevent=/usr/local/libevent make && make install
tar zxvf memcached-1.4.5.tag.gz
cd memcached-1.4.5
./configure --prefix=/usr/local/memcached --with-libevent=/usr/local/libevent
make && make install
Pay attention to the configure process If an error is reported, it is usually due to a lack of libraries. After the installation is completed, you will see the memcached directory in the /usr/local directory. Start memcache:
cd /usr/local/memcached bin/memcached -m 64 -p 11211 -u root -vv # -m 64:分配给memcached的最大内存,默认为64mb -p 11211:监听的端口号 -u root:运行memcache的用户
After successful startup, you will see the following picture:

Note that if you want memcache to run as a service background, you need to add -d:
bin/memcached -m 64 -p 11211 -u root -d
4. Link to the server memcache under windows:
To connect the memcache of the server in the dos window of the windows system, you need to use the telnet function. This function comes with windows, but it needs to be turned on manually. Control Panel-Programs-Turn on or off the windows function:
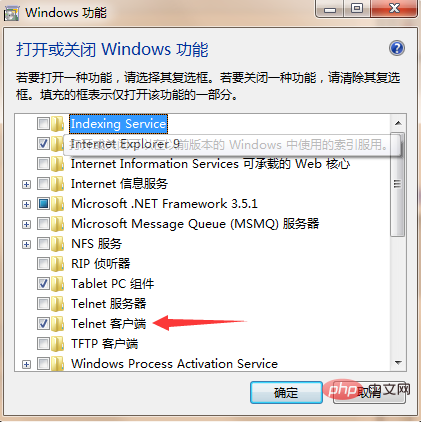
Check the telnet client and enter the command in the dos window:
telnet 192.168.1.1 11211 #ip换成你的服务器ip 11211为memcache的监听端口号
After connecting, you will see a completely black window with a flashing cursor. At this time, use Shortcut key: Ctrl ] Then press Enter, and then you can use memcache's add, delete, modify, and check commands
5: memcache add, delete, modify, and check, unified operation After entering the add, delete, modify, and check commands, press Enter, enter the value, and press Enter Execution completed:
add key flag expire length #新增 key:为指定的键 flag:为标识 expire:为有效时间 length:为长度

Add a new record with the key name as 0, and the valid time will not automatically expire (set to a specific value such as 10 to expire in ten seconds, set to 0 is not valid permanently, but it will not automatically expire. If you restart the server, it will definitely become invalid), the length is 5 bytes
get key #查询 key:为指定的键

returned The name record added above
delete key [time seconds] #删除指定的key,如加可选参数time,则指在删除key后的time秒内,不允许get,add,replace操作此key

After deletion, query will not find this record
replace key flag expire length #替换 与add一样,仅对于已经存在的键,可以用replace进行替换
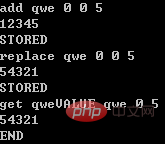
Add qwe=> ;12345, replace with 54321, then get to get
set key flag expire length #设置或修改 参数和replace一样,但功能不一样,set时如果键不存在则新增,如果已存在测修改
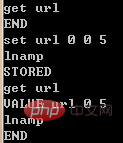
to get the url key that does not exist, set url=>lnamp get again, query the record, set here Plays a new role
incr #增加指定值
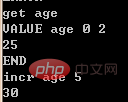
age is 25, incr 5 value becomes 30
decr #减少指定值
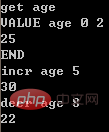
The above age is 30, subtract 8 and return 22
##
stats #统计当前运行的memcache信息
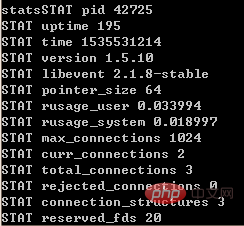
flush_all #清空所有的存储对象
The above is the detailed content of [Linux] memcache installation and basic usage tutorial. For more information, please follow other related articles on the PHP Chinese website!